
|
|
 |
|
|
|
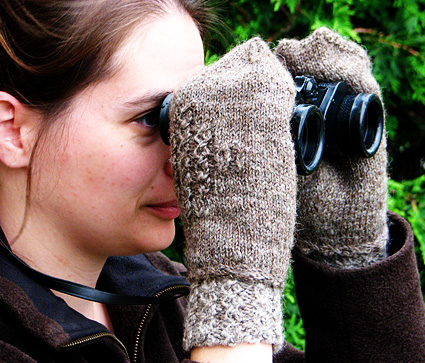
Have silky wrist warmers and
sturdy mittens, too,
all from the same Shetland fleece. Use the variation
in the fiber of this ancient
sheep breed to spin yarns exactly suited to the demands
of your mittens. |
|
|
|
|
SIZE |
|
FINISHED MEASUREMENTS Cropped Mittens |
|
MATERIALS Finished Yarn: Drafting Method:
Tools |
|||||
|
GAUGE |
|
PATTERN NOTES |
|
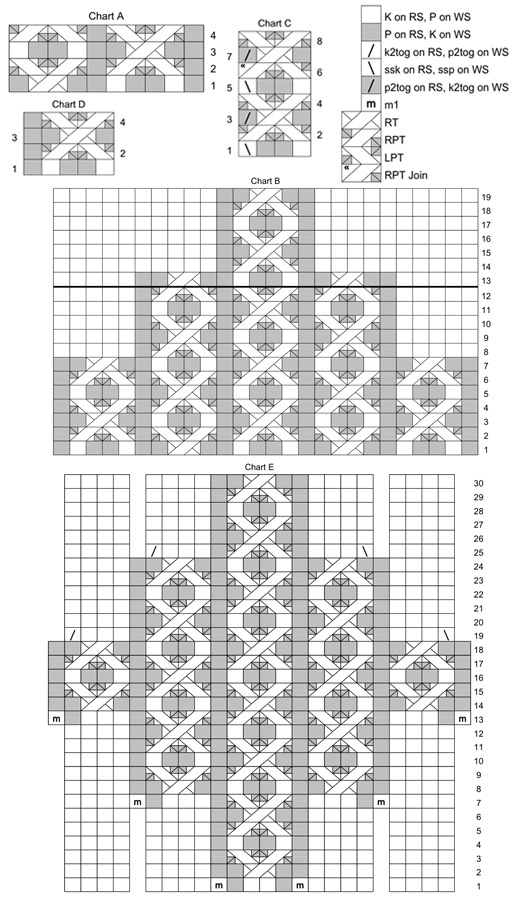
RT (Right Twist):
When worked on RS row, slip next st to cable needle and
hold to back of work, k1 from left needle, k1 from cable
needle. When worked on WS row, slip next st to cable needle
and hold to back of work, p1 from left needle, p1 from cable
needle. Instructions for grafting can be found here. Instructions for basic crochet stitches can be found here. Crochet Cast On: Instructions for the Cable Cast On can be found here. Instructions for Blanket Stitch can be found here. Chart: Click here to
see the charts; they will
print on a single letter-sized
page. |
|
DIRECTIONS WRISTWARMERS Work Rounds 1-4 of Chart A five times. 20 rounds have been worked. Hand is worked differently for right and left wristwarmers. Next round establishes pattern for hand. Left Hand: Right Hand: Both Hands: Turn work so that WS is facing. Work 12 rows back and forth,
forming a thumb opening; when all rows of Chart B have been
worked, remove marker and work these sts in stockinette st. Upper hand shaping is worked differently for right and left wristwarmers. Left Hand: Right Hand: Next Round: K2tog, k to 2 sts before marker, ssk, k to end. Both Hands: Upper Edging: Carefully remove waste yarn from CO edge of edging, placing resulting live sts on a smaller double-point needle. Graft to sts at end of edging. Finish Thumb Opening: MITTENS
Cuff: Note: When working from Chart D, note that odd-numbered
rows are WS rows. Hand: K 1 round. Thumb Gusset: Left Hand: Right Hand: Both Hands: Note: Read ahead! Gusset shaping directions and stitch pattern directions and shaping directions are worked at the same time, beginning on the next round. Continue shaping thumb gusset as set, working increase round
every second round, twice more. 19 sts between markers. AT THE SAME TIME, place chart pattern as
follows: Upper Hand: Next round is worked differently for right and left hands. Left Hand: Right Hand: Both Hands: Decrease Round: Ssk, k to 2 sts before marker, k2tog, slip
marker, ssk, k to last 2 sts, k2tog. 4 sts decreased. Place first 12 sts on one needle, and remaining 12 sts on another needle. Graft sts together. Thumb: Work in stockinette st until thumb measures 2 inches from picked-up sts, or desired length to tip of thumb. Next Round: [K2tog] to end. 9 sts. |
|
FINISHING Hook and Bar Mitten Connectors: Mark six points evenly spaced around cuff of wristwarmer, placed in purl ribs between cables. Form loop: Cut a piece of sewing thread approximately 1 yard
long. Reinforce the loop with blanket stitch: Bring the thread up in front of the thread bar. Pass the needle through the loop. Pull tight and repeat. Mark positions on inner edge of mitten cuff to correspond to loops on wristwarmer cuff. Sew hooks to inside of cuff, using photo as guide. |
| ABOUT THE DESIGNER |
|
Lisa Jacobs discovered hand spinning at the age of nine when her grandmother taught her to use a drop spindle. After running out of fiber and trying unsuccessfully to spin cotton balls, she put her spindle down for a while to learn knitting and crochet. Today Lisa spins, knits, and blogs in Coralville, Iowa. She publishes her patterns through Ravelry under the name Fiber Tree Designs. |
|
Pattern & images © 2009 Lisa Jacobs. Contact Lisa |