
|
|
|

|
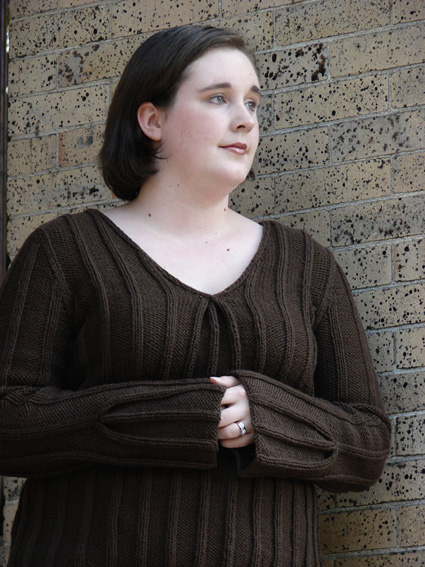
Renaissance began with a simple pleat swatched in Classic Elite's Renaissance yarn. I carried this swatch around in my pocket for a few days mulling over what it would become. Ideas came and went, until finally (after a few more swatches) the right combination of pleats and decreases took shape into the sweater you see here. Pleats are a lot of fun and they're my favorite part of this design. Pleats can add a touch of interest, while also decreasing lots of stitches at once. As fun as pleats are to me, I didn't want to overdo them. On the back of the sweater there are two dart-like decreases designed to mimic the look of the front pleat, but without creating any bulky fabric, and still maintaining the same style. The A-line shape is flattering for many many sizes and shapes, so the pattern is written for a range of sizes. Knitty's editor, Amy, asked if I could knit the model garment to show how beautifully it flatters the contours of a curvy woman. |
|
|
|
|
SIZE |
|
FINISHED MEASUREMENTS |
|
MATERIALS Tools |
|
GAUGE |
|
PATTERN NOTES |
|
ssp: Slip next 2 sts knitwise, one at a time, to right needle. Slip them both, purlwise, back to left needle. Purl them together through their back loops. w2tog: If the second st on the left needle is a k st, work k2tog; if it is a p st, work p2tog. ssw: If the next st on the left needle is a k st, work ssk; if it is a p st, work ssp. 2x6 Rib (Worked over a multiple of 8 sts + 2) |
|
DIRECTIONS Row 1 [RS]: P0[4, 0, 4, 0, 4, 0], work in 2x6 Rib to last
0[4, 0, 4, 0, 4, 0] sts, p0[4, 0, 4, 0, 4, 0]. Back Darts: Next Row [RS]: Work in pattern to second marker, slip marker,
ssk, work in pattern to 2 sts before third marker, k2tog,
work in pattern to end. Shape tops of darts as follows: Continue in pattern until work measures 15[15.25, 15.5, 15.5, 15.75, 16, 16] inches or desired length to underarm, ending with a WS row. Shape Armholes: Note: See Pattern Notes for abbreviations w2tog and ssw. Work Decrease Row 1. Continue in pattern until work measures 7.5[7.75, 8.25, 8.75, 9.25, 9.5, 9.75] inches from beginning of underarm, ending with a WS row. Shape Back Neckline and Shoulders: Next Row [RS]: Work 16[17, 18, 19, 20, 21, 22] sts in pattern, join another ball of yarn and BO 20[22, 24, 24, 26, 28, 28] sts, work in pattern to end. 16[17, 18, 19, 20, 21, 22] sts for each shoulder. Row 1 [WS]: BO 6[7, 5, 5, 6, 5, 5] sts, work in pattern
to end; BO 4 sts, work in pattern to end. Sizes XS, S Only: Sizes M, L, 1X Only: Sizes 2X, 3X Only: FRONT Row 1 [RS]: P0[4, 0, 4, 0, 4, 0], work in 2x6 Rib to last
0[4, 0, 4, 0, 4, 0] sts, p0[4, 0, 4, 0, 4, 0]. Continue in pattern until work measures same as back to
underarm, ending with a RS row (1 row less than for back). Shape Armholes and Neckline: In the next row, front pleats are formed. Work 1 row in pattern. In the next row, work is divided for neckline. Dividing Row [RS]: Work in pattern to 1 st before first marker, ssp, removing marker, slip 2 sts to double-point needle and hold to front of work, slip next 2 sts to double-point needle and hold to back of work, k2 from left needle, p1 from needle at back of work; join a new ball of yarn and p1 from needle at back of work, k2 from needle at front of work, p2tog, removing marker, work in pattern to end. Next Row [WS]: Work in pattern to 3 sts before end of first side, place marker, p3; sl 2 sts purlwise with yarn held to front of work, p1, place marker, work in pattern to end. From this point on, work neckline edging as follows: Neckline Decrease Row [RS]: Work in pattern to 2 sts before
marker, ssw, slip marker, k3; sl 2 sts purlwise with yarn
held to back of work, slip marker, w2tog, work in pattern
to end. 1 st decreased each side. Work Neckline Decrease Row. Work 3 rows in pattern. When work measures same as back to beginning of shoulder shaping, shape shoulders as for back (do not BO 4 sts at neckline edge as for back). 3 sts remain at neckline edge of each shoulder. Place sts on st holders or waste yarn. SLEEVES (Make 2) Row 1 [RS]: P7[7, 0, 0, 2, 2, 3], work in 2x6 Rib to last
7[7, 0, 0, 2, 2, 3] sts, p7[7, 0, 0, 2, 2, 3]. Next Row [WS]: Work 22[22, 23, 23, 25, 25, 26] sts in pattern, place marker, work 20 sts in pattern, place marker, work remaining 22[22, 23, 23, 25, 25, 26] sts in pattern. Work Pleat Row as for Front. 52[52, 54, 54, 58, 58, 60]
sts. Next Row [RS]: Work in pattern to first marker, remove marker, p1, slip 2 sts to a double-point needle and hold to front of work, slip next 2 sts to a double-point needle and hold to back of work; arrange needles so that sts on first double-point needle are directly in front of next 2 sts on left needle, and sts on second double-point needle are directly behind; [k together next st from each needle] twice, p1, remove marker, work in pattern to end. 48[48, 50, 50, 54, 54, 56] sts. Work 3 rows in pattern, ending with a WS row. Increase Row [RS]: Work 1 st in pattern, m1, work in pattern to last st, m1, work last st in pattern. 50[50, 52, 52, 56, 56, 58] sts. Work 17[13, 11, 9, 9, 7, 7] rows in pattern, working increased
sts into pattern and maintaining edge sts in reverse stockinette
st. Work Increase Row. Sizes S, M, L, 1X, 2X, 3X Only: Continue in pattern until work measures 18[18, 18.25, 18.5, 18.75, 18.75, 19] inches or desired length to underarm, ending with a WS row. Shape Sleeve Caps: Note: When shaping sleeve caps, maintain 2 sts at each edge
in stockinette st. Work Decrease Row 1. Work 1 WS row in pattern. Work Decrease Row 1. Work 3 rows in pattern. Work Decrease Row 1. Work 1 WS row in pattern. Work Decrease Row 1. Work Decrease Row 2. Work 1 row in pattern as set. |
|
FINISHING Back Neck Edging: Graft sts of back neckline edging to held sts of right front neckline edging. Weave in remaining ends. |

|
| ABOUT THE DESIGNER |
|
Kristen TenDyke is a knit and crochet designer and technical editor from Massachusetts. Her designs can be found in various well-known publications such as Vogue Knitting, Interweave Knits, Interweave Crochet, Knit Simple, Classic Elite’s pattern collections and more. Kristen has a BFA in Graphic Design from Massachusetts College of Art and Design which she uses working at Classic Elite Yarns and which comes in handy when self publishing designs on her website. |
|
Pattern & images © 2009 Kristen TenDyke. Contact Kristen here. |