|
|
 |
|
|
|
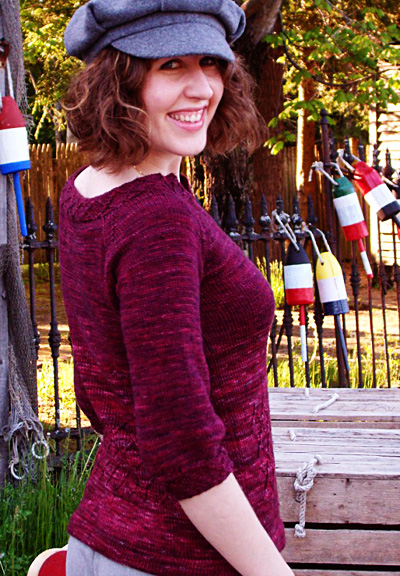
Like many knitters I find it
hard to resist sock yarn.
Beautiful handpainted skeins of mostly superwash merino
but also blends of bamboo, seacell, silk or cashmere
have been collecting in my stash, waiting for the right
pattern. |
|
|
|
|
SIZE |
|
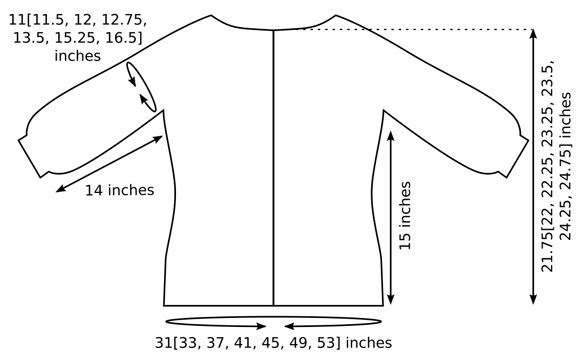
FINISHED MEASUREMENTS |
|
MATERIALS Notions |
|
GAUGE |
|
PATTERN NOTES |
|
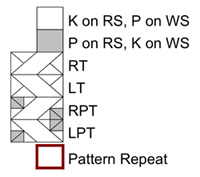
LT (Left Twist): Bring right needle behind left needle and knit into back of second stitch on left needle without dropping st from needle; knit into front of first stitch on left needle, drop both stitches from left needle. RT (Right Twist): K2tog but do not drop sts from left needle, knit again into first st on left needle, drop both stitches from left needle. LPT (Left Purl Twist): Slip next st to cable needle and hold to front of work; p1 from left needle, k1 from cable needle. RPT (Right Purl Twist): Slip next st to cable needle and hold to back of work; k1 from left needle, p1 from cable needle.
Directions for making sewn button loops |
|
DIRECTIONS 
Using provisional CO method and smaller circular needle, CO 186[198, 224, 246, 270, 296, 320] sts. Do not join work; piece is worked back and forth in rows. Hem Facing: Work 10 rows in stockinette st, ending with a RS row. Hem: Carefully remove waste yarn from CO edge, placing resulting
live sts on smaller needle. Joining Row [RS]: Working in stockinette st with seam sts in reverse stockinette st as set, [work next st on left needle together with next st of CO edge] until all sts have been worked. Next Row [WS]: P1, k1, work in pattern as set to last 2
sts, p1, k1. This row sets pattern for lower body: first
and last 2 sts of row are worked in 1x1 Rib as set. Lattice Band: Continue in stockinette st, working front edge sts and seam sts as set, until work measures 15 inches or desired length to underarm, ending with a RS row. Remove markers when working next row. Do not break yarn. Set aside and work sleeves.  SLEEVES Divide sts evenly between needles and join to work in the round, being careful not to twist. Work Rounds 1-15 of Lattice Pattern B. Work in stockinette st until sleeve measures 2[2, 1, 1, 2, 2, 2] inches from top of cuff. Decrease Round: K1, k2tog, k to last 3 sts, ssk, k1. Continue in stockinette st until sleeve measures 14 inches or desired length to underarm. Next Round: K to last 4[5, 7, 7, 9, 11, 13] sts, BO 7[9, 13, 13, 17, 21, 25] sts. Place remaining 60[60, 59, 64, 64, 71, 75] sts on hold on smaller circular needle (or spare set of double-point needles). Make second sleeve in the same way. When sleeve is complete, do not remove from working needles.  YOKE Next Row [WS]: P1, k1, p to last 2 sts, k1, p1. Note: In Lattice Pattern A, odd-numbered rows were RS rows;
for Lattice Pattern B, odd-numbered rows are WS rows. |
|
FINISHING |
|
| ABOUT THE DESIGNER |
|
|
|
Pattern & images © 2009 Anna Mikuskova. Contact Anna |
 Note: Double-point needles
are used for working sleeves.
If preferred, use two circular
needles or one long circular
needle (using Magic Loop
method).
Note: Double-point needles
are used for working sleeves.
If preferred, use two circular
needles or one long circular
needle (using Magic Loop
method).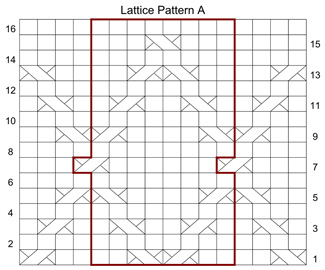 This pattern uses a provisional cast on. Any provisional cast on method may be used. Directions for one method can be found
 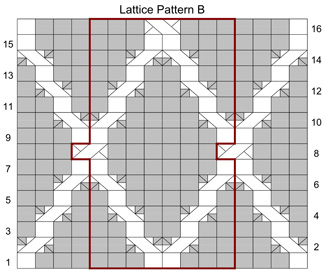 m1p (Make 1 purl stitch): Insert left
needle, from back to front, under
strand of yarn which runs
between last stitch on
left needle and first stitch
on right needle; purl this stitch. 1 st increased (stitch
will be twisted).
m1p (Make 1 purl stitch): Insert left
needle, from back to front, under
strand of yarn which runs
between last stitch on
left needle and first stitch
on right needle; purl this stitch. 1 st increased (stitch
will be twisted).