Knitty: little purls of wisdom
Phat Fiber
Title
beauty shot

Tangy

Neil’s tag line for this convertible project goes:  It’s a sweater, it’s a vest, it’s a swever!  He also suggested that the sleeves could make really neat matching legwarmers. 

A convertible project, Trout River can be a fitted vest with stand-up collar or a sweater. The sleeves can be buttoned on or taken off depending on the temperature. All the hems are trimmed with colorful handspun worked in garter stitch with the main yarn.

If you don’t spin I’ve made a recommendation for a commercial yarn that you could use. Because the project uses less than 100 yards of the trim yarn, you can really pick any special fiber or skein that you want to use in a garment but don’t have enough of for the whole garment.

Gentle shirt-tail shaping is included by working a few short rows on the front and back just above the hemline. 

There are also short rows included in the bust shaping. For a more conventional garment, you can work just the vest or sew the sleeves on for a simple, warm sweater.
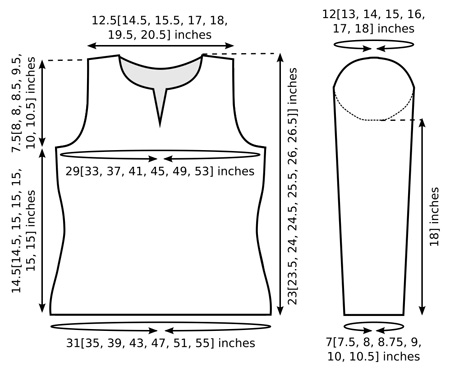
spacer model: Becky Herrick spacer photos: Neil Herrick

SIZE
XS[S, M, L, 1X, 2X, 3X] (shown in size M; modeled with 1 inch positive ease)

spacer

FINISHED MEASUREMENTS
Chest: 29[33, 37, 41, 45, 49, 53] inches
Hip: 31[35, 39, 43, 47, 51, 55] inches
Length: 23[23.5, 24, 24.5, 25.5, 26, 26.5] inches

spacer

MATERIALS
Yarn

spacer [MC] Knit Picks Merino Style [100% merino wool; 123yds/112m per 50g skein]; color: Hawk; 8[9, 10, 12, 13, 14, 16] skeins

Fiber
spacer [CC] The Wool Shed [100% wensleydale; top]; color: rainbow; 2 ounces
OR
spacer [CC] A Verb For Keeping Warm - wensleydale [100% wensleydale; top]; color: Persimmon; 2 ounces

Finished Yarn:
spacer Wraps per inch: 11-12
spacer Yardage used: 66 yards

Drafting Method:
spacer Long draw creating a worsted spun yarn; Chain-ply to maintain color sequence

Commercial alternative
spacer [CC] Mirasol Hacho [100% merino; 137yds/125m per 50g skein]; color: #317 Fruity Pips; 1 skein

Recommended needle size
[always use a needle size that gives you the gauge listed below -- every knitter's gauge is unique]
spacer 1 set US #6/4mm double-point needles
spacer 1 US #6/4mm circular needle; 24 inch for size XS, 24 or 32 inch for sizes S-L, 32 or 40 inch for sizes 1X-3X
spacer Spare circular needle, US #6/4mm or smaller

gearbox

Spinning Tool: 1.25 ounce drop spindle
Notions
spacer 2 small stitch holders
spacer 7 stitch markers: one marker should be a different type or color from the others
spacer 4 split ring markers or safety pins
spacer 8 buttons, 0.5 inch diameter; buy buttons after sweater is complete to ensure correct size
spacer Yarn needle

spacer

GAUGE

spacer20 sts/28 rows = 4" in stockinette st

PATTERN NOTES
[Knitty's list of standard abbreviations and techniques can be found here.]

If you only want a vest, omit the armhole band buttonholes, and don’t knit sleeves. If you only want a sweater, omit the armhole band buttonholes, and work the sleeve cap button bands to a depth of only 1 inch. When sewing in sleeves, align edge of sleeve cap band with picked-up edge of armhole band (on inside of armhole band).

Picking up sts:
When working the upper body and sleeve caps, you will be instructed to slip the first st of each row, resulting in one slipped st for every 2 rows. When picking up sts along these edges, you will be instructed to pick up and purl 3 sts for every 4 rows. This can easily be done by working [p1 in first slipped st, pfb in second slipped st] along these edges.

Armhole:
The sleeve cap edging is larger then the armhole on the vest. The extra flare allows the edging to cover the top of your shoulder, and keeps the overlap in place without too much gaping.

RLI (Right Lifted Increase): Use the right needle to pick up the stitch below the next stitch on the left needle. Place it on the left needle, then knit into it. 1 stitch has been increased.

LLI (Left Lifted Increase): Use the left needle to pick up the stitch 2 rows below the last stitch on the right needle. Knit into this stitch. 1 stitch has been increased.

Wrap & Turn [W&T] – used when working short rows
Note: The directions that follow are written for short rows worked in stockinette stitch.

To wrap and turn on a RS row, knit to point specified in pattern, bring yarn to front of work between needles, slip next stitch to right-hand needle, bring yarn around this stitch to back of work, slip stitch back to left-hand needle, turn work to begin purling back in the other direction.

To wrap and turn on a WS row, purl to point specified in pattern, bring yarn to back of work between needles, slip next stitch to right-hand needle, bring yarn around this stitch to front of work, slip stitch back to left-hand needle, turn work to begin knitting back in the other direction.

Working Wraps Together with Wrapped Stitches:
When working rows which follow short rows, work the "wraps" at the turning points of the short rows, together with the stitches they wrap, as follows:

When working a RS row: Knit to wrapped stitch. Slip next stitch from left needle to right needle, use tip of left needle to pick up "wrap" and place it on right needle, insert left needle into both wrap and stitch, and knit them together.

When working a WS row: Purl to wrapped stitch. Slip next stitch from left needle to right needle, use tip of left needle to pick up "wrap" and place it on right needle, slip both wrap and stitch back to left needle, purl together through back loops.

DIRECTIONS
LOWER BODY
With circular needle and MC, using long tail cast on method, CO 154[174, 194, 214, 234, 254, 274] sts. Place marker to indicate beginning of round; use marker which is different from the others.

Round 1: Using CC, k77[87, 97, 107, 117, 127, 137], place marker to indicate side “seam”, k to end.

Round 2: Using MC, p all sts.

Repeat these 2 rounds 4[4, 4, 5, 5, 5, 5] times more.
Break CC. Using MC, k 1 round.

Optional Short Row Hem Shaping:
Working this sequence of short rows across the front and back of the sweater will create a subtle, flattering “shirttail” shape. Short rows will first be worked across the front of the sweater, and then across the back.

This shaping is not factored into the length measurements given above or shown in the schematic; the shaping will add 1[1, 1, 1.25, 1.25, 1.25, 1.25] inches to the front of the sweater, and 1.25[1.25, 1.25, 1.5, 1.5, 1.5, 1.5] inches to the back.

See Pattern Notes for information about working short rows.

Front Short Rows:
Short Row 1 [RS]: K to 5 sts before marker, W&T.
Short Row 2 [WS]: P to 5 sts before marker, W&T.
Short Row 3 [RS]: K to 5 sts before previous wrapped st, W&T.
Short Row 4 [RS]: P to 5 sts before previous wrapped st, W&T.
Repeat Rows 3-4 1[1, 1, 2, 2, 2, 2] times more.
K to side marker, working wraps together with wrapped sts.

Back Short Rows:
Work Short Rows 1-4 as for front.
Repeat Short Rows 3-4 2[2, 2, 3, 3, 3, 3] times more. K to end of round, working wraps together with wrapped sts. When working following round, work remaining wraps together with wrapped sts.

Important: From this point on, measure length of lower body at side edge, measuring straight up from end-of-round marker.

Work in stockinette st until work measures 2.5[2.5, 3, 3, 3, 3, 3] inches.
Note: As written, lower body measures 14.5[14.5, 15, 15, 15, 15, 15] inches to underarm. If you wish to lengthen or shorten the sweater, work more or fewer rounds at this point. Length may also be altered during waist shaping.

Shape Waist:
Waist Decrease Round: [K1, k2tog, k to 3 sts before marker, ssk, k1] twice. 150[170, 190, 210, 230, 250, 270] sts.
K 3 rounds.
Repeat these 4 rounds 6 times more, then work Waist Decrease Round once more. 122[142, 162, 182, 202, 222, 242] sts.

Continue in stockinette st until work measures 9.5[9.5, 10, 10, 10, 10, 10] inches.
Note: If you wish to lengthen or shorten the sweater, work more or fewer rounds at this point.

Waist Increase Round: [K1, RLI, k to 1 st before marker, LLI, k1] twice. 126[146, 166, 186, 206, 226, 246] sts.
K 2 rounds.
Repeat these 3 rounds 4 times more, then work Waist Increase Round once more.
146[166, 186, 206, 226, 246, 266] sts.

Continue in stockinette st until work measures 12.5[12.5, 13, 13, 13, 13, 13] inches, or 2 inches less than desired length to underarm.

Optional Short Row Bust Shaping:
Working this sequence of short rows across the front of the sweater will add approx. 0.5[0.5, 1, 1, 1.25, 1.25, 1.25] inches of length over the bust, to help the sweater hang correctly. If you have a very small bust, you may wish to omit these short rows. If you have a very large bust, you may wish to work a few extra short rows.

Short Row 1 [RS]: K to 8 sts before marker, W&T.
Short Row 2 [WS]: P to 8 sts before marker, W&T.
Short Row 3 [RS]: K to 5 sts before previous wrapped st, W&T.
Short Row 4 [RS]: P to 5 sts before previous wrapped st, W&T.
Repeat Rows 3-4 0[0, 1, 1, 2, 2, 2] times more.

K to end of round, working wraps together with wrapped sts. When working following round, work remaining wraps together with wrapped sts.

Continue in stockinette st until work measures 14.5[14.5, 15, 15, 15, 15, 15] inches or desired length to underarm, ending last round 2[2, 3, 4, 4, 5, 6] sts before end-of-round marker.

Removing markers, divide work for upper front and back as follows:
Next Round: BO 4[4, 6, 8, 8, 10, 12] sts, k to 2[2, 3, 4, 4, 5, 6] sts before side marker, BO 4[4, 6, 8, 8, 10, 12] sts, k to end. Two sets of 69[79, 87, 95, 105, 113, 121] sts. Place first set of sts on hold on spare circular needle for upper front; upper back will be worked back and forth over last set of sts (set of sts with yarn attached).

UPPER BACK
From this point on, on RS rows, slip first st knitwise with yarn held to back of work. On WS rows, slip first st purlwise with yarn held to front of work.

P 1 row.
Armhole Decrease Row [RS]: Sl 1, ssk, k to 3 sts before edge, k2tog, k1.
Repeat these 2 rows 2[2, 3, 3, 3, 4, 4] times more. 63[73, 79, 87, 97, 103, 111] sts.

Sizes M, L, 1X, 2X, 3X Only:
Work 3 rows in stockinette st. Work Armhole Decrease Row.
Repeat these 4 rows -[-, 0, 0, 2, 2, 3] times more. -[-, 77, 85, 91, 97, 103] sts.

All Sizes:
Continue in stockinette st until work measures 6.5[6.75, 6.75, 7, 7.75, 8.25, 8.5] inches from underarm, ending with a WS row.

Shape Back Neckline:
Next Row [RS]: Sl1, k21[24, 25, 26, 27, 28, 29], BO 19[23, 25, 31, 35, 39, 43] sts, k to end. Two sets of 22[25, 26, 27, 28, 29, 30] sts. Place first set of sts on small st holder for right back shoulder; left back shoulder will be worked over last set of sts (set of sts with yarn attached).

Left Back Neckline and Shoulder:
P 1 row.
Next Row [RS]: Sl 1, ssk, k to end.
Repeat these 2 rows 2[3, 3, 4, 5, 5, 6] times more. 19[21, 22, 22, 22, 23, 23] sts.
P 1 row.

Shoulder slope is shaped using short rows as follows, beginning with RS facing:
Sl 1, k13[15, 16, 16, 16, 17, 17], W&T. P to end.
Sl 1, k9[11, 12, 12, 12, 13, 13], W&T. P to end.
Sl 1, k5[7, 8, 8, 8, 9, 9], W&T. P to end.
Sl 1, k to end, working wraps together with wrapped sts.
BO all sts purlwise.

Right Back Neckline and Shoulder:
Place held sts of right shoulder on needle and join yarn with RS facing.

K 1 row.
Next Row [WS]: Sl 1, p2tog, p to end.
Repeat these 2 rows 2[3, 3, 4, 5, 5, 6] times more. 19[21, 22, 22, 22, 23, 23] sts.

K 1 row. Work short rows as follows, beginning with WS facing:
Sl 1, p13[15, 16, 16, 16, 17, 17], W&T. K to end.
Sl 1, p9[11, 12, 12, 12, 13, 13], W&T. K to end.
Sl 1, p5[7, 8, 8, 8, 9, 9], W&T. K to end.
Sl 1, p to end, working wraps together with wrapped sts.
BO all sts knitwise.

UPPER FRONT
Place held sts of upper front on needle and join yarn with WS facing.
Work armhole shaping as for upper back. Once all decreases have been worked, continue in stockinette st until work measures 2.5[2.75, 2.75, 3, 3.75, 4.25, 4.5] inches from underarm, ending with a WS row.

Shape Neckline:
Next Row [RS]: Sl 1, k28[33, 35, 39, 42, 45, 48], k2tog, k1; place remaining 31[36, 38, 42, 45, 48, 51] sts on st holder for upper right front. 31[36, 38, 42, 45, 48, 51] sts on needle.
P 1 row.
Note: There will be one more decrease on the left front neckline than on the right front neckline, to compensate for the odd number of sts.

Upper Left Front:
Left Neckline Decrease Row [RS]: Sl 1, k to last 3 sts, k2tog, k1.
Work 3 rows in stockinette st.
Repeat these 4 rows twice more. 28[33, 35, 39, 42, 45, 48] sts.

Continue in stockinette st until work measures 4 inches from beginning of neckline shaping, ending with a RS row.
Next Row [WS]: BO 7[8, 9, 12, 14, 16, 18] sts, p to end. 21[25, 26, 27, 28, 29, 30] sts.

Work Left Neckline Decrease Row. P 1 row.
Repeat these 2 rows 1[3, 3, 4, 5, 5, 6] times more. 19[21, 22, 22, 22, 23, 23] sts.

K 1 row. Work short rows and bind off as for right back shoulder.

Upper Right Front:
Place held sts of upper right front on needle and join yarn with RS facing.
Work 2 rows in stockinette st.

Right Neckline Decrease Row [RS]: Sl 1, ssk, k to end.
Work 3 rows in stockinette st.
Repeat these 4 rows twice more. 28[33, 35, 39, 42, 45, 48] sts.

Continue in stockinette st until work measures 4 inches from beginning of neckline shaping, ending with a WS row.
Next Row [RS]: BO 7[8, 9, 12, 14, 16, 18] sts, k to end. 21[25, 26, 27, 28, 29, 30] sts.

P 1 row. Work Right Neckline Decrease Row.
Repeat these 2 rows 1[3, 3, 4, 5, 5, 6] times more. 19[21, 22, 22, 22, 23, 23] sts.

P 1 row. Work short rows and bind off as for left back shoulder.

COLLAR
Sew shoulder seams.

When working collar, break yarn at end of each round, and join at beginning of each new round. This will result in quite a few ends to weave in, but it is the best way to manage both the color and shaping within the collar. Each end can be woven in on WS along row of same color.

Collar may be worked using either double-point or circular needles. At beginning and end of each row, several sts will be slipped to a st holder; use 1 st holder for each side of front neckline. See Pattern Notes for notes on picking up sts along edges with slipped sts.

Although rounds are not joined, all rounds of collar are worked with RS facing.

Using CC, with RS facing, beginning at base of collar slit, pick up and p sts around collar and place markers as follows: 3 sts for every 4 rows along vertical collar slit edge on right front, place marker; 1 st in each bound off st along right front collar shaping, place marker; 3 sts for every 4 rows along shaped vertical edge of collar to beginning of bound off back collar sts, place marker; 1 st in each bound off back collar st, place marker;  3 sts for every 4 rows along shaped vertical edge of collar to beginning of bound off left front collar sts, place marker; 1 st in each bound off st along left front collar shaping, place marker; 3 sts for every 4 rows along vertical collar slit edge on left front. 6 markers in place.

Round 1: Beginning at center front, slip first 3 sts to st holder; using MC, k to 1 st before first marker, RLI, k1, slip marker, LLI, [k to next marker, slip marker, ssk, k to 2 sts before next marker, k2tog, slip marker] twice, k to next marker, RLI, slip marker, k1, LLI, k to last 3 sts, slip last 3 sts to st holder.
Round 2: Slip first 3 sts to st holder; using CC, p to last 3 sts, slip last 3 sts to st holder.
Rounds 3-4: Work as for Rounds 1-2.
Round 5: Slip first 2 sts to st holder; work as for Round 1 to last 2 sts, slip last 2 sts to st holder.
Round 6: Slip first 2 sts to st holder; using CC, p to last 3 sts, slip last 2 sts to st holder.
Rounds 7-8: Work as for Rounds 5-6.

Place held sts from first holder on needle at beginning of round, and held sts from second holder on needle at end of round. Join MC at center front.

BO Round: Using MC, BO all sts purlwise; while binding off, continue to work increases at first and last marker as set, except purl increased sts instead of knitting them.

ARMHOLE EDGING / BUTTONHOLE BANDS
Referring to photos as guides, use safety pins or split ring markers to mark positions of two buttonholes each on front and back of one armhole, approx. 1.75[2, 2, 2, 2.5, 2.5, 2.5] inches apart.

Using double-point needles and CC, beginning at center of BO underarm edge, pick up and p sts around armhole as follows: 1 st in each bound off st; 3 sts for every 4 rows along armhole edge to 1 inch before shoulder seam; 1 st for every 2 rows (1 st in each slipped st) to 1 inch past shoulder seam; 3 sts for every 4 rows along armhole edge to BO underarm edge; 1 st in each bound off st to center of underarm edge. Place marker and join to work in the round.

Round 1: Using MC, k all sts.
Round 2: Using CC, p all sts.
Round 3: Using MC, [k to 1 st before buttonhole position, BO 2 sts] four times, k to end.
Round 4: Using CC, [p to set of bound-off sts, CO 2 sts] four times, p to end.
Rounds 5-8: Work as for Rounds 1-2.
Using MC, BO all sts purlwise.


SLEEVES (Make 2)

Cuff:
Using double-point needles and MC, CO 36[38, 40, 44, 46, 50, 52] sts.
Join to begin working in the round, being careful not to twist.

Round 1: Using CC, k all sts.
Round 2: Using MC, p all sts.
Repeat these 2 rounds 4 times more. Break CC.

Work in stockinette st until work measures 2 inches.

Increase Round: K1, RLI, k to last st, LLI, k1.
K 7[7, 6, 6, 5, 5, 4] rounds.
Repeat these 8[8, 7, 7, 6, 6, 5] rounds 11[12, 14, 14, 16, 16, 18] times more.  60[64, 70, 74, 80, 84, 90] sts.

Continue in stockinette st until work measures 18 inches or desired length to underarm, ending last round 2[2, 3, 4, 4, 5, 6] sts before end of round. Place next 4[4, 6, 8, 8, 10, 12] sts on st holder, removing marker. 56[60, 64, 66, 72, 74, 78] sts.

Sleeve cap is worked back and forth in rows. From this point on, slip first st of each row as for upper back and front.

P 1 row.
Decrease Row [RS]: Sl 1, ssk, k to last 3 sts, k2tog, k1.
Repeat these 2 rows 24[26, 28, 29, 32, 33, 35] times more. 6 sts.

P 1 WS row, then p 1 RS row; do not turn work at end of RS row.

Sleeve Cap Edging / Button Band:
Continuing from sts just worked, pick up and p 3 sts for every 4 rows along side edge of sleeve cap, p held underarm sts, pick up and p 3 sts for every 4 rows along side edge of sleeve cap, place marker and join to work in the round.

Work in garter st until band measures 1.75 inches. BO all sts.

spacer

FINISHING
Weave in ends and block as desired.

For each sleeve, insert sleeve cap edging into armhole edging, lining up shoulders and underarms. Use safety pins or split ring markers to mark positions of buttons on sleeve cap edgings, behind buttonholes. Sew buttons in place.

spacer
ABOUT THE DESIGNER

Becky lives in Lamoille county in Vermont with her husband Neil and a growing number of farm animals. In the summers she’ll take her knitting on any outdoor adventures possible, canoeing, camping, even mountain climbing!  Becky can be found knitting and designing on the bus to her real job every day.

She blogs here. And she can be found on Ravelry as BeckyinVT.

spacer