Knitty: little purls of wisdom
EarthFaire
Title
beauty shot

Tangy

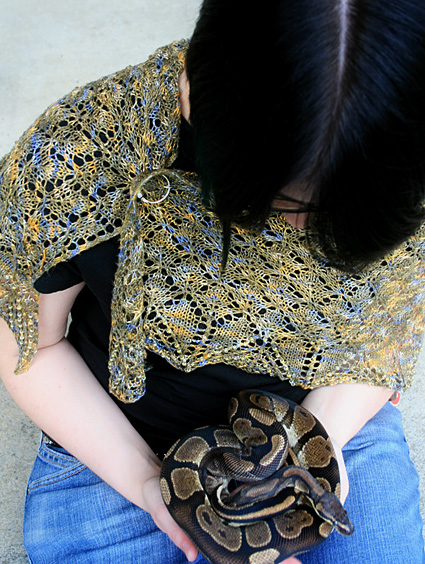
In helping my friend sort through her mom's stash I came across this lovely skein of silk tucked away in a corner of the closet.  It was begging to be used.  So I begged, well asked to use it, to make her a shawl. 
Why is it that your neighbor’s yarn is more desirable than your own?  My dear friend's mom was born and raised in Montreal so when I came across this stitch pattern that resembled the Maple leaf I knew had to incorporate it in this shawl.

Knitters can find inspiration in almost anything. The combination of nature and a good stitch pattern book are my favorite places to start. My next step involves a charting program or some graph paper. I play around with the increases and decreases, (X & Os) until I get something I like. Then I knit the swatch, just to be sure.
spacer model: Sarah Alves, Sid the snake, Brenda Patipa spacer photos: Milt Patipa, Brenda Patipa

SIZE
One

spacer

FINISHED MEASUREMENTS
Width: 62 inches
Length at center: 30 inches

spacer

MATERIALS
Yarn

spacer Lisa Souza Sylvie [100% silk; 750yd/686m per 6oz skein]; color: Petroglyph; 1 skein

Recommended needle size
[always use a needle size that gives you the gauge listed below -- every knitter's gauge is unique]
spacer 1 US #6/4mm circular needle, 32 inches or longer
spacer 1 US #7/4.5mm needle (any kind - used for binding off only)
spacer 1 steel crochet hook, approx. size US #10/1.30mm (small enough to fit through holes in beads)

Notions
spacer 2 stitch markers
spacer Approx. 350 6/0 glass beads
spacer Smooth waste yarn, similar weight to working yarn
spacer Yarn needle

spacer

GAUGE

spacer20 sts/24 rows = 4" in stockinette st using smaller needle, after blocking
 

PATTERN NOTES
[Knitty's list of standard abbreviations and techniques can be found here.]

This project uses a provisional cast on. Use your preferred provisional cast on technique; directions for 
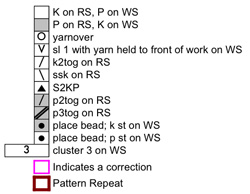
one technique may be found here.

Place Bead: Beads are placed on WS rows using a crochet hook. To apply a bead to a st, slip bead onto crochet hook, slip st from left needle onto hook, slide bead down hook and around st, slip st back onto left needle, then k or p st as indicated. Detailed directions can be found here.

Cluster 3
(worked on WS rows only):
Sl 3 sts with yarn held to front of work, bring yarn between needles to back of work, sl same 3 sts back to left needle, bring yarn between needles to front of work, p same 3 sts.

S2KP: Slip next 2 sts together, knitwise, as if to work a k2tog. Knit next st, then pass both slipped sts over st just knit. This forms a centered double decrease.
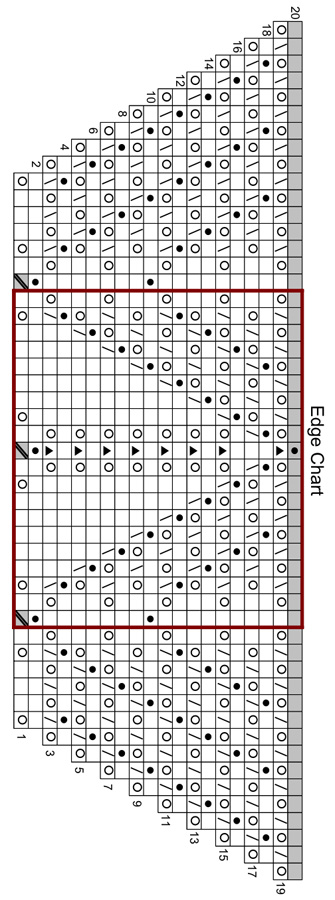
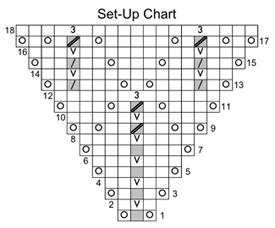
Information about blocking lace can be found here and here.

spacerCharts
The body and edge charts for this pattern are very large. Each fits on a letter-sized page.
Click the chart name below and print the resulting page.

Body chart
[revised 7.12.10]

Edge chart

DIRECTIONS
Using provisional cast on, CO 2 sts.

K 6 rows.

At end of last row, turn work 90 degrees clockwise and pick up and k 3 sts along one long edge of work – this will be 1 st in each garter st ridge along edge. Remove waste yarn from CO edge, placing resulting 2 live sts on left needle; k these sts. 7 sts.

Next Row [RS]: K2, work first row of Set-Up Chart, place marker, k1, place marker, work first row of Set-Up Chart, k2. 11 sts.

The markers now in place indicate the center st of the shawl. From this point on, k this st on RS rows, and p it on WS rows.

The 2 sts at each edge are the border sts; work these sts in garter st throughout.
Charts will be worked twice in each row, as set.

Continue as follows, working center st and edges sts as set:
Work Rows 2-18 of Set-Up Chart. 43 sts.

Work Rows 1-30 of Body Chart three times, then work Rows 1-22 once more. 267 sts.

Work Rows 1-20 of Edge Chart. 307 sts.

BO all sts using larger needle, as follows: K1, [sl st from right needle back to left needle, k2tog tbl] until all sts have been bound off.
spacer

FINISHING
Weave in ends, but do not cut tails until after blocking. Block to measurements given (see links in Pattern Notes), then trim yarn tails.

spacer
ABOUT THE DESIGNER

Brenda’s designs are fueled by the creative energy of the San Francisco Bay Area. Her artistic vibe and desire to explore new techniques infuses her various creative outlets of cooking, beading, and most of all, knitting. 

You can find more of Brenda’s designs here and here.

Ravelry: Beeeepatipaknits
Twitter: bpatipaknits

spacer