Knitty: little purls of wisdom
Loop
Title
beauty shot

Tangy

Like its namesake, the sturdy, regal oak tree, the shapely Quercus cardigan will feature prominently in your fall and winter fashion landscape.

Virtually seamless, Quercus is knit from the top down in a flattering empire style, with set-in sleeves that are picked up from the armholes using short-row shaping and then worked down to the elbow-length cuffs. The graceful open front showcases your favorite brooch or shawl pin, and wonderfully dimensional cable motifs on front, back, and sleeves add visual impact.

After blocking, the front edges of the cardi are meant to roll slightly for a casual look.

The versatile elbow-length sleeves can easily be worked longer if full-length sleeves are preferred, and don't be afraid to modify the ribbing if a deeper or more minimal cuff is preferred.

spacer model: Suzy Stemerman
spacer photos: Julie Turjoman


SIZE
XS[S, M, L, 1X, 2X, 3X] (shown in size S)

FINISHED MEASUREMENTS
Chest: 34[37.5, 40, 44.5, 47.5, 50, 54] inches
Hip: 37[41, 44, 49, 52.5, 55, 59]
Length: 25[25, 25, 27.25, 27.25, 27.25, 27.25] inches

Note: Measurements are taken with front edges overlapped by approx. 6[6, 6, 7, 7, 8, 8] inches.
spacer

MATERIALS
Yarn

spacer Brooklyn Tweed Shelter [100% American wool; 140yd/128m per 50g skein]; color: Nest; 8[8, 9, 9, 10, 12, 13] skeins

Recommended needle size
[always use a needle size that gives you the gauge listed below -- every knitter's gauge is unique]
spacer 1 set US #8/5mm double-point needles
spacer 1 16-inch US #8/5mm circular needle
spacer 1 US #8/5mm circular needle, 32 inches or longer (larger sizes may prefer a longer nedle)
spacer 1 spare circular needle, US #8.5mm or smaller, 32 inches or longer
spacer 1 crochet hook US G|6 / 4mm

Notions
spacer Waste yarn
spacer Cable needle
spacer Stitch markers
spacer Stitch holders
spacer Safety pins or locking stitch markers
spacer Row counter (optional)
spacer Yarn needle

spacer

GAUGE

20 sts/32 rows = 4” in stockinette st using larger needles, after blocking
 

PATTERN NOTES
[Knitty's list of standard abbreviations and techniques can be found here.]

C4B: Slip next 2 sts to cable needle and hold to back of work; k2 from left needle, k2 from cable needle.

C4F: Slip next 2 sts to cable needle and hold to front of work; k2 from left needle, k2 from cable needle.

C8B: Slip next 4 sts to cable needle and hold to back of work; k4 from left needle, k4 from cable needle.

C8F: Slip next 4 sts to cable needle and hold to front of work; k4 from left needle, k4 from cable needle.

This project uses a provisional cast on. Use your preferred provisional cast on technique; directions for one technique may be found here.

Instructions for the Backward Loop Cast On can be found here.

Instructions for surface crochet can be found here.

Information about blocking can be found here and here.

spacerCharts
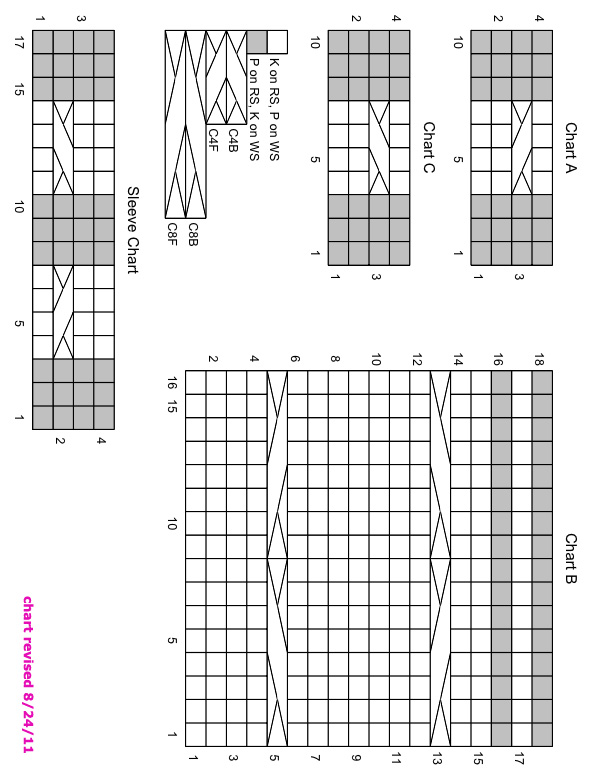
The chart for this pattern is very large and fits on a letter-sized page.
Click here and print the resulting page. [chart revised 8/24/11]


DIRECTIONS

spacer
UPPER BACK
Using provisional cast on method and long circular needle, CO 70[76, 80, 82, 84, 90, 98] sts. Do not join.

Set-up Row [RS]: K17[20, 22, 23, 24, 27, 31], place marker, work Row 1 of Chart A, work Row 1 of Chart B, work Row 1 of Chart C, place marker, k17[20, 22, 23, 24, 27, 31].

This row sets pattern for upper back: cable panel sts between markers are worked following Charts A, B, and C as set, all other sts are worked in stockinette st.

Work 51[55, 55, 59, 59, 63, 63] rows in pattern. You will have just worked Row 16[2, 2, 6, 6, 10, 10] of Chart B.

Shape Armholes:
Next Row [RS]: Kfb, work in pattern to last 2 sts, kfb, k1.

Work 1 row in pattern.

Repeat these 2 rows once more. 74[80, 84, 86, 88, 94, 102] sts.

Using backward loop method (see Pattern Notes), CO 2[3, 4, 4, 5, 5, 6] sts at beginning of next 4[4, 4, 6, 6, 6, 6] rows. 82[92, 100, 110, 118, 124, 138] sts.

Place all sts on spare needle.

Break yarn.

UPPER RIGHT FRONT
Carefully remove waste yarn from CO edge, placing 70[76, 80, 82, 84, 90, 98] resulting live sts on long circular needle.

Attach yarn with RS facing.

Next Row [RS]: K first 17[20, 22, 23, 24, 27, 29] sts (sts of right shoulder); slip next 36[36, 36, 36, 36, 36, 40] sts to one st holder for back neck; slip last 17[20, 22, 23, 24, 27, 29] sts to second st holder for left shoulder.
Note: After removing waste yarn from CO edge, you may find that you have one less st than number given. If this is the case, place one less st on st holder for back neck.

Place safety pin or locking st marker in work at beginning of row just worked (at armhole edge). When measuring length of front, measure from this point.

Shape Neckline:
Note: Use backward loop method when casting on sts at neckline and underarm.

P 1 row.
Next Row [RS]: K to last 2 sts, kfb, k1.
Repeat these 2 rows four times more. 22[25, 27, 28, 29, 32, 34] sts.

Next Row [WS]: CO 3 sts, p all sts.
K 1 row.
Repeat these 2 rows twice more. 31[34, 36, 37, 38, 41, 43] sts.

Next Row [WS]: CO 7[6, 4, 5, 5, 5, 3] sts, p all sts. 38[40, 40, 42, 43, 46, 46] sts.
K 4 rows, ending with a WS row.

Establish Cable Panel:
Next Row [RS]: K1[2, 2, 3, 4, 5, 5], place marker, work Row 1 of Chart A, work Row 1 of Chart B, work Row 1 of Chart C, place marker, k1[2, 2, 3, 3, 5, 5].
This row sets pattern for upper back: sts between markers are worked following Charts A, B, and C as set, all other sts are worked in stockinette st.

Work 29[33, 33, 37, 37, 41, 41] rows in pattern. You will have just worked Row 12[16, 16, 2, 2, 6, 6] of Chart B.

Shape Armhole:
Next Row [RS]: Kfb, work in pattern to end.
Work 1 row in pattern.
Repeat these 2 rows once more. 40[42, 42, 44, 45, 48, 48] sts.

Next Row [RS]: CO 2[3, 4, 4, 5, 5, 6] sts, work all sts in pattern.
Work 1 row in pattern.
Repeat these 2 rows 1[1, 1, 2, 2, 2, 2] times more. 44[48, 50, 56, 60, 63, 66] sts.

Place all sts on spare needle with held sts of back. Break yarn.

spacer
UPPER LEFT FRONT
Place 17[20, 22, 23, 24, 27, 29] held sts of left shoulder on long circular needle. Attach yarn with RS facing.
K 1 row. Place safety pin or locking st marker in work at end this row (at armhole edge). When measuring length of front, measure from this point.
P 1 row.

Next Row [RS]: Kfb, k to end.
P 1 row.
Repeat these 2 rows four times more.  22[25, 27, 28, 29, 32, 34] sts.

Next Row [RS]: CO 3 sts, k all sts.
P 1 row.
Repeat these 2 rows twice more. 31[34, 36, 37, 38, 41, 43] sts.

Next Row [RS]: CO 7[6, 4, 5, 5, 5, 3] sts, k all sts. 38[40, 40, 42, 43, 46, 46] sts.
K 3 rows, ending with a WS row.

Establish Cable Panel:
Next Row [RS]: K1[2, 2, 3, 3, 5, 5], place marker, work Row 1 of Chart A, work Row 1 of Chart B, work Row 1 of Chart C, place marker, k1[2, 2, 3, 4, 5, 5].

This row sets pattern for upper back: sts between markers are worked following Charts A, B, and C as set, all other sts are worked in stockinette st.

Work 29[33, 33, 37, 37, 41, 41] rows in pattern. You will have just worked Row 12[16, 16, 2, 2, 6, 6] of Chart B.

Shape Armhole:
Increase Row [RS]: K to last 2 sts, kfb, k1.
Work 1 row in pattern.
Repeat these 2 rows once more. 40[42, 42, 44, 45, 48, 48] sts.

Work 1 row in pattern.
Next Row [WS]: CO 3[3, 4, 4, 5, 5, 6] sts, work all sts in pattern.
Repeat these 2 rows 1[1, 1, 2, 2, 2, 2] times more. 44[48, 50, 56, 60, 63, 66] sts. Do not break yarn.

spacer
LOWER BODY
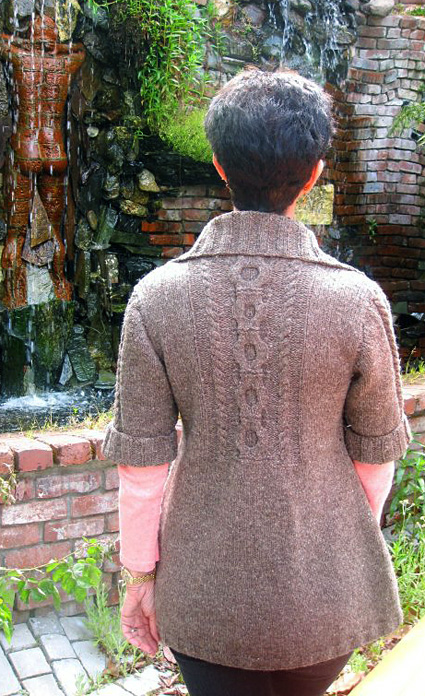
Next Row [RS]: Working all sts in pattern onto long circular needle, work sts of left front, place side marker, work sts of back, place side marker, work sts of right front. 170[188, 200, 222, 238, 250, 270] sts.

Complete Back Cable:
Work 33[29, 29, 23, 23, 19, 19] rows in pattern. You will have just worked Row 4 of Chart B over back cable panel, and Row 18 of Chart B over front cable panels.

Next Row [RS]: Work in pattern to fourth marker (marker before back cable panel), remove marker, p10, k16, p10, remove marker, work in pattern to end.

From this point on, work all sts of back in stockinette st.

Shape Lower Body:
Work 7[15, 15, 25, 25, 29, 29] rows in pattern. You will have just completed Row 8[16, 16, 8, 8, 12, 12] of Chart B.

Note: As written, length of sweater will be 12.75[13.75, 13.75, 15, 15, 15.5, 15.5] inches from back neckline to beginning of hip shaping, after blocking. Work more or fewer rows at this point to adjust length as needed.

Increase Row [RS]: *Work in pattern to 1 st before side marker, kfb, k1, slip marker, kfb; repeat from * once more, work in pattern to end. 4 sts increased.
Work 5 rows in pattern.
Repeat these 6 rows 3[3, 4, 5, 5, 5, 5] times more. 186[204, 220, 246, 262, 274, 294] sts. Remove side markers.

Continue in pattern until you have completed 9[9, 9, 10, 10, 10, 10] repeats of Chart B, ending with Row 15.
Note: As written, length of sweater will be 25[25, 25, 27.5, 27.5, 27.5, 27.5]  inches from back neckline to lower edge, after blocking. To change length of sweater, work more or fewer repeats of Chart B before continuing; each 18-row repeat will change length by 2.25 inches.

Next Row [WS]: *P to marker, remove marker, k to next marker, remove marker; repeat from * once, p to end.

Work 3 rows in stockinette st, ending with a RS row.
P 1 row, evenly decreasing 3[3, 1, 3, 1, 1, 3] sts. 183[201, 219, 243, 261, 273, 291] sts.

Lower Ribbing:
Next Row [RS]: K3, [p3, k3] to end.
Next Row [WS]: P3, [k3, p3] to end.
Work 10[10, 10, 12, 12, 12, 12] more rows in pattern as set.
BO all sts in pattern.

SLEEVES
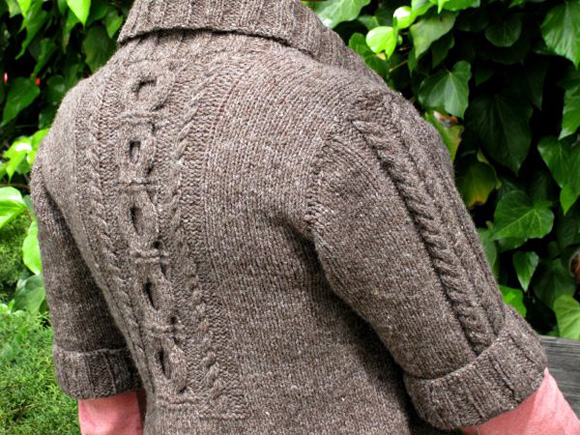
Using short circular needle, beginning at center of underarm with RS facing, pick up and k 69[73, 77, 89, 95, 99, 105] sts around one armhole. This will be approx. 1 st in each CO st and 1 st for every 2 rows around armhole. Don't worry if your stitch count is 1 or 2 sts off; it is more important to pick up sts evenly than to get exactly the right number. If necessary, increase or decrease as necessary when working the first row to obtain the correct number of sts.

spacer
Sleeve Cap:
Set-up Round: K23[24, 25, 31, 33, 35, 37], place first marker, k3[4, 5, 5, 6, 6, 7], work Row 1 of Sleeve Chart over next 17 sts, k3[4, 5, 5, 6, 6, 7], place second marker, k23[24, 25, 31, 33, 35, 37]. Place marker to indicate end of round.

This round sets pattern for sleeve: work 17 sts at center of sleeve following Sleeve Chart as set, work all other sts in stockinette st.

Sleeve cap will now be shaped using short rows, as follows:
Row 1 [RS]: Work in pattern to second marker, slip marker, W&T.

Row 2 [WS]: Work 23[25, 27, 27, 29, 29, 31] sts (all sts between markers) in pattern, slip marker, W&T.

Row 3 [RS]: Work in pattern to wrapped st, k wrap together with wrapped st (see descriptions here), W&T.

Row 4 [WS]: Work in pattern to wrapped st, p wrap together with wrapped st, W&T.

Repeat Rows 3 and 4 15[16, 15, 17, 16, 18, 17] times more. 6[6, 8, 12, 15, 15, 18] sts remain unwrapped between last wrapped st and end-of-round marker.

Next Row [RS]: Work in pattern to end-of-round marker, knitting wrap together with wrapped st. From this point, sleeve will be worked in the round.
Work one round in pattern, knitting remaining wrap together with wrapped st. Sleeve cap is complete; remove first and second markers, leaving end-of-round marker in place.

Shape Sleeve:
Switch to double-point needles when necessary.

Work 8[8, 10, 10, 10, 12, 12] rounds in pattern.
Next Round: *K11[12, 13, 16, 11, 11, 12], k2tog*; repeat from * to * 1[1, 1, 1, 2, 2, 2] times, work 17[17, 17, 17, 17, 21, 21] sts in pattern, repeat from * to * 2[2, 2, 2, 3, 3, 3] times. 65[69, 73, 85, 89, 93, 99] sts.

Work 3 rounds in pattern.
Next Round: K1, k2tog, k to last 3 sts, ssk, k1.
Repeat these 4 rounds 5[5, 5, 5, 5, 6, 6] times more. 53[57, 61, 73, 77, 79, 85] sts.

Continue in pattern until sleeve measures 6[6, 6.25, 6.25, 6.5, 6.5, 6.5] inches from underarm.

Sizes XS, 1X Only:
K 1 round, increasing 1 st. 54[-, -, -, 78, -, -] sts.

Sizes S, M, L, 2X, 3X Only:
K 1 round, evenly decreasing -[3, 1, 1, -, 1, 1] sts. -[54, 60, 72, -, 78, 84] sts.

All Sizes:
Note: As written, cuff will be fairly loose, as shown. If a tighter cuff is desired, use needles 2 sizes smaller than needles used for sweater.

Next Round: [K3, p3] to end.
This round sets 3x3 Rib for cuff. Continue in 3x3 Rib until cuff measures 3[3, 3, 3.5, 3.5, 4, 4.5] inches.
Loosely BO all sts in pattern.

Work other sleeve in the same way.

FRONT BANDS
Note: Edges of front bands will roll.

Right Band:
Using longer circular needle, beginning at lower right front corner with RS facing, pick up and k approx. 3 sts for every 5 rows along right front edge, ending at upper right front corner. Count sts and make a note of this number.
Beginning with a WS row, work in stockinette st until band measures 3[3, 3, 3.5, 3.5, 4, 4] inches. BO all sts.

Left Band:
Using longer circular needle, beginning at left front corner with RS facing, pick up and k approx. 3 sts for every 5 rows along left front edge, ending at lower left front corner. Count sts; if you have more or fewer sts than for right band, increase or decrease as necessary when working first row to obtain the same number of sts as for right band.
Continue as for right band.

spacer
COLLAR
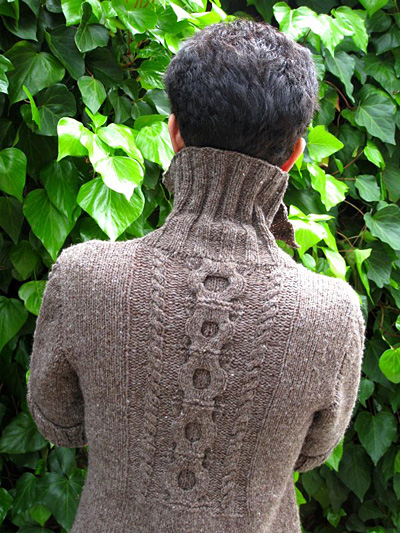
Place held sts of back neck on needle. Using longer circular needle and beginning at right front corner with RS facing, pick up and k sts along upper edge of right front band and right front neckline edge, work back neck sts, then pick up and k sts along left front neckline edge and upper edge of left front band. Pick up 2 sts for every 3 rows, and 1 st in each CO st.
Count sts; when working first row, evenly increase or decrease up to 3 sts to obtain a multiple of 6 sts + 3.

Note: In the directions that follow, [RS] and [WS] will refer to RS and WS of collar. RS of collar is facing when WS of sweater is facing.

Row 1 [RS]: [P3, k3] to last 3 sts, p3.

Row 2 [WS]: [K3, p3] to last 3 sts, k3.

These 2 rows set 3x3 Rib for collar. Continue in 3x3 Rib until collar measures 5[5.5, 5.5, 5.75, 5.75, 6, 6] inches, ending with a RS row.

Next Row [WS]: K2, m1, work in pattern as set to last 2 sts, m1, k2.

Work 1 row in pattern, purling increased sts.

Repeat these 2 rows twice more.

BO all sts in pattern.
spacer

FINISHING
With WS of sweater facing, work 1 row surface crochet (see Pattern Notes) across back neck sts at base of collar. this will help prevent back neck from stretching.

Weave in ends. Wet block to measurements shown. When blocking, overlap and pin out front bands, shape collar and pin out collar points.
spacer
ABOUT THE DESIGNER

designernamespacer Julie Turjoman is the author of Brave New Knits: 26 Projects and Personalities From the Knitting Blogosphere (Rodale, 2010). Her designs have appeared in Interweave Knits, Twist Collective, and in the books Vampire Knits and More Knitting In the Sun.

After a decade in the San Francisco Bay area, Julie is moving to Chicago this fall, where she looks forward to designing really warm cardigans. Her blog and more information about her knitting and design work can be found at julieturjoman.com.


spacer