Knitty: little purls of wisdom
Simply Sock Yarns
Title
beauty shot
Tangy

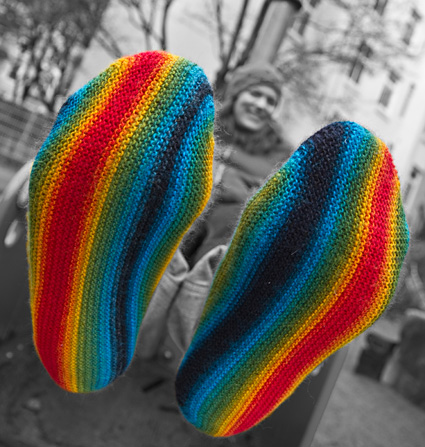
I love socks in bright, colorful self-striping yarns – but for some time now, I have been a little bored with the usual stripes running across the foot in the same old way every time. I wanted lengthwise stripes, beautiful ones, without any disruption of the pretty color changes. But none of the existing lengthwise-sock-patterns would do that, because they are all use seams at some point.

So I came up with my own version: Longitudinal starts on one side with Judy's Magic Cast-On, is knit lengthwise across to the other side and grafted, so the flow of colors is perfectly preserved.

Garter stitch makes the color changes even more interesting and the sock a very easy knit – no purling required!

spacer model: Julia Waberseck
spacer photos: Nicola Susen
   Pin It!


SIZE
From Baby to Mens XL.
A[B, C, D, E, F, G, H, I, J, K] shown in Size I.

FINISHED MEASUREMENTS
Foot length:  4[5, 6, 7.5, 8, 9, 9.5, 10, 10.5, 11, 11.5] inches
Foot circumference: 4.5[5.5, 6, 6.5, 7, 7, 7, 8, 8, 9, 10] inches
Sock Height from bottom of heel: 2.5[3.5, 4.5, 5.5, 6.5, 6.5, 7, 7, 7.5, 7.5, 8.5] inches
Leg length: 1.75[2.5, 3.3, 4.25, 5, 5, 5.5, 5.5, 5.75, 5.5, 6.5] inches

spacer

MATERIALS
Yarn

spacer Schoppel Zauberball [75%/Wool 25% Nylon; 459 yd/420 m per 100g skein]; color: Frische Fische/Tropical Fish; 1[1, 1, 1, 1, 1, 1, 1, 1, 2, 2] skeins

Recommended needle size
[always use a needle size that gives you the gauge listed below -- every knitter's gauge is unique]
spacer 1 US #1.5/2.5 mm circular needle, 40 inch or longer

Notions
spacer yarn needle
spacer 1 stitch marker
spacer a safety pin or removable stitch marker

spacer
GAUGE
30 sts/34 ridges (68 rows) = 4 inches in garter stitch


PATTERN NOTES
[Knitty's list of standard abbreviations and techniques can be found here.]

Judy’s Magic Cast-On.

Kitchener Stitch: Pay particular attention to the instructions on grafting garter stitch.

Because the sock is knitted lengthwise, the leg and foot length are set by the number of cast-on stitches.  You can modify them (individually, or both) by casting on more or fewer stitches in the appropriate section. Calculate the stitches required for that section by taking the length you want and multiply that by the number of sts per inch.

DIRECTIONS
Cast on 18[22, 27, 36, 38, 46, 49, 51, 55, 55, 56] stitches on each end of the circular needle for the foot using Judy’s Magic Cast-on.

Place a marker after the last cast-on stitch on the bottom needle – this will be used to place the heel – and then cast on 13[18, 25, 31, 38, 38, 42, 41, 44, 42, 49] more stitches onto each needle for the leg. 62[80, 104, 134, 152, 168, 182, 184, 198, 194, 210] sts total – 31[40, 52, 67, 76, 84, 91, 92, 99, 97, 105] on each needle.  

The bottom needle – the needle with the marker – is the sole needle, and the marker indicated where the heel will be worked.

A row of knitting goes down the front of the leg, over the top of the foot, over the toes across the sole, the heel and then up the back of the leg. The toe-cap is worked at the break between the two needles, and the heel is worked on the point with the stitch marker, on the bottom needle. See photo above.

Check to make sure that the first st to be worked is on the top needle. Note that if the stitches on one of the needles are oriented the other work, knit them through the back loop on the first row. 

Setup row [RS]: Knit, working any twisted sts through the back loop. Mark the RS of the fabric with a safety pin or removable stitch marker.

The increases and decreases for the toes and the heel are always knit on the inside [WS] of the sock.

Left section
Row 1 [WS]: K to 1 st before heel marker, kfb, slip marker, kfb, k to last st of heel needle, kfb; on top needle, kfb, k to end of row. Turn. 4 sts increased.

Row 2 [RS]: Knit.

Repeat Rows 1 & 2 5[7, 8, 9, 10, 10, 10, 11, 11, 13, 14] more times. 86[112, 140, 174, 196, 212, 226, 232, 246, 250, 270] sts.

Center section
Knit 10[10, 12, 12, 12, 12, 12, 16, 16, 16, 22] rows.

Right section
Row 1 [WS]: K to 2 sts before heel marker, k2tog, slip heel marker, ssk, k to last 2 sts of sole needle, k2tog; on top needle, ssk, k to end of row. Turn. 4 sts decreased.

Row 2 [RS]: Knit all stitches on both needles, turn work.

Repeat Rows 1 & 2 5[7, 8, 9, 10, 10, 10, 11, 11, 13, 14] more times. 62[80, 104, 134, 152, 168, 182, 184, 198, 194, 210] sts. 

Knit 1 more row.

FINISHING
Final row [RS]: Knit all stitches of the sole needle.  Stop at center of toe.

Cut the yarn, leaving a tail of approx. 60 inch. Join the stitches using Kitchener stitch, making sure to maintain the garter stitch pattern. Weave in ends.

spacer
ABOUT THE DESIGNER

Nicola Susen knits, designs and photographs in Hamburg, Germany.

Find her on Ravelry.

spacer