
|
|
 |
|
|
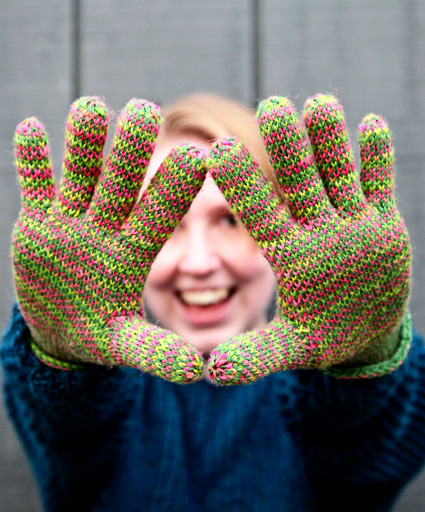
I avoided knitting gloves for the longest time, assuming that they were fiddly, complicated, and impossible to fit to my hands if they were knit from a pattern. And it's true sometimes: if the stitch pattern is big and complicated, it really limits your options in terms of size, but if the fabric is just a single color in plain stockinette, they're rarely any warmer than the thin, cheap gloves you can buy at the pharmacy. But when I discovered the incredibly simple, warm and durable Salt and Pepper stitch pattern and worked through some traditional glove patterns from Maine, I discovered a match made heaven (i.e. a sushi bar in a cold New England winter). Salt and Pepper is one of the oldest and simplest colorwork patterns -- being just a checkerboard of single knit stitches in two colors. One round goes A, B, A, B, the next goes B, A, B, A, and that's it! An odd number of stitches enables you to just keep working A, B, A, B, around and around without interruption (and without any apparent jog), and the two colors make a double-thick, sturdy fabric that really keeps out the chill. I think it's great for a new colorwork knitter -- you'll definitely have your preferred techniques down patt by the end of glove one. It's so simple that it's usually used as a "filler" pattern for more complicated designs, but I think it can have its own unqiue, complex appearance when it's worked with one hand-dyed sock yarn and one solid sock yarn like this. Given that the colors I had were pink and green, the stitch pattern name was based on condiments, and that the gloves are so supple you could even use chopsticks while wearing them, well, Ginger and Wasabi just fit like a glove. What else does this pattern have going on? How about a purl-free pseudo ribbing that flows right into the main stitch pattern? And versatile, easily modified directions that let you see what the heck's going on with all those little stitches? You bet! Fingers and parts that can be made to any length to fit your beautifully unique hands? It wouldn't be worth making gloves otherwise! |
||
|
|
 |
Tweet
 |
|
SIZE |
|
|
FINISHED MEASUREMENTS |
|
MATERIALS Notions |
|
GAUGE |
| 28 sts/40 rounds = 4 inches in stockinette stitch 40 sts/40 rounds = 4 inches in Salt and Pepper Pattern |
|
PATTERN NOTES |
|
Inc AB (makes 2 sts in 1): knit both colors A and B in the front loop of one stitch. On the next round, knit each of those two strands like a separate stitch Salt and Pepper pattern (Odd number of sts, worked in the round): To cast on in the color pattern, such as over the thumb gusset, I recommend a simple backwards loop cast on method. If the last color you knit was color B, cast on 1 st with color A, then cast on 1 st with color B, then A, then B, and so on until you have the correct number of stitches. The decreases at the tops of the fingers are designed to be completely carefree. You can make each finger exactly as long as you want it with no guesswork about how much length the decreasing will take because it'll all be done in just one round! You can work the double decreases with alternating A and B colors like I did, or you can work them all in one color to make a little star shape at the top. This same general method applies to the quick double decreases between the fingers just above the cast on stitches. It's not critical to get them in any particular spot, as long as it's over those cast on stitches. Because the pattern is only a multiple of two stitches, the double decreases can be worked in pattern without missing a beat. So if the last color you knit was color B, you can work the double decrease with color A, then go back to knitting B, A, B, A, and so on. |
|
DIRECTIONS Lower Hand and Thumb gusset: Repeat Rnds 3-6 until there are 21[21, 25] sts before the marker, 93[103, 113] sts total. Size M only: All sizes continue: Next rnd: Work 1 st in pattern, slip the next 23[25, 27] sts to scrap yarn, cast on 5 sts in color pattern to bridge the gap (see Pattern Notes), work in pattern to end of round. 75[83, 91] sts. Work even in Salt and Pepper pattern until palm measures 3[3.25, 3.5] inches from where the palm meets the cuff, or desired length to beginning of pinky finger. Separate the pinky sts: Separate the ring finger sts: Separate the middle finger sts: Index finger: Note: See details in Pattern Notes about the Finger decreases Decrease round: In color pattern, [Sl1-k2tog-psso] to the last 2[1, 0] sts, ssk 1[0, 0] times, k0[1, 0]. Middle finger: Next Round: Work in pattern to the 7 cast on sts, work 2 sts, sl1-k2tog-psso, work 2 sts. Work even in pattern until finger measures 2.5[2.75, 3] inches or until work clears the top of your middle finger. Secure both colors as before, positioned to work across Ring finger sts. Return sts to needle, and work in pattern across the 20[22, 24] held Ring finger sts, then pick up and knit 7 sts in pattern along the cast on edge. Next Round: Work in pattern to the 7 cast on sts, work 2 sts, sl1-k2tog-psso, work 2 sts. 25[27, 29] sts Work even in pattern until finger measures 2.25[2.5,2.75] inches or until work clears the top of your ring finger. Decrease round: [Sl1-k2tog-psso] to the last 1[0, 2] sts, ssk 0[0, 1] times, k1[0, 0]. Pinky finger: Thumb: Next Round: Work in pattern to the 8 cast on sts, work 3 sts, sl1-k2tog-psso, work 2 sts. 29[31, 33] sts Decrease round: [Sl1-k2tog-psso] to the last 2[1, 0] sts, ssk 1[0, 0] times, k0[1, 0]. |
|
FINISHING |
| ABOUT THE DESIGNER |
|
Kirsten Hipsky is the design manager for WEBS, where she designs, writes, edits, knits and crochets patterns for their house brand Valley Yarns. |
|
Pattern & images © 2013 Kirsten Hipsky. Contact Kirsten |