Knitty: little purls of wisdom
Twisted Fiber Art
Title
beauty shot

Tangy

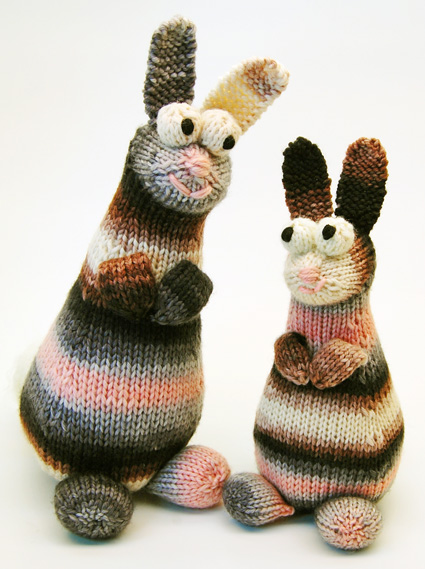
I hear the folks at Knitty are fond of rabbits. Well, here's my contribution to the lagomorph population: Rabbity, a pair of woogly eyed hoppers in a colorway designed to pay tribute to editor Amy's beloved Newton bunny, a soft grey fuzzball who gave more kisses than any other rabbit in the universe. Don't try to tell her otherwise.

These rabbits are easy to make. The body and head are knit in one piece, with short rows for head shaping. The ears, eyes, paws, and legs can be knit on stitches picked up from the body, or knit separately and sewn on.

Each bun takes less than 100 yds, so your stash will multiply into a kissy colony in no time. Don't be put off by the difficulty level -- we've provided alternatives for some of the more challenging bits, and projects like this are an excellent way to try out new techniques.

After all, your bun will be so cute that any little goofs won't be noticed.


spacer photos: cheezombie
   Pin It!


SIZE
Variable, from itty bitty to big and floppy depending on yarn/needle combination; should fit most rabbit needs.

FINISHED MEASUREMENTS
Small DK Rabbitty: approx. 8 inches tall to the tip of the ears
Large worsted Rabbitty: approx. 10 inches tall

spacer

MATERIALS
Yarn

Small DK Rabbitty:
spacer [MC] Twisted Fiber Duchess [wool, 240yd per 100g skein]; color: Newton; 1 skein
spacer [CC] KnitPicks Bare [merino wool; 220yd per 100g skein]; color: undyed; 1 skein
spacer [CC] Jo-Ann Sensations Beautiful Yarn [49% Acrylic, 51% Nylon. 1-3/4oz, 50g, 71yds per 50gm ball]; color P-01 Off White; 1 ball

Recommended needle size
[always use a needle size that gives you the gauge listed below -- every knitter's gauge is unique]
spacer US size 3/3.25mm needles for working in the round: DPNs, 1 long circular or 2 short circulars

Large worsted Rabbitty:
spacer [MC] Twisted Fiber Queen [100% wool, 185yd per 100g]; color: Newton; 1 skein
spacer [CC] KnitPicks Bare [100% merino wool; 220yd per 100g skein]; color: undyed; 1 skein
spacer [CC] Jo-Ann Sensations Beautiful Yarn [49% Acrylic, 51% Nylon. 1-3/4oz, 50g, 71yds per 50gm ball]; color P-01 Off White; 1 ball

Recommended needle size
[always use a needle size that gives you the gauge listed below -- every knitter's gauge is unique]
spacer US size 5/3.75mm needles for working in the round

Notions
spacer yarn needle
spacer scraps of black and pink embroidery thread, yarn, etc. for pupils and face
spacer stuffing (see note in Pattern Notes)

spacer
GAUGE
Exact gauge is unimportant and will vary depending on yarn/needle choice, but it must be tight so no stuffing shows through. Using needles a few sizes smaller than those recommended for the yarn will give a tighter fabric.
 

PATTERN NOTES
[Knitty's list of standard abbreviations and techniques can be found here.]

Rabbitty is knit from the base of the body up to the head. The eyeballs and legs are knit on stitches picked up from the body, or knit separately and sewn on.

Almost any yarn will work with this pattern. The samples were knit with DK and worsted weight yarn. The pattern only uses less than 100yds of MC and scraps of CC for eyes, face, and tail, so it's perfect for using up odds and ends.

On Stuffing:
Polyfil polyester stuffing is recommend but roving, yarn scraps and plastic pellets would all work (provided the knitted fabric gauge is tight enough). Weighting the bun's bottom isn't necessary; the triangular shape of the base of the body and the way the feet and tail are sewn on make it reasonably steady.

Stuff the body firmly, but not so much that the stitches stretch and make holes. The body should be a soft triangular shape, wider at the bottom and tapered at the top. Don't be afraid to work the stuffing with your hands or smoosh it with blunt tools or stab it with pointy needles until it is the shape you want. Treat your stuffing like clay and sculpt it into the desired shape. For the eyes, sometimes it is easier to roll the stuffing into a ball before inserting, and don't overstuff, that's where the stretching is usually most obvious. The paws only need a little -- don't stuff more than half full so it will bend to make the arm part.

RLI (Right Lifted Increase): Insert the right needle into the stitch below the next stitch on the left needle. Pick up this stitch and place it on the left needle, then knit into it. 1 stitch has been increased.

LLI (Left Lifted Increase): Use the left needle to pick up the stitch 2 rows below the last stitch on the right needle. Knit into this stitch. 1 stitch has been increased.

DIRECTIONS
BODY
With MC, cast on 6 st. Distribute across needles as you prefer and join for working in the round.

Round 1: Kfb around. 12 sts.

Round 2: Knit

Round 3: Kfb around. 24 sts.

Round 4: Knit

Round 5: [Kfb, k2, kfb] around. 36 sts.

Round 6: Knit

Round 7: [Kfb, k2, kfb] around. 54 sts.

Round 8: Knit

Round 9: [Kfb, k16, kfb] around. 60 sts.

Rounds 10-19: Knit

Round 20: [Ssk, k16, k2tog] around. 54 sts.

Rounds 21-25: Knit

Round 26: [Ssk, k14, k2tog] around. 48 sts.

Rounds 27-31: Knit

Round 32: [Ssk, k12, k2tog] around. 42 sts.

Rounds 33-37: Knit

Round 38: [Ssk, k10, k2tog] around. 36 sts.

Rounds 39-43: Knit

Round 44: [Ssk, k8, k2tog] around. 30 sts.

Rounds 45-49: Knit

Round 50: [Ssk, k6, k2tog] around: 24 sts.

Rounds 51-55: Knit

Short rows to shape the back of the head:
Row 1 [RS]: K7, wrap and turn.
Row 2 [WS]: P4, wrap and turn.
Row 3 [RS]: K13, wrap and turn.
Row 4 [WS]: P12, wrap and turn.
Row 5 [RS]: K11, wrap and turn.
Row 6 [WS]: P10, wrap andturn.
Row 7 [RS]: K9, wrap and turn.
Row 8 [WS]: P8, wrap and turn.
Row 9 [RS]: K9, wrap and turn.
Row 10 [WS]: P10, wrap and turn.
Row 11 [RS]: K11, wrap and turn.
Row 12 [WS]: P12, wrap and turn.
Row 13 [RS]: K13, wrap and turn.
Row 14 [WS]: P14, wrap and turn.
Final row [RS]: Knit to end of round.

Stuff body. (See Pattern Notes)

At this point you'll resume working in the round for the head. Continue stuffing head as you go.

Rounds 1-5: Knit.
Round 6: [Ssk, k4, k2tog] around. 18 sts.
Round 7: Knit.
Round 8: [Ssk, k2, k2tog] around. 12 sts.
Round 9: Knit.
Round 10: [Ssk, k2tog] around. 6 sts.

Cut yarn, draw through remaining stitches, pull tight and weave in ends.

Eyeballs
Note: the Eyeballs can be a little fiddly, so we've included suggestions for making them a little easier.

With CC1, with RS facing, pick up and knit 6 sts on two parallel needles on top of head (see photo at right as a guide for placement).
Note: If you find this fiddly, using CC1, CO 6 sts and join for working in the round.

Round 1: Knit.
Round 2: (LLI, k1) around. 12 sts. Note: if you find this increase fiddly, you can work KFB 6 times around instead.
Rounds 3-5: Knit
Round 7: Ssk around. 6 sts.

If you made the Eyeballs attached to the head, cut yarn and loosely draw through loops, stuff eyeball, pull loops tight and weave in ends.

If you made them separately, cut yarn, draw through loops and pull tight. Stuff through cast on end and sew to head. Weave in ends.

Repeat for second eyeball.

Feet
Using MC, cast on 8 sts. Join for working in the round.

Round 1: Knit.

Round 2: [K1, LLI] around. 16 sts.

Round 3: Knit.

Round 4: [RLI, k8, LLI] around. 20 sts.

Round 5-14: Knit.

Turn inside out, so that WS is facing.

Slip the first 10 sts to one needle, second 10 to another, and work 3-needle BO to close, or BO normally and sew shut.

Sew to bottom of body, stuff through toe hole, sew hole shut and weave in ends.

Ears
Using MC, cast on 4 sts. Do not join -- ears are worked back and forth.

Row 1 [WS]: Knit

Row 2 [RS]: K1, kfb, k1. 6 sts.

Rows 3-22: Knit

Row 23 [WS]: K1, ssk, k2tog, k1. 4 sts.

Row 24 [RS]: Slip 1st st, ssk, pass slipped st over ssk, slip last st, pass st on the right over the slipped st.

Cut yarn and draw through last loop. Sew to top of the head and weave in ends.

Arms (Paws?)
Using MC, cast on 12 sts. Join for working in the round.

Rounds 1-10: Knit

Round 11: K2tog around. (6 st)

Cut yarn (leave a long tail for sewing) and draw through remaining st and pull tight.

Stuff the paw end of the arm, leaving the rest empty. Sew the cast on end at an angle on the chest.

Fold the arm in half, and stitch paw in place in the center of the chest with the cast-off yarn tail.

Tail
Using CC2, cast on 12 sts. Join for working in the round.

Round 1: Knit.

Round 2: Kfb around. 24 sts.

Rounds 3-10: Knit.

Round 11: K2tog around. 12 sts.

Round 12: Knit.

Round 13: K2tog around. 6 sts.

Stuff.

Cut yarn (leave a long tail for sewing) and draw through remaining st and pull tight. Sew cast on end to the rear of the body, weave in ends.

FINISHING
Using pink or black yarn, embroider nose with a few horizontal stitches, and mouth with 2 st in a V shape. Use photo as a guide.

Using black yarn, embroider pupils with black yarn by repeatedly stitching in and out of the same two holes until a roundish shape is achieved.

spacer
ABOUT THE DESIGNER

Cheezombie often finds herself bleary eyed and finger sore, but still knitting and watching slasher movies and cartoons, at 2 a.m. The byproducts of these late-night sessions fuel others, whereby creating a cycle of sleeplessness and creativity and funny critters.

Knitting Manifesto:
1. Projects should take no longer than a few hours from start to finish.
2. Projects should have few or no seams to sew up at the end.
3. Projects should be made in one piece, or the absolute minimum of pieces necessary.
4. Projects should use the simplest stitches to get the desired effects as possible.
5. And above all, they should be quick and fun enough to knit over and over until you have little herds of funny critters following you about the house.

spacer