Knitty: little purls of wisdom
Title
beauty shot
Tangy

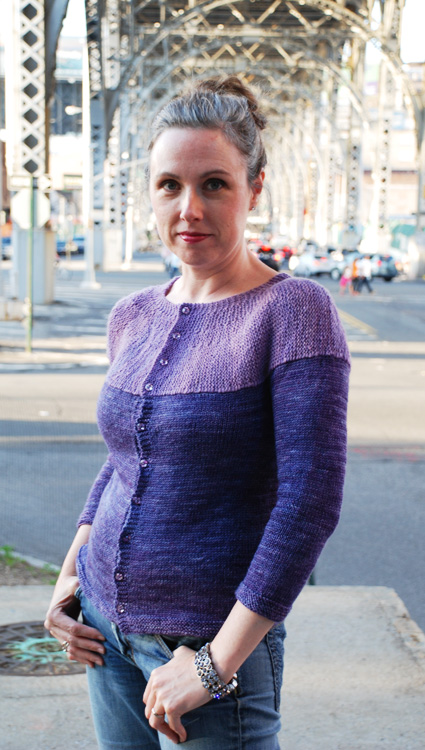
We all have that precious skein or two of handspun fingering-weight yarn that's just crying out to become something special. Why not turn it into the yoke of a lightweight cardigan, perfect for transitioning from Summer to Fall. Add in a few skeins of a complementary commercial yarn (or more handspun, if you have it), and you're all set!

The body and sleeves of this sweater are worked from the bottom up with integrated garter stitch button bands, and the yoke is constructed sideways, nipping off a stitch of the body for every garter ridge worked. Short rows shape things into a traditional round yoke turned on its side.

From Anne/Wooly Wonka
When Kathleen first showed me the prototype for her Bloc Party cardigan, I immediately thought "Wow! That'd be great done up in handspun." After some back and forth, we came up with a plan, and I set her up with a matched set of enough handspun to knit the yoke and a commercially spun yarn I'd hand-dyed to work the body of the sweater. She needed a fingering-weight yarn, and wanted something with both body and drape, so I suggested a BFL (blue-faced Leicester wool) and silk blend, since I had that both in roving form and yarn form. After looking through some colorway options, Kathleen picked one of my personal favorites, "Lupines", for the roving, and left it to me to dye something that would pair well with it for the commercial yarn. (I created a dark blurple, "Blackberries" for that colorway.)

To spin up the dyed roving, I split the 4-oz braid into four equal sections (about 1 oz each). I then pulled narrow strips off the roving lengthwise as I spun, and worked on keeping the singles smooth as I spun them, as I wanted a smooth, shiny yarn with a worsted-type character. I had taken a spare yard of the commercial yarn and kept that as a reference guide next to my wheel, so I could pull out a yard of singles from the bobbin, let them twist back on themselves and check to see that I was keeping a fairly close match to the commercial yarn. I spun all the singles onto two bobbins, then plied the singles together into a 2-ply yarn.

I wound the yarn off, gave it a little bath with wool wash, spun the water out and gave it a few snaps to set the twist. I let it air dry, and then packed it and the commercial yarn up to head out to Kathleen for knitting tasks.

From Kathleen
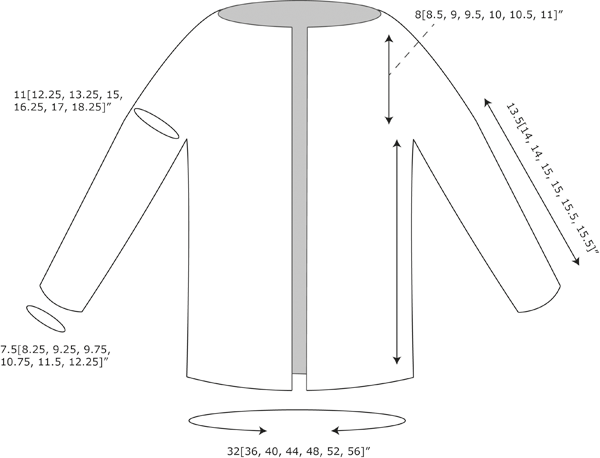
This version of Bloc Party turned out even better than I could have imagined. This version is all gleaming-silk refinement. The drape of the body yarn is elegant, and the silk in the handspun elevates the garter stitch yoke. It doesn't hurt that I found the perfect sparkly buttons at M&J Trimming. Dress it up for a special occasion, dress it down for every day, but no matter what, you're ready to party!

spacer model: Kathleen Dames
spacer photos: Nicholas Dames
 

SIZE
Women's XS[S, M, L, 1X, 2X, 3X]
shown in size M with 4" ease

FINISHED MEASUREMENTS
Chest circumference: 32[36, 40, 44, 48, 52, 56] inches
Length: 22[23, 23, 25, 25, 26, 27] inches

spacer

MATERIALS
Commercial + Handspun Yarns used
spacer [MC] Wooly Wonka Artio Sock [50% BFL Wool, 50% Silk; 435 yards/398 meters per 100g]; color: Blackberries; 2[2, 2, 3, 3, 3, 4] skeins
spacer [CC] Wooly Wonka Handspun Yarn -- One-of-a-kind [75% BFL Wool, 25% Silk; 349 yards/319 meters per 3.9 ounce skein]; color: Lupines; 1[1, 1, 2, 2, 2, 2] skeins -- Note: Approximate quantities: 208[252, 300, 352, 408, 468, 532]yds fingering weight yarn or 2.3[2.8, 3.4, 3.9, 4.6, 5.3, 5.9]oz. fiber
Editor's note: Wooly Wonka Fiber will be making a kit available for this pattern.
Please contact Anne at Wooly Wonka Fiber for further information.


Finished Yarn:
spacer Wraps per inch: 20
spacer Ply: 2
spacer Drafting method: worsted

gearbox

Spinning Tool: Lehigh Valley Spinning Wheels Saxony wheel; double drive.
Lazy Kate: Lehigh Valley Spinning Wheels 3-bobbin lazy kate.
Niddy Noddy: Crazy Monkey skein winder - 4-skein size.

Recommended needle size
[always use a needle size that gives you the gauge listed below -- every knitter's gauge is unique]
spacer US #3/3.25mm circular needle
spacer US #6/4mm circular needle

Tools
spacer Waste yarn or stitch holders
spacer Stitch markers
spacer 10[11, 11, 12, 12, 12, 13] buttons
spacer yarn needle

spacer

GAUGE

21 sts x 32 rows = 4" in MC in Stockinette stitch on larger needle
20 sts x 40 rows = 4" in CC in Garter stitch on smaller needle
 

PATTERN NOTES
[Knitty's list of standard abbreviations and techniques can be found here.]

Slip all sts purlwise.

You don't need to wrap stitches when working short rows in garter stitch; simply work the specified stitches, turn your work and go back.

When working buttonholes as you go, I like to work them on both sides, then I know exactly where to sew my buttons when the time comes -- right over the holes to close them up and match the buttonholes!

When working the yoke in CC, be sure to slip the first st of every row purl-wise with yarn in back for a neat edge at the neck and a neat join with the body at the base of the yoke.

DIRECTIONS
SLEEVES (Make 2)
With larger needle and MC, CO 40[44, 48, 52, 56, 60, 64] sts. Work 10 rows in Garter St, then work 5 rows of St st.

Inc Row [RS]: K1, M1L, k to last st, M1R, k1. 2 sts inc'd

Work 5 rows even.

Rep the last 6 rows 9[10, 11, 13, 15, 15, 16] more times. 58[64, 70, 78, 86, 90, 96] sts.

Work even until sleeve measures 13.5[14, 14, 15, 15, 15.5, 15.5] inches, or desired length to underarm.

Break yarn.

Place first and last 7[8, 9, 10, 11, 11, 12] sts of last row on waste yarn for underarms.

Set aside.
44[48, 52, 58, 62, 68, 72] held for yoke; 14[16, 18, 20, 22, 22, 24] sts on waste yarn for underarm.

BODY
With larger needle and MC, CO 168[189, 210, 231, 252, 273, 294] sts.

Work 10 rows in Garter St

Next Row [RS]: K42[47, 53, 58, 63, 68, 74] sts, pm, k84[95, 104, 115, 126, 137, 146], pm, k42[47, 53, 58, 63, 68, 74] sts.

Next Row [WS]: K5, p to last 5 sts, k5.

Buttonhole Row [RS]: K2, yo, k2tog, k to last 4 sts, k2tog, yo, k2.

Work even, working a buttonhole row every 2 inches until piece measures 13.5[14, 14, 15, 15, 15.5, 15.5] inches from CO edge, or desired length to underarm.

Underarm row [WS]: K5, p30[34, 39, 43, 47, 52, 57] sts, p14[16, 18, 20, 22, 22, 24] and place on waste yarn; p70[79, 86, 95, 104, 115, 122] sts; p14[16, 18, 20, 22, 22, 24] and place on waste yarn; p30[34, 39, 43, 48, 52, 57] sts, k5.

140[157, 174, 191, 208, 229, 246] sts on needle for yoke; 14[16, 18, 20, 22, 22, 24] sts on waste yarn for each underarm.

Joining Sleeves & Body [RS]:
K35[39, 44, 48, 52, 57, 62] sts (Right Front), k44[48, 52, 58, 62, 68, 72] sts from first sleeve, k70[79, 86, 95, 104, 115, 122] sts (Back), k44[48, 52, 58, 62, 68, 72] sts from second sleeve, k35[39, 44, 48, 52, 57, 62] sts (Left Front). 228[253, 278, 307, 332, 365, 390] sts.

Work even in St st for 1 inch.
Cut MC.

YOKE
With CC and smaller needle, CO 28[30, 33, 35, 38, 40, 43] sts.

Right Buttonband
Row 1 [RS, working towards body]: Sl1 wyib, k26[28, 31, 34, 37, 38, 41], ssk (last st of CC with first st of MC from Body on larger needle).

Row 2 [WS, working towards collar]: Sl1 wyib, k to end.

Note: From this point on, all RS rows that are not short-rows will end with the same ssk method (last CC stitch with next MC st held on larger needle at Body.

Work Rows 1-2 again.

Eyelet Buttonhole Row [RS]: Sl1 wyib, k2, *yo, k2tog, k8; repeat from * to last st, ssk.

Work Row 2. Repeat Rows 1-2 twice more. Work Row 1.

Right Front
If desired, place markers before turning and retain them in place, since all short rows happen on the same spot from now on.

Short Row A: Sl1 wyib, k23[25, 28, 30, 33, 35, 38]. Turn and k to last st, ssk.

Short Row B: Sl1 wyib, k18[20, 22, 24, 26, 28, 29]. Turn and k to last st, ssk.

Short Row C: Sl1 wyib, k14[15, 16, 18, 19, 20, 21]. Turn and k to last st, ssk.

Work (Row 2, Short Rows A, B, C, Row 1) a further 7[9, 10, 11, 12, 13, 14] times.

Right Sleeve
Note: Increases will be worked to raise the back neck

Increase Row [WS]: Sl1 wyib, k23[25, 28, 30, 33, 35, 38], kfb, k to end. 1 st inc'd

Work (Row 1, Short Rows A, B, C, Increase Row) 4 more times.

Right Back
Work (Row 1, Short Rows A, B, C, Row 2) a further 14[15, 17, 20, 22, 25, 27] times.

Center Back
Work Rows 1-2 a total of 8[12, 12, 10, 10, 6, 12] times.

Left Back
Work (Row 1, Short Rows A, B, C, Row 2) a total of 14[15, 17, 20, 22, 25, 27] times.

Left Sleeve
Work Row 1.

Note: Decreases will be worked to lower the front neck back to the initial length.

Decrease Row [WS]: Sl1 wyib, k23[25, 28, 30, 33, 35, 38], k2tog, k to end. 1 st dec'd

Work (Row 1, Short Rows A, B, C, Decrease Row] 4 more times.

Left Front
Work (Row 1, Short Rows A, B, C, Row 2) a further 7[9, 10, 11, 12, 13, 14] times.

Left Buttonband
Work Rows 1-2 twice.

Work Eyelet Buttonhole Row.

Work Row 2, Rows 1-2, Row 1.

BO purlwise on the next WS row.

spacer

FINISHING
Seam up each sleeve. Weave underarm sts together. Weave in ends. Sew on buttons, closing up buttonholes on left side. Block and enjoy!

spacer
ABOUT THE DESIGNER

Kathleen Dames knits and designs in New York City and Bath, Maine.

You can find more of her work here and on Ravelry.

spacer