Sophistical pullover, a free knitting pattern from Knitty.com. Free knitting pattern for a modern pullover with a v-neck, a box pleat back and interesting welts near the front hem.
INTRODUCTION
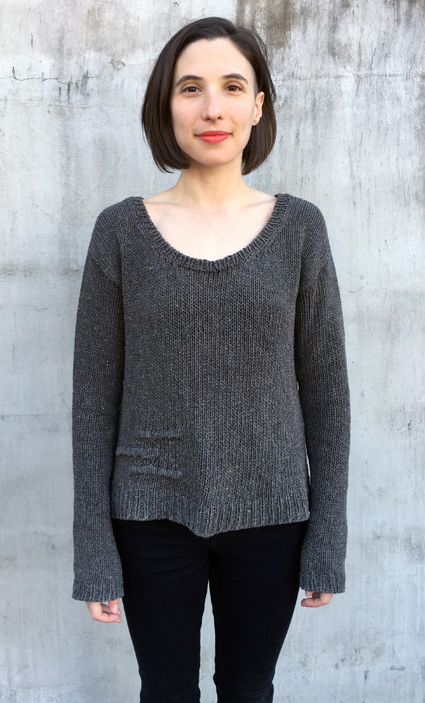
Sophistical
![]()
This is a great loose-fitting layering piece that's mostly super-simple and quick to knit. The front and back are worked flat and seamed at the shoulders and sides. Drop sleeves are picked up and worked in the round until they're exactly the right length. Simple 1x1 ribbing finishes the neckline.
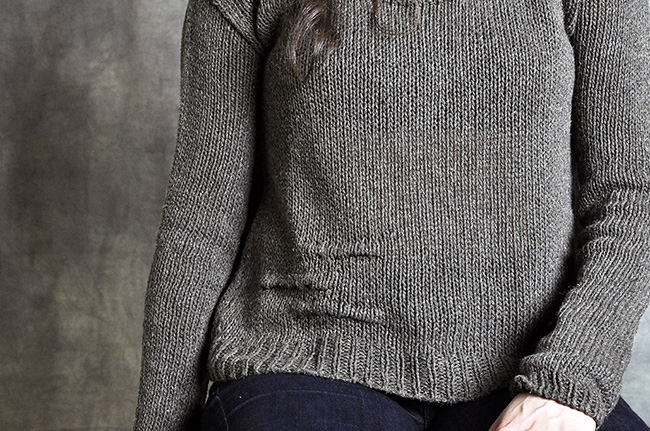
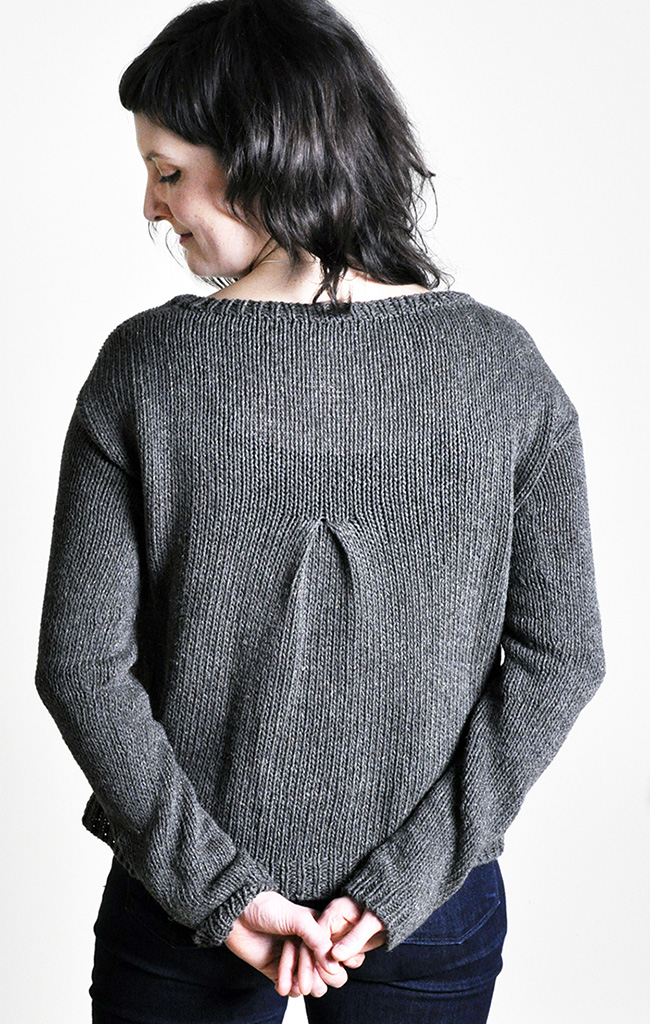
However, there are a few slightly tricky parts that really add a lot of style: a tubular cast-on and bind-off start and finish your ribbing beautifully, three organic-looking welts on the front skew the hemline in an interesting way, a box pleat on the back adds a bit of swing, and short-row shaping provides a better fit at the shoulders.
If you're a beginning knitter and you're not sure if you're up to the challenge, you can make this project easier by doing some or all of the following: work a regular cast-on, skip the welts, omit the box pleat, do a stepped-BO at the shoulders instead of the short rows, BO in pattern at the sleeve cuffs and neckline.
 model: Vanessa Goodman, Kate Franklin
 photos: Cheryl Niamath
SIZE
XS[S, M, L, 1X, 2X, 3X]
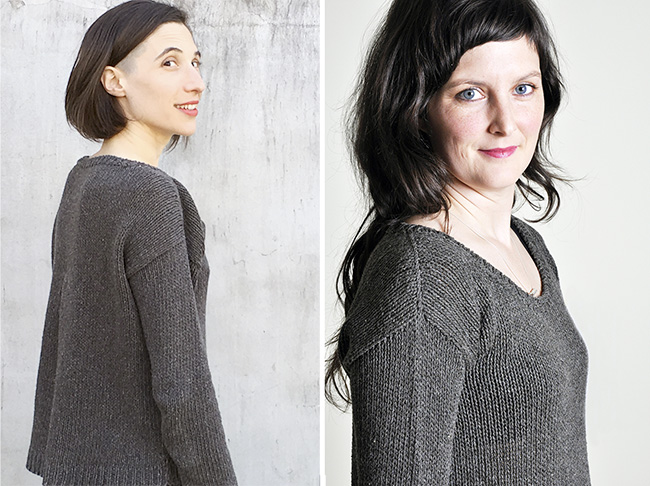
shown in size S with 9.5 inches of ease on Vanessa (above) and 6.5 inches of ease on Kate (below)FINISHED MEASUREMENTS
Bust and hip: 37.75[40, 44.5, 48, 52.5, 56, 60.5] inches/96[101.5, 113, 122, 133.5, 142, 153.5] cm
Length: 20.5[22, 23.5, 25, 26.5, 28, 29.5] inches/52[56, 59.5, 63.5, 67.5, 71.5, 75] cm
Note: This sweater looks best with at least 4 inches of positive ease.
MATERIALS
Yarn
![]() Shibui Heichi [100% silk, 105 yd/96 m per 50g skein]; color: Tar; 8[9, 9, 10, 10, 11, 12] skeins.
Shibui Heichi [100% silk, 105 yd/96 m per 50g skein]; color: Tar; 8[9, 9, 10, 10, 11, 12] skeins.
Note: This yarn is unfortunately discontinued.
A nice alternative would be Spud & Chloe Sweater [55% wool/45% organic cotton; 160 yd/146m per 100g skein]; 6[6, 7, 7, 7, 8, 8] skeins.
Recommended needle size
[always use a needle size that gives you the gauge listed below - every knitter's gauge is unique]
![]() 1 set US #9/5.5mm needles for working flat, or size needed to obtain gauge
1 set US #9/5.5mm needles for working flat, or size needed to obtain gauge
![]() 1 set US #8/5mm needles for working flat
1 set US #8/5mm needles for working flat
![]() 1 set US #9/5.5 mm preferred needles for small circumferences in the round, or size needed to obtain gauge
1 set US #9/5.5 mm preferred needles for small circumferences in the round, or size needed to obtain gauge
![]() 1 set US #8/5mm preferred needles for small circumferences in the round
1 set US #8/5mm preferred needles for small circumferences in the round
Notions
![]() stitch markers
stitch markers
![]() tapestry and sewing needles
tapestry and sewing needles
![]() dressmaker’s pins
dressmaker’s pins
![]() yarn needle
yarn needle
GAUGE
14 st/23 rows = 4 inches in stockinette stitch on larger needles
PATTERN NOTES
[Knitty's list of standard abbreviations and techniques can be found here.]
When working the Front and Back, slip the first st of each row purlwise. This will leave you with a neat selvedge and also be helpful when it's time to pick up your sleeve sts.
For shorter sleeves, work the decrease rounds closer together.
K3tog: knit three together. 2 sts decreased.
Sssk: slip the next 3 stitches, 1 by 1, knitwise; insert the tip of the left needle from left to right into the fronts of those 3 sts and knit them tog. 2 sts decreased.
1x1 ribbing:
Row 1: *K1, p1; rep to end.
Rep Row 1 for 1x1 ribbing
Welt st:
Step 1: Using one of your smaller DPNs, slip needle knitwise into the purl bump 4 rows down to pick up this stitch.
Step 2: Purl into the next st on your working needle together with the st on your DPN.
Repeat Steps 1-2 for welt st.
DIRECTIONS
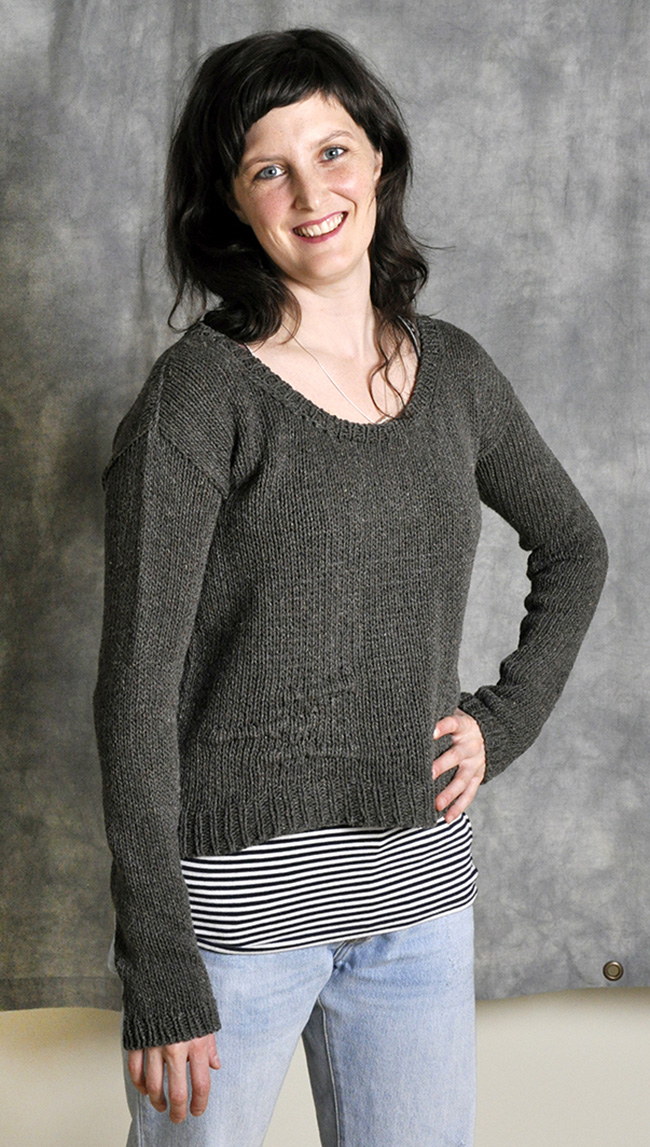
Front
Using smaller needles, CO 66[70, 78, 84, 92, 98, 106] sts using the tubular CO method.
Work 2 inches/5 cm in 1x1 ribbing. Switch to larger needles and work 7 rows in St st, ending with a RS row.
Next row [WS]: Sl1, p 16[16, 16, 20, 20, 24, 24] , (work 1 welt st, p1) 7 times, purl to end.
Work even for 9 rows.
Next row [WS]: Sl1, p 9[9, 9, 16, 16, 20, 20] , (work 1 welt st, p1) 6 times, purl to end.
Work even for 9 rows.
Next row [WS]: Sl1, p 18[18, 18, 22, 22, 26, 26] , (work 1 welt st, p1) 7 times, purl to end.
Work even until front measures 16[17, 18, 19, 20, 21, 22] inches/ 40.5[43, 45.5, 48.5, 51, 53.5, 56] cm from CO edge, ending with a WS row.
Shape neckline
Note: both sides of neckline are worked at the same time.
Next row [RS]: Sl1, k 26[28, 32, 35, 38, 40, 44] , join a new ball, BO 14[14, 14, 14, 16, 18, 18] sts, knit to end.
Work one row even.
Next row [RS]: Sl1, knit to last 4 sts, k3tog, k1, proceed to next set of stitches, sl1, sssk, knit to end. 2 sts decreased on each side.
Work one row even.
Rep these two rows 2[2, 2, 3, 4, 4, 5] more times. 20[22, 26, 27, 28, 30, 32] sts remain on each side.
Next row [RS]: Sl1, knit to last 4 sts, k2tog, k2, proceed to next set of sts, sl1, k1, ssk, knit to end. 1 st decreased on each side.
Work one row even.
Rep these 2 rows 5[5, 5, 6, 6, 6, 6] more times. 14[16, 20, 20, 21, 23, 25] sts remain on each side.
Work even until front measures 20.5[22, 23.5, 25, 26.5, 28, 29.5] inches/ 52[56, 60, 63.5, 67.5, 71, 75] cm from CO edge, ending with a WS row.
Shape shoulders
Left shoulder:
Short row 1 [RS]: Knit to end, turn.
Short row 2 [WS]: Purl to last 5 sts, w&t.
Short row 3: Knit to end, turn.
Short row 4: Purl to 5 sts before last wrap, w&t.
Rep Short rows 3 & 4 until 6 or fewer sts remain.
Next row [RS]: BO all sts, picking up wraps as you come to them.
Right shoulder:
Short row 1 [RS]: Knit to last 5 sts, w&t.
Short row 2 [WS]: Purl to end, turn.
Short row 3: Knit to 5 sts before last wrap, w&t.
Short row 4: Purl to end, turn.
Rep Short rows 3 & 4 until 6 or fewer sts remain.
Next row [RS]: BO, picking up wraps as you come to them.
Note: if you are omitting the short row shoulder shaping, work as follows:
Left shoulder: BO 5 sts at beg of each RS row, working the remainder of row and the WS as est, until 6 or fewer sts remain. Then BO all rem sts.
Right shoulder: BO 5 sts at beg of each WS row, working remainder of row and the RS as est, until 6 or fewer sts remain. Then BO all rem sts.
Back
Note: If you are omitting the box pleat, CO same number of sts as for Front and work until back measures 20.5[22, 23.5, 25, 26.5, 28, 29.5] inches/ 52[56, 60, 63.5, 67.5, 71, 75] cm from CO edge, ending with a WS row.
Using smaller needles, CO 78[82, 90, 96, 104, 110, 118] sts using tubular CO method.
Work 2 inches/5 cm in 1x1 ribbing to match front. Switch to larger needles and work in St st until back measures 16 inches/40.5 cm from CO edge, ending with a WS row.
Make box pleat:
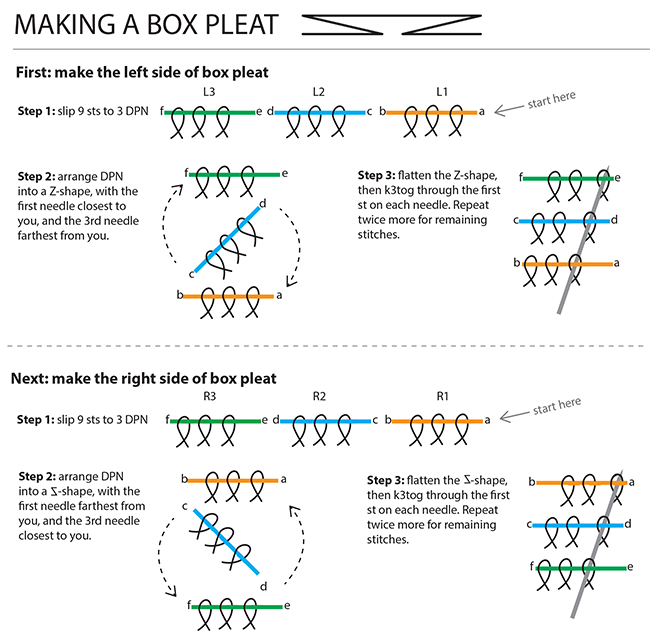
Next row [RS]: K3 0[32, 36, 39, 43, 46, 50] , work box pleat as follows: slip next 3 sts purlwise, one at a time, to a DPN. Repeat twice more, so you have 9 sts on 3 DPNs. Arrange the DPN into a Z shape, then flatten the Z shape so that your 3 DPNs are lined up together (see diagram). Knit the first st on each DPN together. Repeat twice more to finish the first half of the box pleat. Repeat for second half of box pleat, but arrange the DPNs into a reverse Z-shape before knitting sts together. Knit to end of row.
Continue in pattern until back measures 20.5[22, 23.5, 25, 26.5, 28, 29.5] inches/ 52[56, 60, 63.5, 67.5, 71, 75] cm from CO edge, ending with a WS row.
Shape shoulders & back neckline
Short row 1 [RS]: Knit to last 5 sts, w&t.
Short row 2 [WS]: Purl to last 5 sts, w&t.
Short row 3: Knit to 5 sts before wrapped st, w&t.
Short row 4: Purl to 5 sts before wrapped st, w&t.
Rep Short rows 3 & 4 until back shoulder shaping matches front shoulder shaping.
Next row [RS]: Knit to end, picking up wraps as you come to them.
On the next row, BO all sts purlwise.
Note: if you are omitting short row shoulder shaping, work stepped BO as for front.
Sleeves
Sew shoulder seams.
Place pin or removable stitch marker on each selvedge, 8[8.5, 9, 9.5, 10, 11, 12] inches/ 20.5[21.5, 23, 24, 25.5, 28, 30.5] cm down from the shoulder seams. Pin sides together.
For a custom fit: measure your upper arm (around your bicep). Divide the measurement by 2, and add 1.5 inches/4 cm (or more, if you want a looser-fitting sleeve). Measure this distance down from the shoulder seam and place marker to indicate depth of armhole.
For example: if your upper arm is 16 inches, your marker would be placed 9.5 inches/24 cm from the shoulder seam: 16/2=8 +1.5=9.5.
Sew up side seams to marker using mattress stitch.
Using larger circular needle, pick up and knit 46[50, 52, 56, 58, 62, 64] sts evenly around armhole. Pm to indicate beginning of round.
If you have customized your armhole fit, pick up and knit 1 st for every 2 rows evenly around the armhole.
Work 14 rnds in St st.
Dec rnd: K1, k2tog, knit to 3 sts before marker, ssk, k1. 2 sts decreased.
Rep Dec Rnd every 14th round 2[2, 3, 3, 3, 4, 4] more times, then every 10th round 3[4, 4, 4, 4, 4, 5] times, then every 6th round 4[4, 3, 4, 4, 5, 5] times. 26[28, 30, 32, 34, 34, 34] sts remain.
Work even until sleeve measures 16.75[18.5, 20, 21, 21, 24.5, 26.25] inches/ 42.5[47, 51, 53.5, 53.5, 62, 66.5] cm, or 1.5 inches/4 cm shorter than desired finished length.
Switch to smaller needles and work 1.5 inches/4 cm in 1x1 ribbing.
BO using tubular method.
Rep for second sleeve.
Neckline
Using longer circular needle and starting at left shoulder seam, pick up and knit an even number of sts evenly around neckline as follows: 1 st for each st in back and front necklines, 3 sts for every 4 rows along front neckline shaping. PM and join to work in the round.
Work 4 rnds in 1x1 ribbing.
BO using the tubular BO.
FINISHING
Weave in ends. Block to finished measurements.

Schematic measurements
A: 20.5[22, 23.5, 25, 26.5, 28, 29.5] inches/ 52[56, 60, 63.5, 67.5, 71, 75] cm
B: 4[4.5, 5.75, 5.75, 6, 6.5, 7.25] inches/ 10.25[11.5, 14.5, 14.5, 15, 16.5, 18.5] cm
C: 37.75[40, 44.5, 48, 52.5, 56, 60.5] inches/ 96[101.5, 113, 122, 133.5, 142, 153.5] cm
D: 8[8.5, 9, 9.5, 10, 11, 12] inches/ 20.5[21.5, 23, 24, 25.5, 28, 30.5] cm
E: 18.25[20, 21.5, 22.5, 22.5, 26, 27.75] inches/ 46.5[51, 54.5, 57, 57, 66, 69] cm
F: 7.5[8, 8.5, 9.25, 9.75, 9.75, 9.75] inches/ 19[20.5, 21.5, 23.5, 25, 25, 25] cm
ABOUT THE DESIGNER
 Cheryl lives and knits in Vancouver, Canada. Her first surprisingly popular pattern, Fetching, was published in Knitty ten years ago. Since then, her patterns have appeared in further issues of Knitty, Interweave Knits, knitscene, and other print and online publications.
Check out her website for more patterns and ideas, or find her on Ravelry as CherylN. For pattern help, please see the Fetching Knits group on Ravelry.
Pattern & images © 2016 Cheryl Niamath. Contact Cheryl