Vis-a-Vis, a free knitting pattern from Knitty.com. Free knitting pattern for a convertible moebius cowl that zips from a huge loop into a snugger double-wrap cowl. It's very cool.
INTRODUCTION
Vis-à-vis
 by You-Shan Feng
 (for the knitting)
 (for the setup)
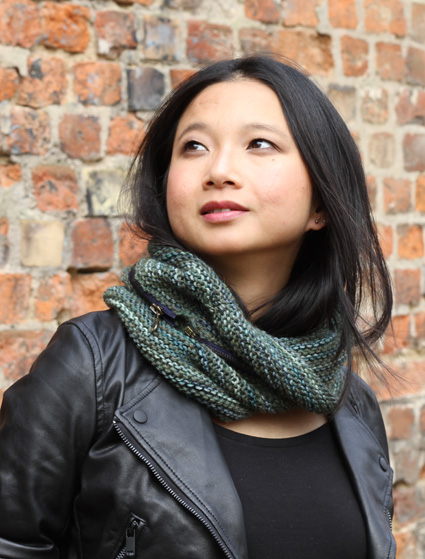
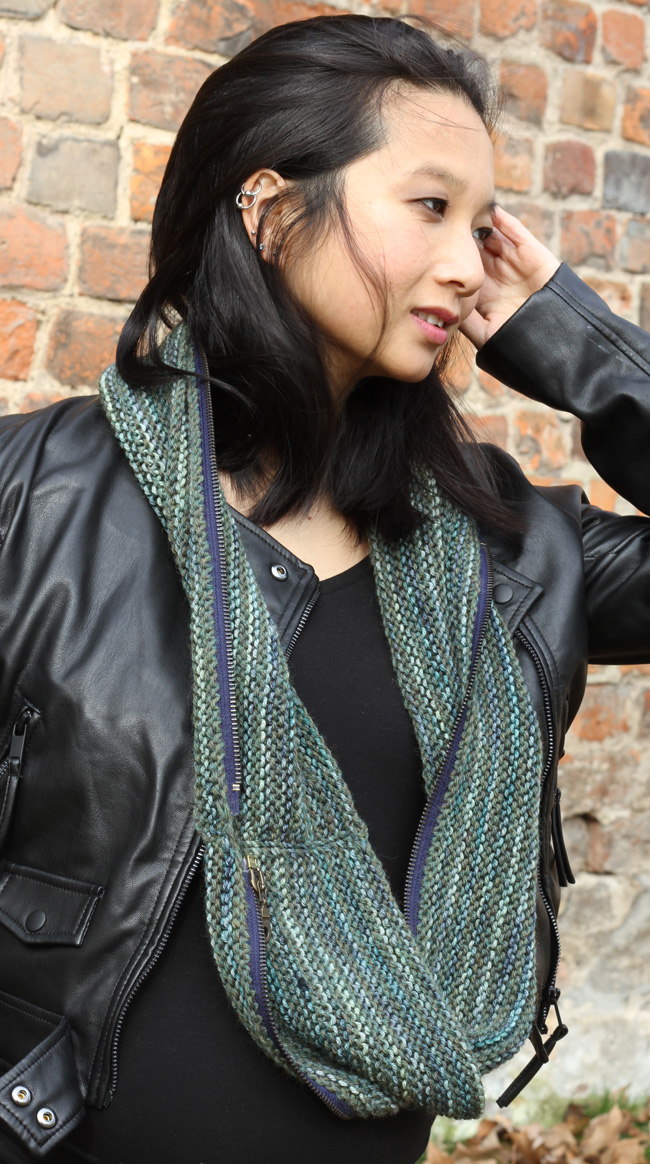
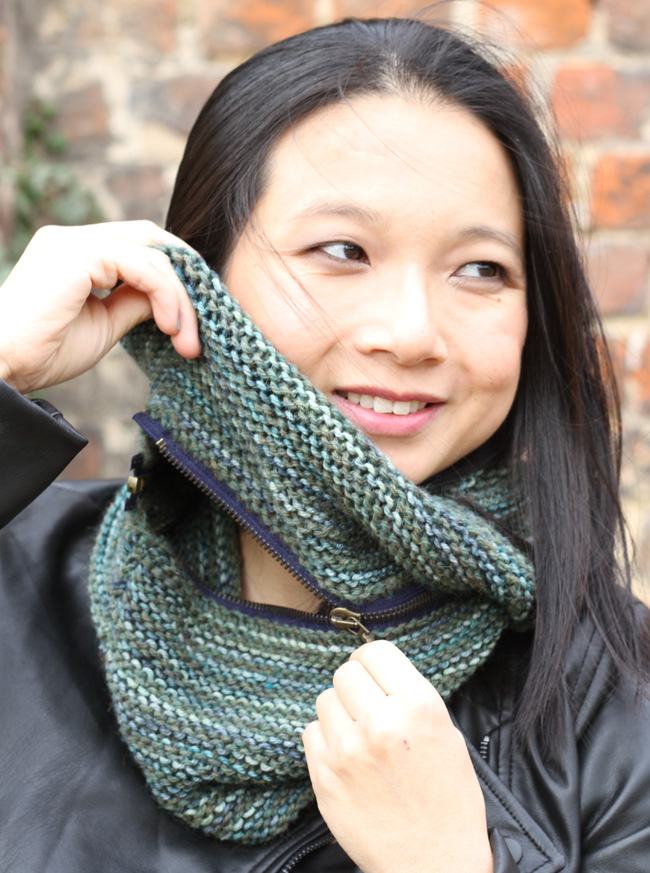
One of my favorite childhood was playing with a paper Möbius band in school. My mind was blown the first time I cut one apart lengthwise and instead of forming two loops, the Möbius band magically unwound into a longer loop with two full twists. Vis-à-vis is a tribute to the paper Möbius band: a cowl with a half twist which can be unzipped into a larger twice-twisted thinner cowl.
Seemingly simple at first glance, this cowl has a challenging cast on, is seamless and reversible with a hidden cast on edge. It is also a great transitional piece for changing seasons: keep it zipped for a squishy and thick cowl or unzip it for a warmer weathered thin cowl.
 model: You-Shan Feng
photos: Shasi Poon
SIZE
Unisex: One size, adjustable (see pattern notes)
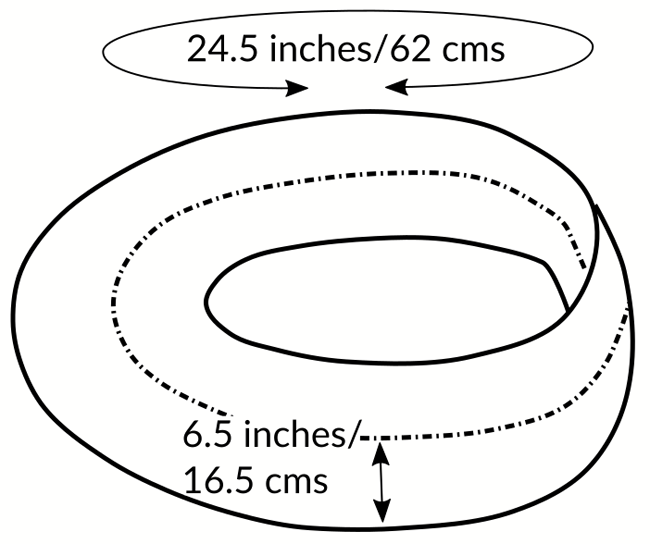
FINISHED MEASUREMENTS
Circumference: 24.5 inches/62 cm
Total Width: 14 inches/35.5 cm
MATERIALS
Yarn
![]() [MC] Malabrigo Rios [100% Pure Merino; 210yd/192m per 100g skein]; 855: Aguas; 1 skein
[MC] Malabrigo Rios [100% Pure Merino; 210yd/192m per 100g skein]; 855: Aguas; 1 skein
![]() [CC] Cascade 220 Heathers [100% wool; 220yd/201m per 100g skein]; 9338: Lichen; 1 skein
[CC] Cascade 220 Heathers [100% wool; 220yd/201m per 100g skein]; 9338: Lichen; 1 skein
Note: although the pattern is written for these two yarns, this pattern will work for a variety of yarns. See pattern notes for suggestions on choosing yarn.
Recommended needle size
[always use a needle size that gives you the gauge listed below - every knitter's gauge is unique]
![]() US #8/5mm circular needle, length 40-inch/100-cm
US #8/5mm circular needle, length 40-inch/100-cm
Notions
![]() 24-inch/60-cm separating zipper
24-inch/60-cm separating zipper
![]() fabric chalk, pencil or pen
fabric chalk, pencil or pen
![]() a ruler
a ruler
![]() sharp pointed tapestry needle with a wide eye or a "Knit Picker" for cast on (see pattern notes)
sharp pointed tapestry needle with a wide eye or a "Knit Picker" for cast on (see pattern notes)
![]() regular tapestry needle for zipper edge finishing and weaving in endsyarn needle
regular tapestry needle for zipper edge finishing and weaving in endsyarn needle
GAUGE
18 sts/24 rows = 4 inches/10cm in stockinette stitch
18 sts/32 rows (16 ridges) = 4 inches/10cm in garter stitch
PATTERN NOTES
[Knitty's list of standard abbreviations and techniques can be found here.]
Yarn notes:
The cowl can be knitted using yarn(s) from DK to aran weight (if the yarn is thinner or thicker than this range, the cast on will be difficult). I suggest choosing a squishy and elastic yarn for the best results.
A longer zipper can also be used to create a larger cowl but do not use one shorter than 24 inches/60 cm as the cowl needs to fit over the head.
Choosing different yarns and/or zipper would change your needle size, total yarn needs and final dimensions.
Construction notes:
The cowl is worked in garter stitch in the round. Working in the conventional manner – knitting one round, purling the next, will result in a “jog” at the start of the round. If you want to avoid the look of the “jog,” try these.
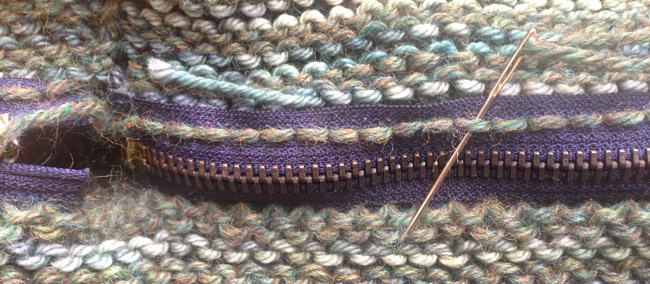
The cast on is the trickiest part of the project. Take your time making a gauge swatch and cast on evenly. For the cast on, you will need the separating zipper (zipped), MC yarn, circular needle, sharp tapestry needle and fabric chalk/marker. This video tutorial may be of assistance.
Note: if you have a “knit-picker,” you can use that to pull yarn loops through the zipper tape as detailed on Techknitter’s webpage or this Interweave video tutorial.
As not everyone has access to this tool, casting on works just as well using a sharp tapestry needle. Just make sure the eye of the needle is large enough to accommodate a double strand of your chosen yarn.
Covering zipper edge: find a tutorial here.
Sewn Bind Off instructions here.
DIRECTIONS
Lay out the zipper horizontally so that the box & pin are on the right and top stoppers are on the left. Using a ruler, mark the top zipper tape with dots according to the gauge of the yarn (i.e. 18 dots for every 4 inches/10cm). Turn the zipper over vertically so that the WS of zipper is facing up, the box & pin still on the right and zipper top on the left. Using the gauge of your yarn, again mark the top zipper tape.
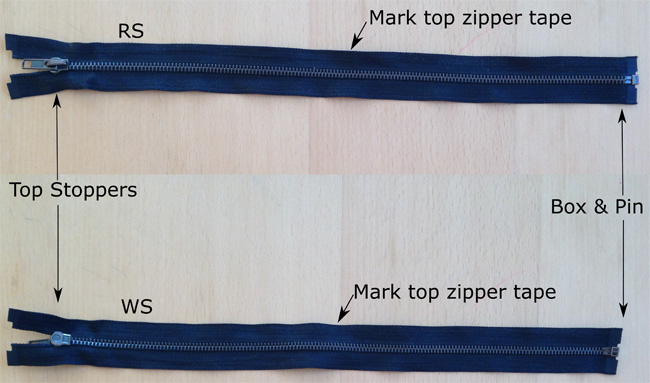
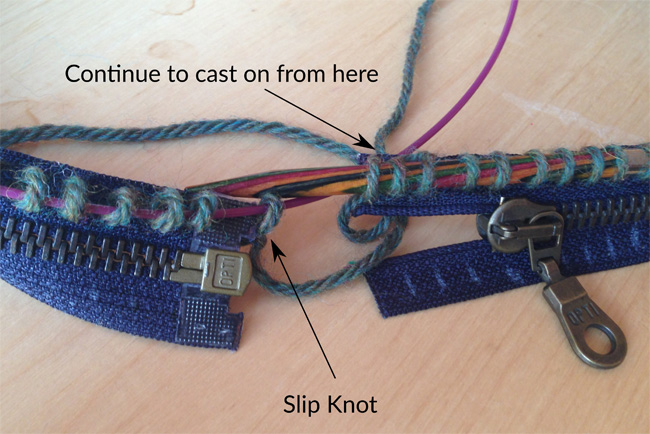
Turn the zipper again so that RS is facing. Using MC, place a slip knot onto the circular needle. With the knitting needle facing left, you will begin to cast on beginning at the zipper tape above the box & pin.
Insert the tapestry needle from back to front through the first mark from the right. Take a bit of yarn next to the slip knot, fold in half and insert through eye of the needle. Pull needle through the zipper tape, bringing the yarn loop with it.
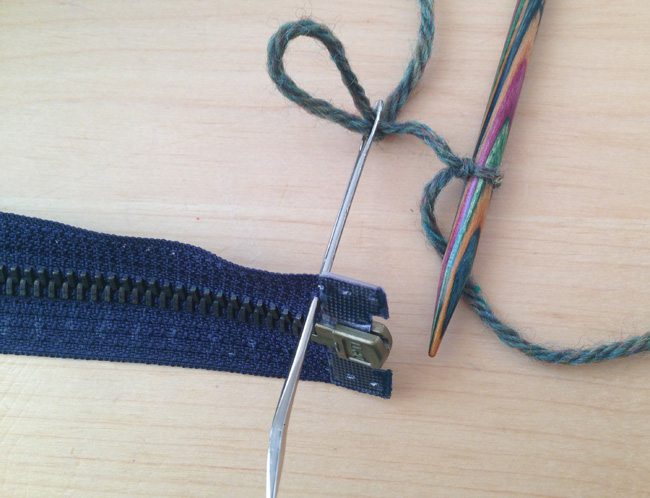

Place this loop onto the knitting needle and tug slightly to neaten – you now have the slip knot and additional stitch on the needle.
Continue to pull loops through the zipper tape using the tapestry needle and placing those loops onto the knitting needle.
On the WS you should see a row of dashes formed by the yarn.
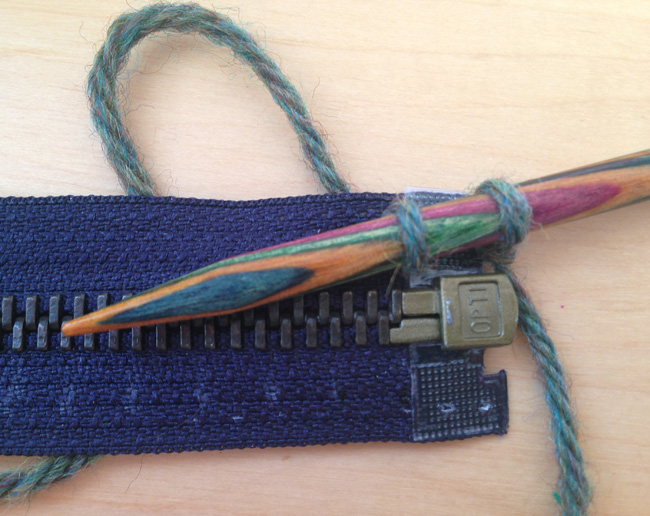
Form the Möbius band:
Rearrange the zipper into a loop so that the box & pin is next to the zipper top and RS is facing
Turn the box & pin side of the zipper so that WS is facing, giving the zipper a half twist.
You now are looking at the RS of the zipper top on the right side and the WS of the bottom on the left. 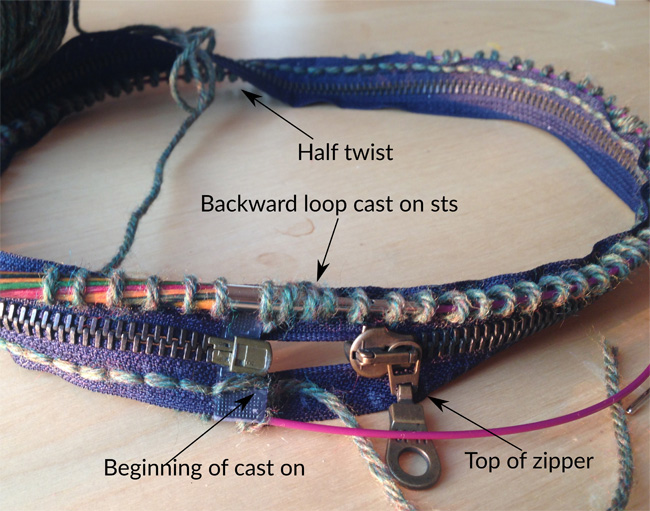
Note: it does not matter if you give the zipper a clockwise or counterclockwise twist.
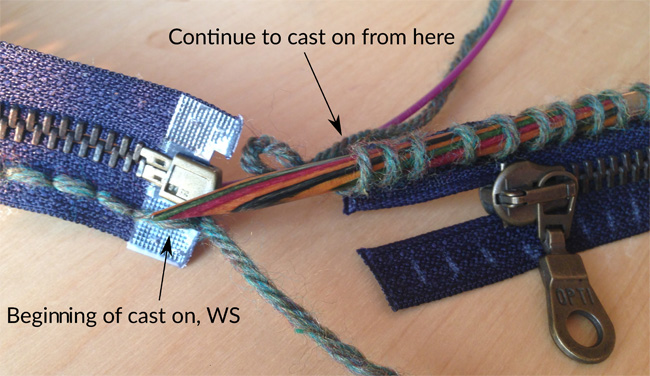
Once you reach the end of the WS zipper tape, you should again be at the place where the top and bottom of the zipper are joined. Using backward loop cast on, add 2 sts. The next stitch you work will be the first stitch of your rnd and also the original slipknot.
Place marker for start of round. You are ready to work in the round.
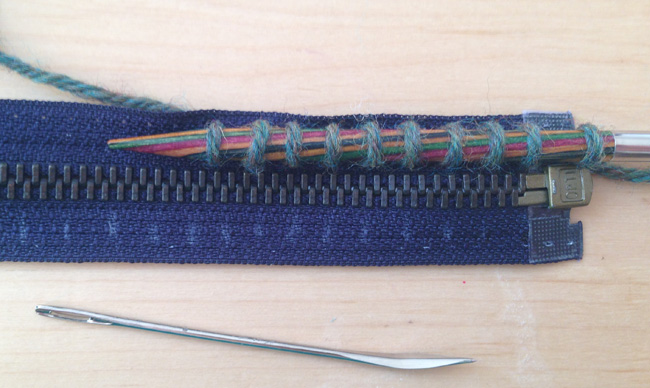
Cowl
The first round will be a bit fussy, so take your time and move sts around the cable as you need.
Set up Rnd: Purl around, making sure that you are joining, with your first st going into the slip knot.
If working with CC, attach the contrasting yarn now. Do not break MC – carry the yarn up as you work.
Rnd 1: Knit.
Rnd 2: Purl.
Switch to MC
Repeat Rnds 1-2, switching between MC and CC every 2 rnds (or how you prefer to stripe) until cowl measures 6.5 inches/16.5 cm from the cast on (the zipper), ending with a purl rnd.
Break yarn leaving a yarn tail approximately 140 inches/356 cm or three times length of the edge to be bound off. Bind off all sts using the sewn bind off.
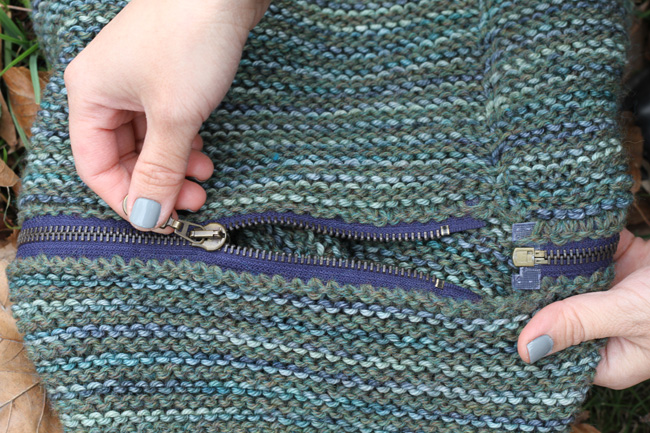
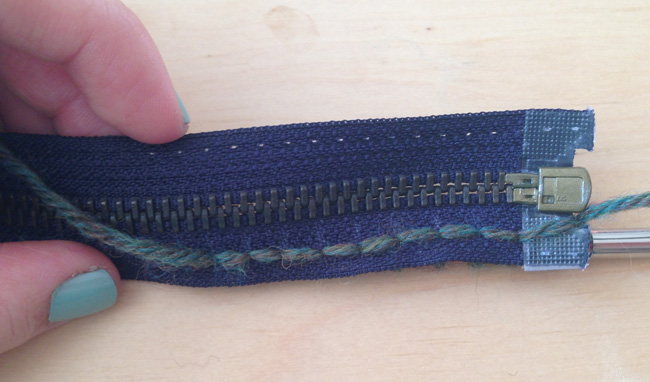
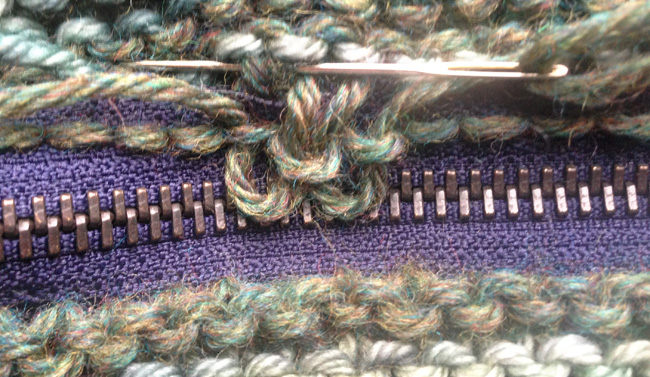
Covering the zipper edge:
Cut a length of MC yarn at least 140 inches/356 cm or three times the length of a full rnd. Thread through tapestry needle.
Orient the cowl so that the raw edge (or WS) of zipper is on top and facing (there will be dashes of MC yarn where you have cast on. Insert needle from top to bottom through one of these dashes and pull through, leaving about a 2-inch yarn tail.
Insert needle from bottom to top in the next dash on the left.
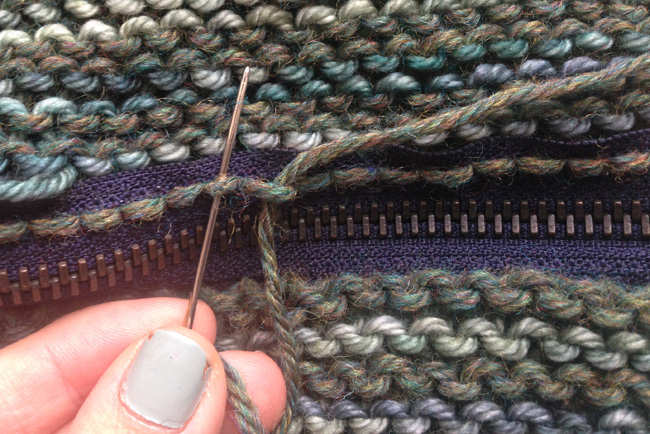
Directly above the raw zipper tape is the first garter ridge. Just beneath that ridge, find the corresponding (or directly above) “V” legs of the garter ridge. Insert needle from right to left behind both legs of the “V” and pull through.
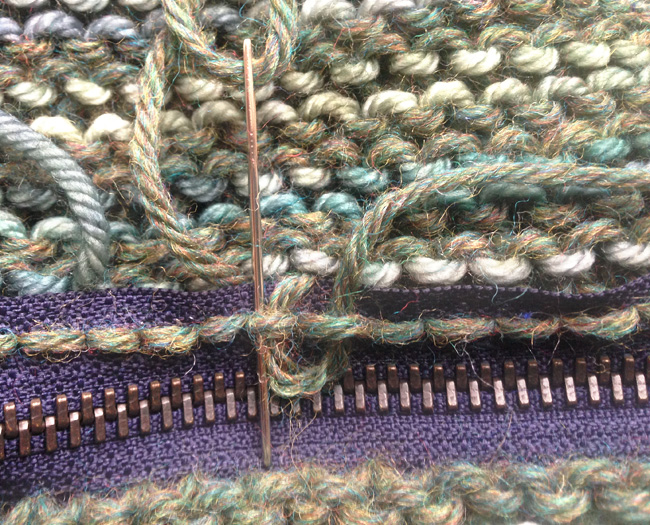
Insert needle top to bottom through the last dash stitch the yarn went through.
Then insert needle from bottom to top of the next dash stitch on the left.
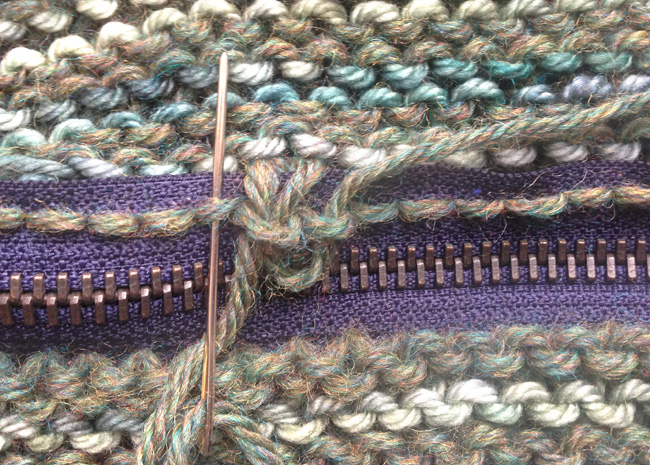
Insert needle from right to left of the next “V” legs of the garter above.
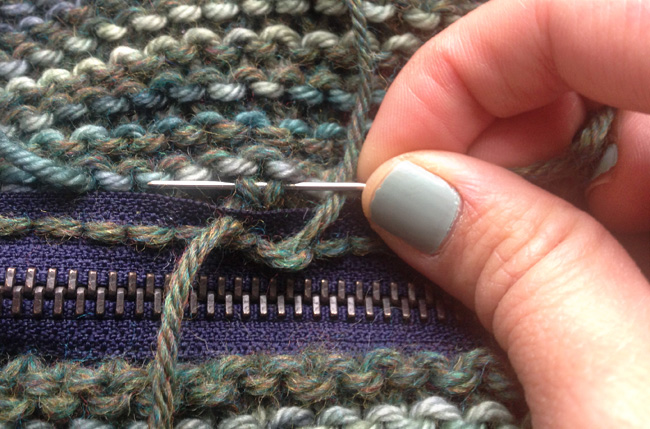
Pull yarn through and tighten a bit but not too tightly. The tension should match the rest of the cowl.
A garter ridge that hides the zipper edge should form.

Continue until all the raw zipper tape has been hidden.
FINISHING
Gently block, and weave in all ends.
Unzipping the cowl is easy but it is a bit trickier to zip it up again. You will need to practice matching up the zipper box & pin and making sure there is one twist on either side to successfully zip the cowl back together.
ABOUT THE DESIGNER
 You-Shan lives, works and plays in Greifswald, Germany, where her yarn stash will soon consume the Baltic Sea like The Blob.
You can find her on Ravelry here.
Pattern & images © 2017 You-Shan Feng. Contact You-Shan