Square Jester Hat/Fool for All Seasons, a free knitting pattern from Knitty.com. Free knitting pattern for a square/round colorwork hat with colorwork pomballs.
INTRODUCTION
Fool for All Seasons

![]()
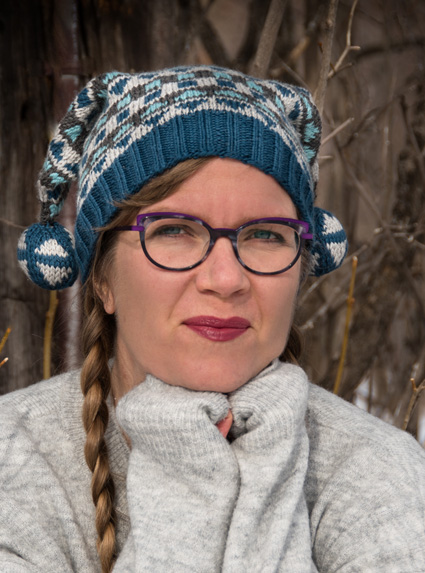
There's something about a stiff wind and cool temps that seems to bring out the sass in many prairie dwellers. If the weather is going to be grim, we aren't. Sometimes it seems that the colder it gets, the wackier the hats become. This hat comes from this urge to turn silly when the weather turns serious.
The project is quite easy. The colourwork is simple and the top needs no shaping. The pomballs provide all the tanginess you'll need - just two little sizzles of something a little different.
I'd love to see a whole family decked out in these hats for holiday photos!
 model: Sarah Schira
 photos: Sandra Schira
SIZE
Newborn[Baby, Toddler/Preschooler, Adult Small, Adult Medium, Adult Large]
FINISHED MEASUREMENTS
Circumference: 12[14, 16, 18, 20, 22] inches/ 30[35, 40, 45, 51, 56] cm
Depth: 6[6.75, 7.5, 8.75, 9.75, 10.75] inches/ 15[17, 19, 22, 25, 27] cm
Choose a size with at least 2"/5cm of negative ease in the adult sizes, a little less for the kids' sizes.
MATERIALS
Cascade Yarns 220 Superwash Sport [100% Merino; 136 yd/ 136 m per 50g skein];
![]() [C1] 1946 Silver Grey; 1 skein
[C1] 1946 Silver Grey; 1 skein
![]() [C2] 900 Charcoal; 1 skein
[C2] 900 Charcoal; 1 skein
![]() [C3] 1910 Summer Sky Heather; 1 skein
[C3] 1910 Summer Sky Heather; 1 skein
![]() [C4 ]239 Majolica Blue; 1 skein
[C4 ]239 Majolica Blue; 1 skein
Approximate Yardage:
![]() [C1] 28[35, 46, 55, 70, 91] yd/ 26[32, 43, 51, 65, 84] m
[C1] 28[35, 46, 55, 70, 91] yd/ 26[32, 43, 51, 65, 84] m
![]() [C2] 31[39, 51, 61, 78, 102] yd/ 29[36, 47, 56, 72, 93] m
[C2] 31[39, 51, 61, 78, 102] yd/ 29[36, 47, 56, 72, 93] m
![]() [C3] 15[19, 25, 29, 37, 48] yd/ 14[18, 23, 27, 34, 44] m
[C3] 15[19, 25, 29, 37, 48] yd/ 14[18, 23, 27, 34, 44] m
![]() [C4] 24[30, 39, 47, 60, 78] yd/ 22[28, 36, 43, 46, 72] m
[C4] 24[30, 39, 47, 60, 78] yd/ 22[28, 36, 43, 46, 72] m
For working the first two sizes
[always use a needle size that gives you the gauge listed below - every knitter's gauge is unique]
![]() US #2/2.75mm needles for small circumference in the round: DPNs, 1 long or 2 shorter circulars
US #2/2.75mm needles for small circumference in the round: DPNs, 1 long or 2 shorter circulars
![]() US #4/3.5mm needles for small circumference in the round: DPNs, 1 long or 2 shorter circulars
US #4/3.5mm needles for small circumference in the round: DPNs, 1 long or 2 shorter circulars
For working all other sizes
[always use a needle size that gives you the gauge listed below - every knitter's gauge is unique]
![]() US #2/2.75mm needles for small circumference in the round: DPNs, 1 long or 2 shorter circulars
US #2/2.75mm needles for small circumference in the round: DPNs, 1 long or 2 shorter circulars
![]() US #2/2.75mm 16 inch circular needle
US #2/2.75mm 16 inch circular needle
![]() US #4/3.5mm 16 inch circular needle
US #4/3.5mm 16 inch circular needle
Notions
![]() yarn needle
yarn needle
![]() stitch marker
stitch marker
![]() small amount of stuffing
small amount of stuffing
GAUGE
24 sts/32 rounds = 4 inches/10cm stockinette in the round using larger needles
24 sts/32 rounds = 4 inches/10cm stranded colourwork in the round using larger needles, after blocking
PATTERN NOTES
[Knitty's list of standard abbreviations and techniques can be found here.]
As written, the newborn and baby sizes are not slouchy. As a mother, I didn't like worrying about how the bulk of a hat felt in a car seat. It's easy to add length should you desire.
CDD: Slip 2 sts together (as if to k2tog), k1, pass 2 slipped sts over st just knit.
Technique:
- Stranded colorwork (Fair Isle) photo tutorial | video tutorial
CHARTS

DIRECTIONS
Using smaller needles (small circumference needle for first two sizes, circular for larger sizes) and C4, cast on 72[84, 96, 108, 120, 132] sts. Join to work in the round and place a beginning of round marker, being careful not to twist your work.
Brim
Ribbing round: [K2, p2] around
Work ribbing as set until piece measures 1[1, 1.5, 1.5, 1.5, 1.5] inches/ 2.5[2.5, 4, 4, 4, 4] cm from the cast-on edge.
Body
Switch to larger needles (small circumference needles for first two sizes, circular for larger sizes) and knit one round.
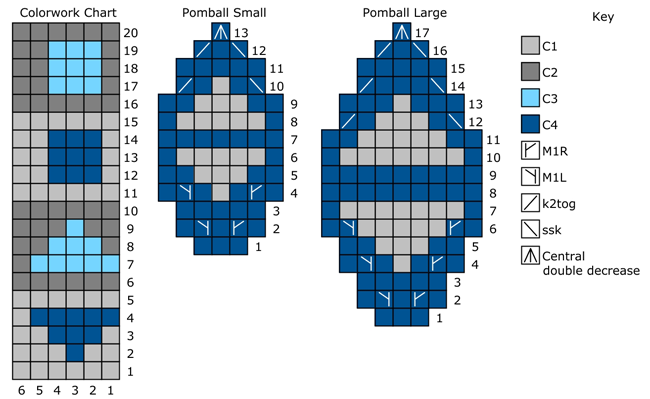
Next round: Work Colorwork chart around.
Work full chart 2[2, 2, 2, 3, 3] times, and work –[rounds 1-5, rounds 1-10, rounds 1-15, -, rounds 1-10] again.
Setup for closure:
Remove BOR marker. Using the background colour of the band you have just finished, k 18[21, 24, 27, 30, 33] .
Redistribute the stitches so that half are on one needle and the other half are on a second needle – 36[42, 48, 54, 60, 66] sts on each. With RS facing, work a three-needle bind off. This will create a decorative ridge along the top of the hat.
Pomball (Make 2)
Note: Use Pomball Small chart for first three sizes, use Pomball Large chart for the rest.
With C4 and smaller needles for small circumference in the round, cast on 6 sts.
Row 1 (RS): Without joining to work in the round, kfb across. 12 sts.
Distribute sts across needles as you prefer and join for working in the round.
Using the chart, work pomball, remembering to keep floats loose around the ‘corners' between the needles.
If working Small chart, stop after round 9 to stuff the pomball 3/4 full.
If working Large chart, stop after round 13, to stuff the pomball 3/4 full.
After final round, finish stuffing pomball.
Break yarn, leaving a 12-inch/30-cm tail and thread onto yarn needle. Pull through remaining sts and then plunge the needle straight down through the centre of the ball and come out through the middle of the other end, where the cast-on end waits.
FINISHING
Attaching the Pomball
Using yarn needle, bring each end of one ball through a top corner of the hat. Knot them together and then weave in one, leaving the other to finish attaching the ball. Thread that one on needle and bring it through the corner. Then insert the needle through the bottom of the pomball, catching a bit of the fabric, and back into the hat. Repeat one more time and weave in end.
Repeat on the other corner with the second pomball.
Weave in ends. Soak and block (don't worry about the pomballs - just wash them like normal knitting and pat them into shape). Wear with sassy defiance that no weather will drag you down.
ABOUT THE DESIGNER
 Sarah loves to make casually sophisticated accessories for staying stylishly warm on the Canadian prairies. She is the coldest person she knows, but her whole family is also knitworthy in a cold landscape, so she faces an eternal struggle between gift knitting and keeping herself toasty warm.
Pattern & images © 2018 Sarah Schira.