Disco Blocks, a free knitting pattern from Knitty.com. Free knitting pattern for a pair of top-down socks with intarsia blocks of color .
INTRODUCTION
Don't You Want Me
 by Winwick Mum

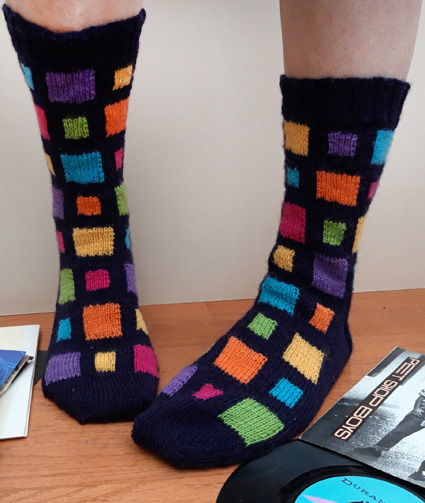
Step back into the 1980s – flashing lights, flashing dance floors, crazy clothes to match crazy hair-styles... ah, you can almost smell the nostalgia! These fun top-down intarsia socks are perfect for using up leftovers as well as any self-striping yarns that have long enough color sections to complete full blocks.
The socks are worked in the round using the intarsia technique. Each round is either knitted or purled and then a wrap and turn is used at the join to turn the work around to knit or purl back the other way. This means that the intarsia blocks can be worked without needing to carry the yarn across the colours.
![]() photos: Christine Perry
photos: Christine Perry
SIZE
Adult S[M, L]
FINISHED MEASUREMENTS
Foot/leg circumference: 8[8.5, 9] inches/ 20.5[22, 23] cm
Note: Choose a size approximately .5 inch/1 cm smaller than your actual foot circumference
MATERIALS
Yarn
![]() [MC]Opal Uni 4 ply [75% wool, 25% polyamide; 425m per 100g skein]; color: Navy Blue; 1 skein
[MC]Opal Uni 4 ply [75% wool, 25% polyamide; 425m per 100g skein]; color: Navy Blue; 1 skein
![]() [CC]West Yorkshire Spinners [75% wool, 25% polyamide; 400m per 100g skein]; color: Rum Paradise; 1 skein
[CC]West Yorkshire Spinners [75% wool, 25% polyamide; 400m per 100g skein]; color: Rum Paradise; 1 skein
Note: Leftovers or mini skeins of an appropriate yarn weight may be used. See Pattern Notes for details on the CC yarn and making substitutions.
Recommended needle size
[always use a needle size that gives you the gauge listed below - every knitter's gauge is unique]
![]() US #1.5/2.5mm needles for small circumference in the round: DPNs, 1 long or 2 short circulars as you prefer
US #1.5/2.5mm needles for small circumference in the round: DPNs, 1 long or 2 short circulars as you prefer
Notions
![]() stitch holder (optional)
stitch holder (optional)
![]() stitch markers
stitch markers
![]() yarn needle
yarn needle
GAUGE
30 sts/42 rounds = 4 inches/10 cm in stockinette stitch
PATTERN NOTES
[Knitty's list of standard abbreviations and techniques can be found here.]
The CC yarn suggested is a striped yarn and the pictured socks used one stripe section for each of the colored boxes. It is easiest to cut the yarn into the colored sections. The length of the stripe section is approximately 2.75m/108 inches and one stripe section is more than enough for both large and small colored boxes. You could use sock yarn leftovers to achieve the same effect.
P2togtbl: Purl the next two stitches together by putting your right hand needle through the stitches from left to right at the back of the left hand needle. As an alternative, you can use knitting expert Barbara Walker's method of purling the next stitch on the left hand needle, slipping the purled stitch back onto the left hand needle and slipping the second stitch on the left hand needle over the purled stitch can be used instead.
Techniques:
- Intarsia in the Round – Working the Charts
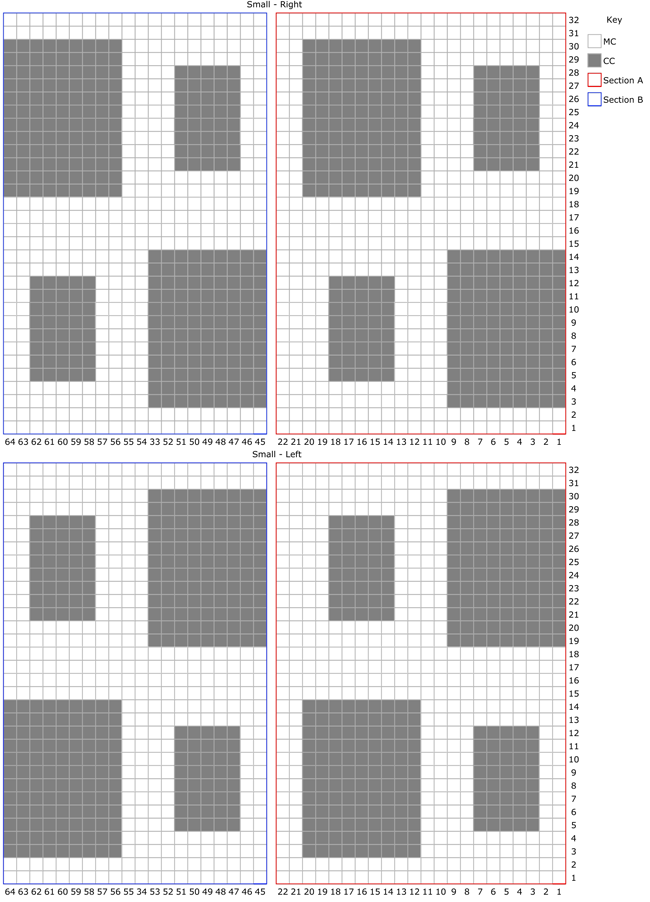
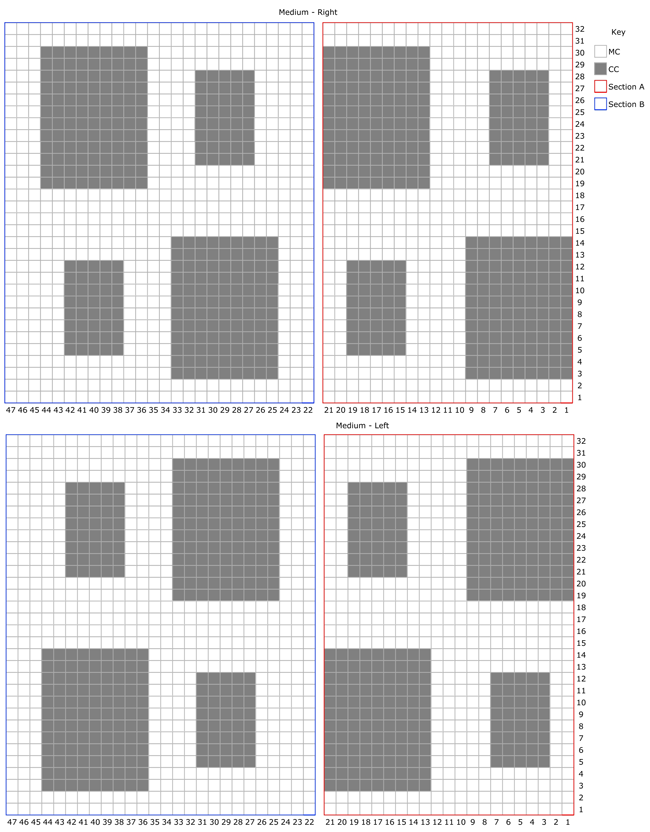
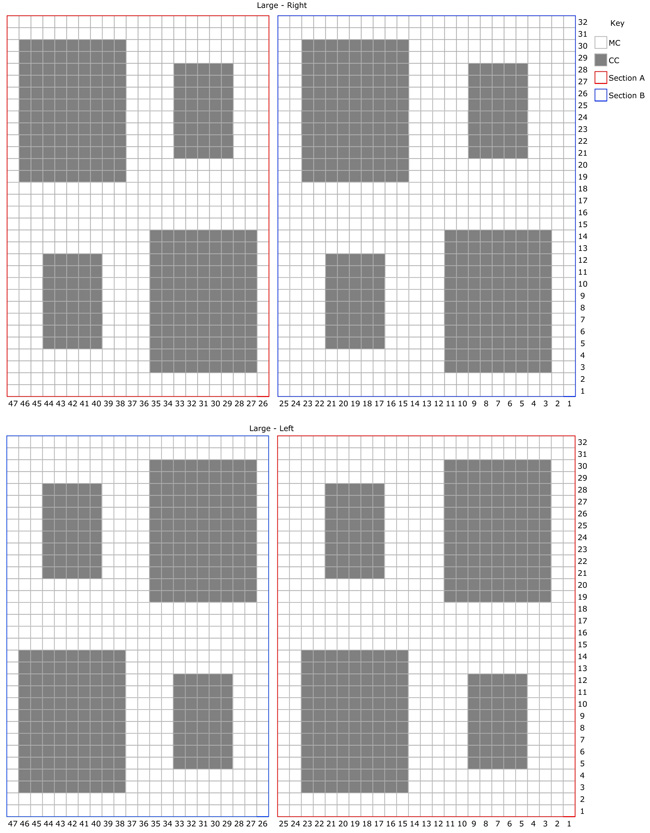
Intarsia in the round is worked back and forth – first knit all the way across, work a short-row wrap and turn, and then purl all the way back, once again working a wrap and turn at the end of the round. You will read the color chart from right to left on knit rounds and left to right on purl rounds.
Join the yarn for the new colors as you come to them and weave the ends in as you go. I found it easiest to work with long lengths of yarn rather than whole balls as the yarns will tangle. You will need a new length of the main color for each section of that color, in addition to the color for the block. Remember to twist the yarns when you change color to prevent holes in the fabric.
- Kitchener Stitch/Grafting: tutorials here and here
CHARTS
DIRECTIONS
Using your preferred method, CO 64[68, 72] sts, distribute sts across needles as you prefer for join for working in the round.
Ribbing rnd: [K2, p2] around. Work ribbing as set for 16 rnds total.
Leg
Begin chart for appropriate size and appropriate sock (Left or Right), and work using Intarsia in the Round technique, as follows:
Size S – Left Leg only: Work Left Leg Small chart Section A (sts 1-22) twice, then work Left Leg Small Section B (sts 45-64).
Size S – Right Leg only: Work Right Leg Small chart Section A (sts 1-22) twice, then work Right Leg Small Section B (sts 45-64).
Size M – Left Leg only: Work Left Leg Medium chart Section A (sts 1-21), work Left Leg Medium chart Section B (sts 22-47), then repeat Section A (sts 48-68).
Size M – Right Leg only: Work Right Leg Medium chart Section A (sts 1-21), work Right Leg Medium Section B (sts 22-47), then repeat Section A (sts 48-68).
Size L – Left Leg only: Work Left Leg Large chart Section A (sts 1-25), work Left Leg Large chart Section B (sts 26-47), then repeat Section A (sts 48-72).
Size L – Right Leg only: Work Right Leg Large Section A (sts 1-25), work Right Leg Large Section B (sts 26-47), then repeat Section A (sts 48-72).
All sizes: Repeat Rows 1-32 for chosen size as above until leg is desired length to start of heel.
Heel Flap
Work Heel Flap and Turn only with MC using yarn from main ball.
Right Sock: Heel starts at start of round.
Left Sock: To setup, work 32[34, 36] sts in pattern, and start Heel at this point.
Note: For both socks make note of last chart row worked, so you can continue on the instep.
Row 1 [RS]: K 32[34, 36] , turn. Rem sts are held for instep.
Row 2 [WS]: P 32[34, 36] , turn.
Row 3: K2, (sl1, k1) 15[16, 17] times, turn.
Row 4: Sl1, p 31[33, 35] , turn.
Row 5: (Sl1, k1) 16[17, 18] times to end, turn.
Repeat Rows 4-5 until you have worked 32[34, 36] rows total, or heel flap measures desired length, ending with a RS row.
Turn heel:
Using MC, turn heel as follows:
Row 1 [WS]: Sl1, p 17[18, 19] , p2tog, p1, turn.
Row 2 [RS]: Sl1, k5, ssk, k1, turn.
Row 3: Sl1, p6, p2tog, p1, turn.
Row 4: Sl1, k7, ssk, k1, turn.
Row 5: Sl1 p8, p2tog, p1, turn.
Row 6: Sl1, k9, ssk, k1, turn.
Row 7: Sl1, p10, p2tog, p1, turn.
Row 8: Sl1, k11, ssk, k1, turn.
Row 9: Sl1, p12, p2tog, p1, turn
Row 10: Sl1, k13, ssk, k1, turn.
Row 11: Sl1, p14, p2tog, p1, turn.
Row 12: Sl1, k15, ssk, k1, turn.
Size S only:
Row 13: Sl1, p16, p2tog, turn.
Row 14: Sl1, k16, ssk. 18 sts.
Size M only:
Row 13: Sl1, p16, p2tog, p1, turn.
Row 14: Sl1, k17, ssk, k1. 20 sts.
Size L only:
Row 13: Sl1, p16, p2tog, p1, turn.
Row 14: Sl1, k17, ssk, k1, turn.
Row 15: Sl1, p18, p2tog, turn.
Row 16: Sl1, k18, ssk. 20 sts.
The working yarn should be at the left hand side of your heel turn as you hold your sock with the outside of the heel flap facing you.
Gusset
Note: For the right sock, you’ll work the instep stitches in patt according to sts x of the chart. For the left sock, you’ll work the instep stitches in patt according to sts x of the chart.
Note: The sole sts are worked with the same ball of MC, the yarn you used to work the heel. The other MC sections – the sts between the start of instep and the first block, those between the last block and the end of instep, those between blocks on the instep, will be worked with their own lengths of MC as before.
Gusset setup rnd: Using the MC you used to work the heel, pick up and knit 1 stitch for every 2 rows knitted along the first side of your heel flap. Change MC yarn – use either the yarn that was leftover on the instep if it’s at the correct end, or join a new length. Using this new MC, work across instep sts in patt as set. If you find that the CC is at the wrong side of each block of color, simply bring the yarn across the back of the sock so that you can use it to knit with, and then anchor the yarn under the working yarn as you knit so that the float won’t catch on your toes as you put your sock on. Then pick up and knit the same number of stitches along the second side of the heel flap using the working yarn from the instep. K to 3 sts before instep, k2tog, k1, w&t.
The new start of round is at the start of the instep.
Shape gusset
Rnd 1: Pick up the sole yarn, purl across sole to 3 sts before instep, p2togtbl, p1, drop sole yarn; continue across instep in patt as set, w&t.
Rnd 2: Work in patt across instep, pick up the sole yarn, k to 3 sts before instep, k2tog, k1, w&t.
Rnd 3: Purl across sole to 3 sts before instep, p2togtbl, p1; drop the sole yarn and continue across instep in patt as set, w&t.
Repeat Rnds 2-3 until 64[68, 72] stitches rem.
Foot
Work even in patt as set until sock is 1.75[1.75, 2] inches/ 4.5[4.5, 5] cm short of desired finished length.
As you work the foot, keep track of the chart patterns. You need 3 inches/7.5 cm for a full repeat of the chart, 1.5 inches/3.75 cm for half a repeat of the chart and 1.75[1.75, 2] inches/ 4.5[4.5, 5] cm for the toe, so make sure that you don’t start a new chart repeat if there’s less than 4.75[4.75, 5] inches/ 12[12, 12.5] cm left for a full repeat or 3.25[3.25, 3.5] inches/ 8.25[8.25, 8.75] cm for half a repeat.
Toe
The toe is worked in the round, the chart pattern is discontinued.
Rnd 1:K1, ssk, k to 3 sts before end of instep, k2tog, k2, ssk, k to 3 sts before end of rnd, k2tog, k1. 4 sts decreased.
Rnd 2: Knit.
Repeat Rnd 1-2 until 28[32, 32] sts rem.
Using Kitchener stitch, graft toes closed.
FINISHING
Weave in ends and block. Blocking can be done either by soaking the socks in warm water and an appropriate wool wash, rolling in a towel to remove excess water and then putting onto a sock blocking form and drying away from direct heat; alternatively, they can be pressed carefully into shape using an iron and a damp tea towel, although care must be taken not to press too hard with the iron.
ABOUT THE DESIGNER
 Christine Perry is the writer and designer behind the award-winning blog Winwick Mum, and the Winwick Mum Sockalong beginner sock knitting tutorials. She has written two books, Super Socks and More Super Socks and also writes a regular column for Simply Knitting magazine. Christine has recently collaborated with West Yorkshire Spinners on a brand new Winwick Mum Collection of Signature 4ply yarn.
Find her on Ravelry.
Pattern & images © 2019 Winwick Mum.