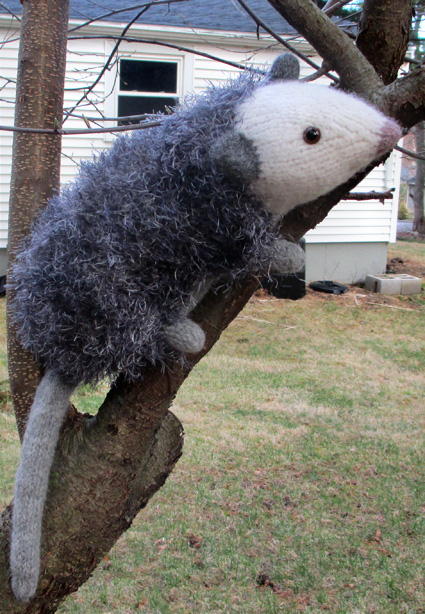
Ozzie the Opossum, a free knitting pattern from Knitty.com. Free knitting pattern for a felted fuzzy Opossum toy.
INTRODUCTION
Ozzie the Opossum
 by Frances Gillespie

Ozzie is a knitted and felted opossum. Many people see novelty yarn and think "Scarf!" I see it and think "Critter!" To me, Fun Fur is an opossum just waiting to be knit.
The twist to this design is that wool yarn and novelty yarn are held together while knitting, then felted: the wool shrinks but the novelty yarn does not, forming a continuous furry coat without visible stitches.
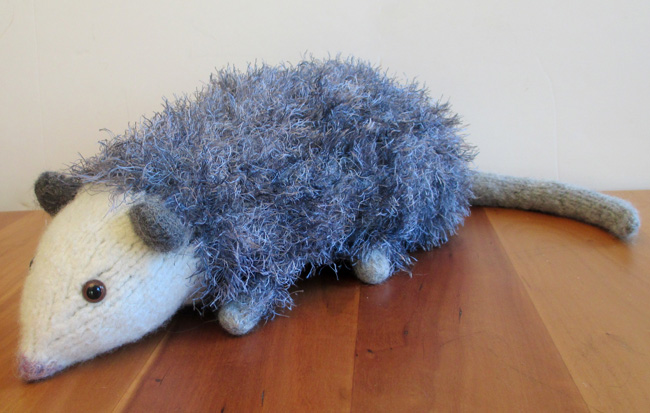
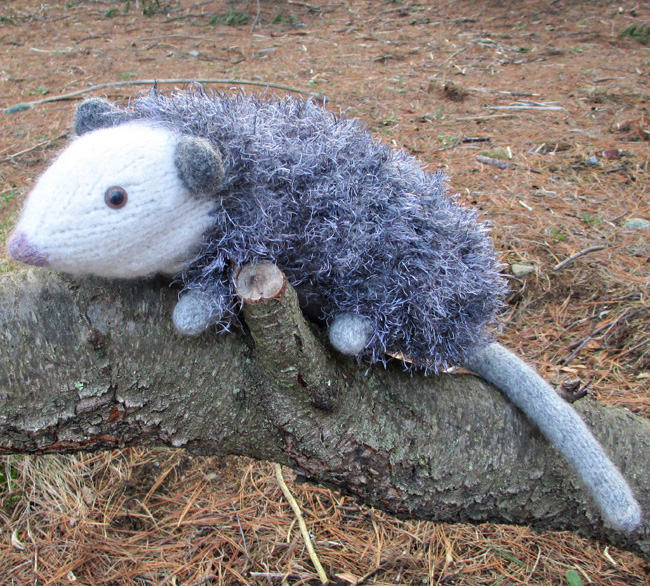
![]() photos: Frances Gillespie
photos: Frances Gillespie
SIZE
One
FINISHED MEASUREMENTS
Approximately 15 inches/38 cm long (not including his tail)
MATERIALS
Yarn
![]() [MC] Patons Classic Wool [100% wool; 210 yd/192 m per 100g skein]; color: Gray Mix; 1 skein
[MC] Patons Classic Wool [100% wool; 210 yd/192 m per 100g skein]; color: Gray Mix; 1 skein
![]() [CC1] Lion Brand Fun Fur [100% polyester; 64 yd/59 m per 50g skein]; color: Lava; 1 skein
[CC1] Lion Brand Fun Fur [100% polyester; 64 yd/59 m per 50g skein]; color: Lava; 1 skein
![]() [CC2] Patons Classic Wool [100% wool; 210 yd/192 m per 100g skein]; color: Aran; 1 skein
[CC2] Patons Classic Wool [100% wool; 210 yd/192 m per 100g skein]; color: Aran; 1 skein
![]() [CC3] Patons Classic Wool [100% wool; 210 yd/192 m per 100g skein]; color: Natural Heather; 1 skein
[CC3] Patons Classic Wool [100% wool; 210 yd/192 m per 100g skein]; color: Natural Heather; 1 skein
![]() [CC4] Patons Classic Wool [100% wool; 210 yd/192 m per 100g skein]; color: Dark Gray Mix; 1 skein
[CC4] Patons Classic Wool [100% wool; 210 yd/192 m per 100g skein]; color: Dark Gray Mix; 1 skein
Recommended needle size
[always use a needle size that gives you the gauge listed below - every knitter's gauge is unique]
![]() US #9/5.5mm needles for working flat
US #9/5.5mm needles for working flat
![]() US #9/5.5mm needles of preferred type for working small circumferences in the round
US #9/5.5mm needles of preferred type for working small circumferences in the round
Note: DPNs are recommended for ease of working small rounds, and for sections worked flat with small numbers of stitches.
Notions
![]() stitch markers
stitch markers
![]() stitch holders or short lengths of waste yarn
stitch holders or short lengths of waste yarn
![]() yarn needle
yarn needle
![]() sewing needle
sewing needle
![]() matching thread
matching thread
![]() two 12 mm brown animal safety eyes
two 12 mm brown animal safety eyes
![]() polyester fiberfill
polyester fiberfill
GAUGE
14 sts/18 rows = 4 inches/10 cm using single strand of Patons Classic Wool, before felting.
Note: Gauge is not critical but should be loose enough to allow for shrinkage after felting.
PATTERN NOTES
[Knitty's list of standard abbreviations and techniques can be found here.]
You will begin at the tail end and work towards the nose.
DIRECTIONS
UPPER BODY
Using one strand MC and one strand CC1 held together, cast on 20 sts.
Row 1 [WS]: Purl.
Row 2 [RS]: K1, kfb, k6, kfb, k2, kfb, k6, kfb, k1. 24 sts.
Rows 3, 5, 7, 9 and 11: Purl.
Row 4: K1, kfb, k3, kfb, k3, kfb, k4, kfb, k3, kfb, k3, kfb, k1. 30 sts.
Row 6: K1, kfb, k26, kfb, k1. 32 sts.
Row 8: K9, kfb, k12, kfb, k9. 34 sts.
Row 10: Knit.
Row 12: K9, kfb, k14, kfb, k9. 36 sts.
Rows 13-33: Work even in stockinette stitch.
Row 34: K5, slip these 5 sts to a holder for right back foot, knit to last 5 sts, slip these 5 sts to a second holder for left back foot. 26 sts remain.
Rows 35-42: Work even in stockinette stitch.
Rows 43, 45, 47, 49, 51, 53 and 55: Purl.
Row 44: K10, k2tog, k2, k2tog, k10. 24 sts.
Row 46: K9, k2tog, k2, k2tog, k9. 22 sts.
Row 48: K1, kfb, k7, kfb, k2, kfb, k7, kfb, k1. 26 sts.
Row 50: K1, kfb, k9, kfb, k2, kfb, k9, kfb, k1. 30 sts.
Row 52: K1, kfb, k11, kfb, k2, kfb, k11, kfb, k1. 34 sts.
Row 54: K1, kfb, k13, kfb, k2, kfb, k13, kfb, k1. 38 sts.
Cut MC and CC1 and tie off.
Continue with one strand of CC2.
Place first 5 sts and last 5 sts on stitch holders for front feet. 28 sts left on the needle.
Row 56 [RS]: *K2, kfb; rep from * to last st, k1. 37 sts.
Row 57 [WS]: P10, p5, slip these 5 sts to a holder for back of ear, p3, kfb, p8, slip the last 5 sts worked to a holder for back of second ear, p10. 28 sts.
Row 58: K10, cast on 5 sts over gap, k8, cast on 5 sts over gap, k10. 38 sts.
Rows 59-64: Work even in stockinette stitch. Mark both ends of Row 63 with a piece of yarn.
Row 65: P3, p2tog, p8, p2tog, p8, p2tog, p8, p2tog, p3. 34 sts.
Rows 66, 68, 70, 72, 74 and 76: Knit
Row 67: P4, p2tog, p6, p2tog, p6, p2tog, p6, p2tog, p4. 30 sts.
Row 69: P3, p2tog, p5, p2tog, p6, p2tog, p5, p2tog, p3. 26 sts.
Row 71: P2, p2tog, p5, p2tog, p4, p2tog, p5, p2tog, p2. 22 sts.
Row 73: P2, p2tog, p3, p2tog, p4, p2tog, p3, p2tog, p2. 18 sts.
Row 75: P1, p2tog, p3, p2tog, p2, p2tog, p3, p2tog, p1. 14 sts.
Row 77: P1, p2tog, p1, p2tog, p2, p2tog, p1, p2tog, p1. 10 sts.
Cut CC2, leave a 12 inch/30.5 cm tail for seaming. Continue with one strand of CC3.
Rows 78-80: Work even in stockinette stitch.
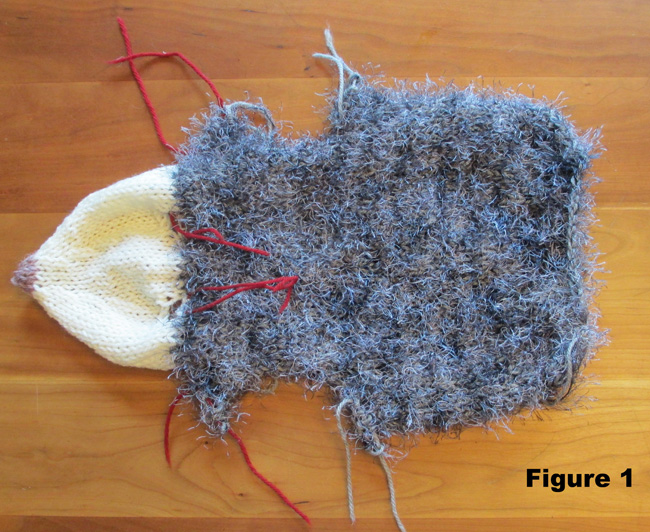
Cut yarn, leaving a 12 inch/30.5 cm tail, and pull through remaining st. This will be used to seam the two sides of nose together. The Opossum upper body will now look as in Figure 1.
LOWER BODY
Using one strand of MC cast on 12 sts.
Row 1 [WS]: Purl.
Row 2 [RS]: K1, kfb, k8, kfb, k1. 14 sts.
Rows 3 and 5: Purl.
Row 4: K1, kfb, k3, kfb, k2, kfb, k3, kfb, k1. 18 sts.
Row 6: K1, kfb, k4, kfb, k4, kfb, k4, kfb, k1. 22 sts.
Rows 7-33: Work even in stockinette stitch.
Row 34: K5, slip these 5 sts to a holder for left back foot, kfb, knit to last 6 sts, kfb, slip the last 5 sts of the row to a second holder for right back foot. 14 sts.
Rows 35-37: Work even in stockinette stitch.
Row 38: K1, kfb, k10, kfb, k1. 16 sts.
Row 40: K1, kfb, k12, kfb, k1. 18 sts.
Rows 41-55: Work even in stockinette stitch.
Row 56: K5, slip these 5 sts to a holder for left front foot, k8, slip last 5 sts of the row to a holder for right front foot. 8 sts.
Rows 57: P2tog, purl to last 2 sts, p2tog. 6 sts.
Row 58: K2tog, knit to last 2 sts, k2tog. 4 sts.
Row 59: Repeat Row 57. 2 sts.
Row 60: K2tog. 1 st.
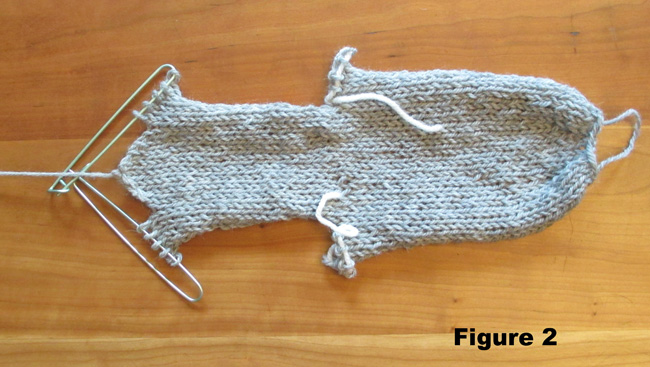
Opossum lower body will now look as in Figure 2.
Cut yarn, leaving a 24 inch/61 cm tail, and thread yarn needle. Line up the end of the lower body to the marked ends of Row 63 on Upper Body. Seam seams from this point down to foot sts on holder.
Thread a length of CC2 onto yarn needle and sew seam under chin from nose down to chest point. You are now ready to begin front feet.
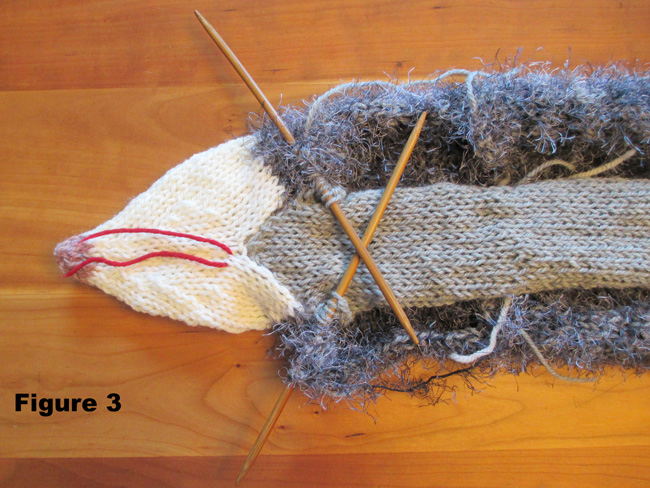
Left Front Foot
Place front foot sts from both Upper Body and Lower Body onto one needle (see Figure 3). 10 sts.
Continue in MC:
Row 1 [RS]: K4, k2tog, k4. 9 sts.
Row 2-6: Work even in stockinette stitch.
Cut yarn, leaving a 24 inch/61 cm tail. Thread onto yarn needle and pull through 9 live foot sts. Sew foot seam, then continue body side seam down to back foot sts on holders.
Right Front Foot
Repeat as for left foot, but when sewing body side seam leave a 2 inch/5 cm gap midway along the side seam on the right side – this is where the opossum will be stuffed after felting.
Back Feet
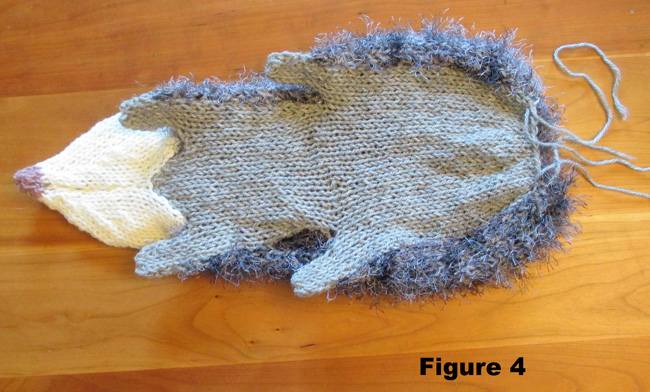
Work Back Feet as for the Front Feet. After completing them, sew the seams from back feet down to the cast on sts for the Upper and Lower Body.
Note: there will still be an opening at his rear end (see Figure 4).
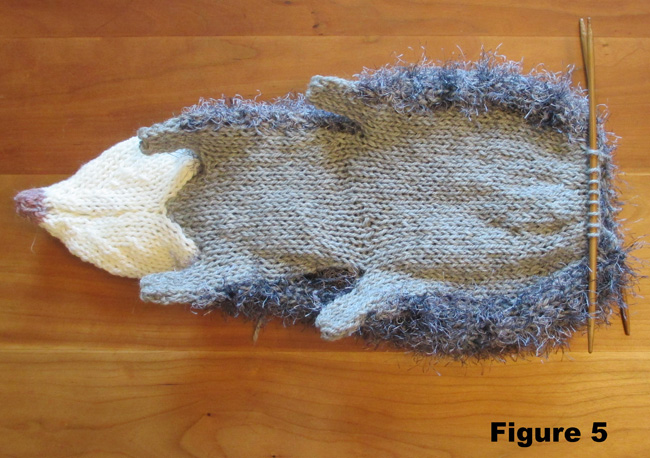
Tail
Using MC, pick up 8 sts from the cast on sts of the Lower Body, turn. With a second needle, pick up 8 sts from the cast on edge of the Upper Body (see Figure 5).
Join to work in the round:
Rounds 1-12: Knit. 16 sts.
Round 13: (K6, k2tog) twice. 14 sts.
Round 14-25: Knit.
Rounds 26: (K5, k2tog) twice. 12 sts.
Rounds 27-38: Knit.
Round 39: (K4, k2tog) twice. 10 sts.
Rounds 40-51: Knit.
Round 52: (K3, k2tog) twice. 8 sts.
Rounds 53-56: Knit.
Cut yarn, leaving a 24 inch/61 cm tail, thread on yarn needle and pull through all sts.
EARS (work two)
Work back of ear:
With the tail end of the opossum facing you, slip the 5 sts put on hold for back of ear onto needle. Attach CC4.
Row 1 [RS]: K2, kfb, k2. 6 sts.
Rows 2-5: Work even in stockinette stitch.
Row 6: P2tog, p2, p2tog. 4 sts.
Row 7: K2tog twice. 2 sts.
Cut yarn leaving 12 inch/30.5 cm tail, pull through last 2 sts and fasten off.
Work front of ear:
Holding work so nose end of opossum is facing you and with CC4, pick up 6 sts from cast on sts.
Rows 1-5: Work even in stockinette stitch.
Row 6: K2tog, k2, k2tog. 4 sts.
Row 7: P2tog twice. 2 sts.
Cut yarn, leaving 12 inch/30.5 cm tail, and pull through last 2 sts. Use this yarn to seam the back and front of ear together, then fasten off.
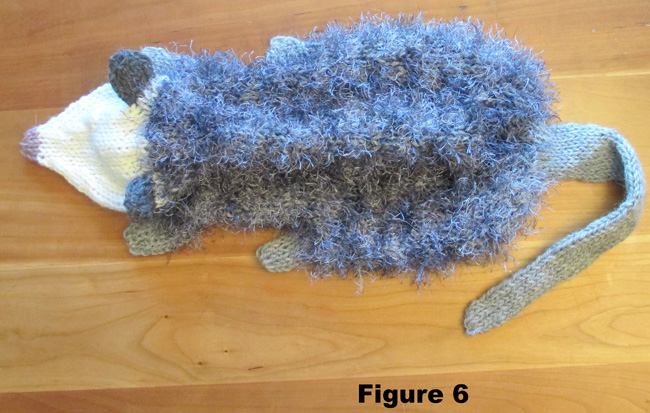
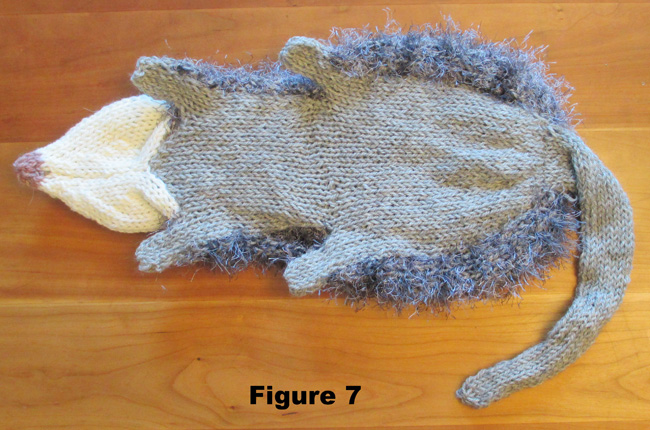
Your opossum is now knit – see Figures 6 and 7 for how the top and bottom should look.
FINISHING
Fasten off all yarn ends. Place the opossum in a mesh bag in your washing machine, set on extra small load with hot water, and add a tiny pinch of laundry detergent. Start the machine.
Check every five minutes or so until the opossum reaches the desired level of felting, being careful not to let the machine go into the spin cycle. Remove opossum from the bag, loosely stuff with newspaper and set somewhere warm to dry. When dry, remove the newspaper and attach the safety eyes, using photos as a guide for placement. Stuff firmly with polyester filling, and sew shut with matching thread. You may also need to secure any seams that did not completely close during felting with needle and thread.
ABOUT THE DESIGNER
 Frances is a longtime knitter who branched out into felting about 18 years ago. She is fascinated with the process of designing the unusual, weird, and unloved critters.
She can be contacted here or found on Ravelry.
Pattern & images © 2019 FeltedFriends.