Diplocaulus, a free knitting pattern from Knitty.com. Free knitting pattern for a DETAILS HERE.
INTRODUCTION
Delta the Diplocaulus
by Frances Gillespie

I've always preferred designing the unusual, unloved or just, well, strange. (Teddy bears and bunnies never really did it for me). Diplocaulus was a prehistoric amphibian with a wacky boomerang shaped head. Theories for this appendage are many: possibly it served as a hydrofoil for efficient swimming, enabled it to burrow into the bottom to feed or simply made it harder to be eaten.
If made for a child, Delta should be a room decoration only, until age 3 or past the 'everything in the mouth' stage.
 photos: Frances Gillespie
SIZE
One
FINISHED MEASUREMENTS
Length: Approximately 21 inches/38 cm long
MATERIALS
Yarn
![]() Patons Classic Wool Bulky [100% wool; 78 yd/71 m per 100g skein]; color: Emerald; 2 skeins
Patons Classic Wool Bulky [100% wool; 78 yd/71 m per 100g skein]; color: Emerald; 2 skeins
Recommended needle size
[always use a needle size that gives you the gauge listed below - every knitter's gauge is unique]
![]() US #11/8mm needles for small circumference in the round: traditional or flexible DPNs, 1 long circular for magic loop, or 2 shorter circulars.
US #11/8mm needles for small circumference in the round: traditional or flexible DPNs, 1 long circular for magic loop, or 2 shorter circulars.
![]() US #11/8mm needles for working flat. Note: you can use the same needles as above.
US #11/8mm needles for working flat. Note: you can use the same needles as above.
Notions
![]() Short lengths of waste yarn or removable stitch markers
Short lengths of waste yarn or removable stitch markers
![]() sewing needle and matching thread
sewing needle and matching thread
![]() two 15 mm safety eyes
two 15 mm safety eyes
![]() polyester fiberfill
polyester fiberfill
![]() yarn needle
yarn needle
GAUGE
10 sts/12 rounds = 4 inches/10 cm using single strand of Patons Classic Wool Bulky on size 11 needles, before felting
Gauge is not critical but should be loose enough to allow for shrinkage after felting.
PATTERN NOTES
[Knitty's list of standard abbreviations and techniques can be found here.]
Body is worked in the round on two needles; head is worked flat in stockinette; legs are picked up along the sides of the body and worked with i-cord.
When sewing, use two of the three plies of the yarn to make it easier to seam and reduce bulk.
DIRECTIONS
Body
Cast on 3 sts.
Work i-cord as follows: *K3, return these sts to left needle; repeat from * once more, and k3 again.
The next step has you join the round, and distribute the sts. If you're working on DPNs, you'll find it easier to split the stitches across only 2 needles for the first few rounds, using a third to work.
Round 1: RLI, k1; split across needles at this point, k2. Join for working in the round.
Rounds 2-3: Knit 2 rounds.
Round 4: RLI, k to end, LLI. 6 sts.
Rounds 5-8: Knit 4 rounds.
Round 9: RLI, k to end, LLI. 8 sts.
Rounds 10-14: Knit 5 rounds.
Rounds 15-20: Repeat rounds 9-14. 10 sts.
Round 21: RLI, k1, LLI, k2, k2tog twice, k2, RLI, k1, LLI. 12 sts.
Round 22: Knit.
Round 23: K3, RLI, k6, RLI, k3. 14 sts.
Round 24: Knit.
Round 25: RLI, k1, LLI, k4, k2tog twice, k4, RLI, k1, LLI. 16 sts.
Rounds 26-28: Knit 3 rounds.
Round 29: RLI, k1, LLI, k5, k2tog twice, k5, RLI, k1, LLI. 18 sts.
Round 30: Knit.
Round 31: K5, RLI, k8, LLI, k5. 20 sts.
Round 32: Knit.
Round 33: RLI, k1, LLI, k7, k2tog twice, k7, RLI, k1, LLI. 22 sts.
Rounds 34-36: Knit 3 rounds.
Round 37: RLI, k1, LLI, k8, k2tog twice, k8, RLI, k1, LLI. 24 sts. Mark the first st of this round with piece of yarn or removable marker – this is marker 1, and it's used to guide leg placement.
The next five rows are not worked in rounds but back and forth in rows. This leaves a gap for stuffing.
Row 38 [RS]: Knit. Turn to WS.
Row 39 [WS]: Purl.
Row 40: Knit.
Row 41: Purl.
Row 42: Knit. Mark the twelfth st of row 42 as before – this is marker 2 for leg placement – and do NOT turn at the end of the row. Resume working in the round.
Round 43: K2tog, k10, LLI, RLI, k10, k2tog.
Round 44: Knit.
Round 45: K6, RLI, k12, RLI, k6. 26 sts.
Round 46: Knit.
Round 47: K2tog, k11, LLI, RLI, k11, k2tog.
Rounds 48-50: Knit.
Repeat Rounds 47-50 once more, marking the first st of the first even round as before – this is marker 3 for leg placement.
Round 55: K2tog, k11, LLI, RLI, k11, k2tog.
Rounds 56-57: Knit 2 rounds.
Round 58: K5, k2tog, k12, k2tog, k5. Mark twelfth st of Row 58 as before – this is marker 4 for leg placement. 24 sts.
Rounds 59-60: Knit 2 rounds.
Round 61: RLI, k10, k2tog twice, k10, LLI.
Round 62-64: Knit 3 rounds.
Round 65: RLI, k10, k2tog twice, k10, LLI.
Round 66: K5, k2tog, k10, k2tog, k5. 22 sts.
Round 67: (K2tog, k7, k2tog) two times. 18 sts.
Round 68: Knit.
Round 69: (K2tog, k5, k2tog) two times. 14 sts.
Round 70: Knit.
Bind off.
Legs
Work each leg as follows:
With RS facing, rejoin yarn at a marker and pick up and knit 5 sts along the side of the body, working in the order and direction given below:
- Right hind leg will begin at marker 1, pick up stitches tail to head direction.
- Right front leg will begin at marker 3, pick up stitches tail to head direction.
- Left hind leg will begin at marker 2, pick up stitches head to tail direction.
- Left front leg will begin at marker 4, pick up stitches head to tail direction.
Once stitches have been picked up, work i-cord as follows: K5; *return these sts to the left needle and k5; repeat from * until 10 rows have been worked
Next row: K2tog, k1, k2tog. 3 sts.
Toes
Continuing on the leg stitches, use the backwards loop method to cast on 3 st (you are still working in i-cord, so you will cast on to the right of st on the needle).
Bind off 4 st (move single st on right needle to left needle).
Cast on 3 sts.Bind off 4 sts.
Cast on 3 sts.
Bind off all sts.
Cut yarn, leave 12-inch/30-cm tail, thread onto large needle. Use this to secure the last toe you made to the rest of the foot.
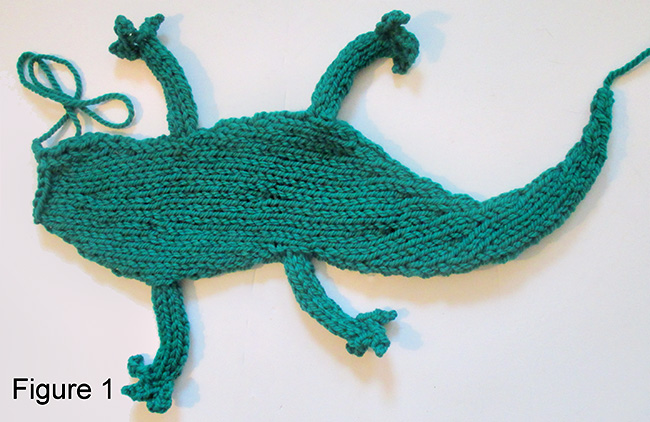
See Figure 1 for how body and legs will look.
Head Piece (make 2)
Cast on 4 sts. Do not join, piece is worked flat.
Row 1: Purl.
Row 2: K1, RLI, k to last st, LLI, k1. 2 sts increased.
Row 3: P1, RLI, p to last st, LLI, p1. 2 sts increased.
Repeat Rows 2-3 twice more, and work Row 2 again. 18 sts.
Row 9: Purl.
Row 10: K1, RLI, k to last st, LLI, k1. 2 sts increased.
Repeat Rows 9-10 once more, and work Row 9 again. 22 sts.
Row 14: Knit.
Row 15: P1, RLI, p6, bind off 8 sts, p to last st, RLI, p1. 16 sts. From here, continue only on the 8 sts just worked.
Row 16: K to last 3 sts, k2tog, k1. 1 st decreased.
Row 17: P1, p2tog, p to end. 1 st decreased.
Repeat Rows 16-17 until 2 sts rem.
Next row: Knit.
Last row: P2tog.
Break yarn, leaving 12-inch/30-cm tail, thread through remaining st and fasten off.
Rejoin yarn to the remaining 8 st on the right side of work:
Row 16: K1, k2tog, k to end. 1 st decreased.
Row 17: P to last 3 sts, p2tog, p1. 1 st decreased.
Repeat Rows 16-17 until 2 sts rem.
Next row: Knit.
Last row: P2tog. Break yarn, leaving 12 inch/30cm tail, thread through remaining st and fasten off.
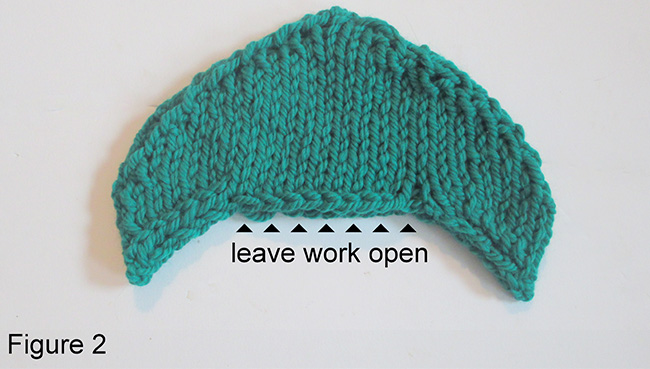
Sew the two pieces of the head together, leaving a gap to insert the neck (see Figure 2).
FINISHING
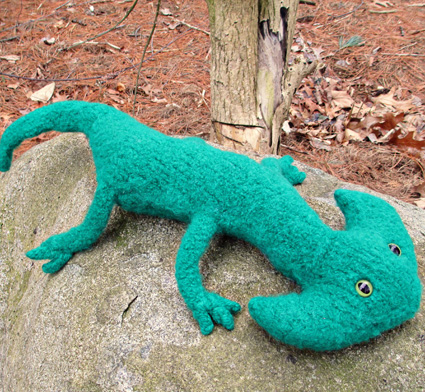
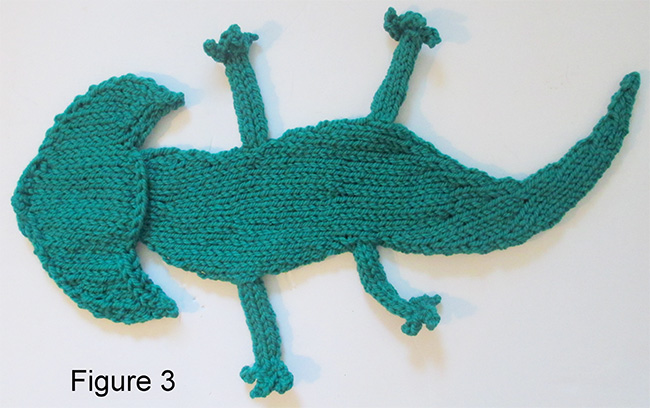
Insert neck of diplocaulus into the head section up to round 67 of neck. Sew to body using needle and yarn; run in all loose ends and fasten off – see Figure 3 for how the finished critter will look.
You are now ready to felt your diplocaulus. Place it in a mesh bag in your washing machine; set on extra small load and hot water, and add a tiny pinch of laundry detergent. Start the machine.
Check every five minutes or so until it reaches the desired level of felting. (Be careful not to let it go through the spin cycle or it may get creases). Remove it from the bag, loosely stuff it with newspaper and set it somewhere warm to dry. When it is dry, remove the newspaper and attach the safety eyes, using photos as a guide for placement. Stuff firmly with polyester filling, and sew shut with matching thread. You may also need to secure any seams with needle and thread that did not completely close during felting.
ABOUT THE DESIGNER
 Frances is a longtime knitter who branched out into felting about 15 years ago. She's fascinated with the process of designing the unusual, weird, and unloved critters.
Find her here on Ravelry.
Pattern & images © 2020 Frances Gillespie.