Orinthia, a free knitting pattern from Knitty.com. Free knitting pattern for a DETAILS HERE.
INTRODUCTION
Orinthia
by Sarah Alderson

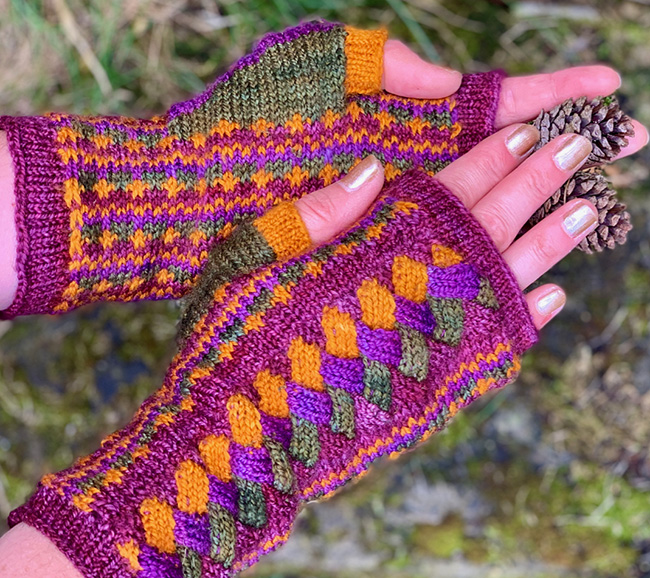
Orinthia means "to excite and stir the mind", which is how I feel about fall arriving: beautiful leaf colors and stunning knitwear to wear. The mittens were created to bring a little excitement and magic to my fall knitting. They are a fun project to learn new techniques and think about construction and fit in a completely different way.
The mittens are worked flat and sideways, with an entrelac panel and slip-stitch pattern that shows off coordinating mini-skein colors. They are surprisingly simple to make, with only one color yarn used at a time. Shaping of the thumb is created with short rows within the slip-stitch pattern and the mittens are finished with ribbed cuffs knitted in the round. This pattern uses one skein of yarn that contains 4 coordinating mini-skeins to create the pattern. It's also a great way to use up leftover yarns.
 photos: Sarah Alderson
SIZE
Women's S[M, L]
FINISHED MEASUREMENTS
Circumference: 8[8.75, 9.25] inches/ 20.5[22, 23.5] cm
Length: 6.75[7.5, 8.25] inches/ 17[19, 21] cm
Note: Measure around the palm of your hand above your thumb and choose the size with circumference closest to your actual hand measurement.
MATERIALS
Yarn
![]() Blue Ridge Yarns Footlights [100% merino wool; 400 yd/366 m per 3.53 oz/100 g skein]; color: Pansies; 1[1, 1] set of mini skeins
Blue Ridge Yarns Footlights [100% merino wool; 400 yd/366 m per 3.53 oz/100 g skein]; color: Pansies; 1[1, 1] set of mini skeins
Note: The 4 mini skein colours in this yarn are referred to as MC, CC1, CC2 and CC3 to show colour changes and sequence.
Yarn Characteristics:
Select a set of 4 sock yarn mini skeins in solid or semi-solid highly contrasting colours. Choose a high-twist, plied, fingering-weight yarn for durability. This would be a good project for using up leftovers of sock yarn, too.
Recommended needle size
[always use a needle size that gives you the gauge listed below - every knitter's gauge is unique]
![]() US #1.5 /2.5mm needles for working flat
US #1.5 /2.5mm needles for working flat
![]() US #1.5 /2.5mm needle(s) for working a small circumference in the round
US #1.5 /2.5mm needle(s) for working a small circumference in the round
![]() US #0 /2.0mm needle(s) for working a small circumference in the round
US #0 /2.0mm needle(s) for working a small circumference in the round
Notions
![]() a length of waste yarn for holding stitches
a length of waste yarn for holding stitches
![]() stitch markers
stitch markers
GAUGE
28 sts/32 rows = 4 inches/10 cm in stockinette stitch
32 sts/46 rows = 4 inches/10 cm in rib pattern
PATTERN NOTES
[Knitty's list of standard abbreviations and techniques can be found here.]
In the Entrelac section, all stitches should be slipped purlwise with yarn held to the WS of the work.
- Judy's Magic Cast On (used as a provisional cast on)
- grafting (photo tutorial)
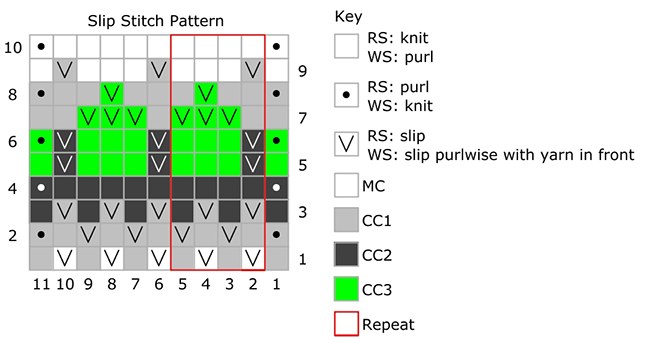
Slip Stitch Pattern
Note: Do not break yarn between color changes.
Row 1 [RS]: With CC1, k1, (sl1, k1) to end.
Row 2: K1, p1, (sl1, p1) to last st, k1.
Row 3: With CC2, k1, (sl1, k1) to end.
Row 4: K1, p to last st, k1.
Row 5: With CC3, k1, (sl1, k3) to 2 sts before end, sl1, k1.
Row 6: K1, (sl1, p3), to 2 sts before end, sl1, k1.
Row 7: With CC1, k2, (sl3, k1) to last st, k1.
Row 8: K1, p2, (sl1, p3) to 4 sts before end, sl1, p2, k1.
Row 9: With MC, k1, (sl1, k3) to 2 sts before end, sl1, k1.
Row 10: K1, p to last st, k1.
CHARTS
DIRECTIONS
Right Mitten
With MC and your larger needles for small circumference in the round and using Judy's Magic Cast On as a provisional cast-on, CO 36[40, 44] sts onto each needle.
Slip the 36[40, 44] lower stitches to waste yarn, and change to your needles for working flat.
Purl 1 row.
Entrelac Set-up
Row 1 [RS]: K1, turn
Row 2 [WS]: P1, turn
Row 3: Sl1, k1, turn
Row 4: P2, turn
Row 5: Sl1, k2, turn
Row 6: P3, turn
Row 7: Sl1, k3; do not turn.
You have now completed the first base triangle. Rep Rows 1 to 7 until all cast-on sts have been worked. 9[10, 11] base triangles.
Break off MC.
First Entrelac Stripe
Join CC1. Turn so that WS is facing.
Row 1 [WS]: P1, turn.
Row 2 [RS]: M1, k1, turn.
Row 3: Sl1, p2tog, turn.
Row 4: K1, m1, k1, turn.
Row 5: Sl1, p1, p2tog, turn.
Row 6: K2, m1, k1, turn.
Row 7: Sl1, p2, p2tog, do not turn. The first side triangle has been completed, leave the sts on the needle.
With WS still facing, pick up and purl 4 sts along the selvedge of the triangle now between the needles, working from the tip to the base of the triangle. Turn work so RS is facing.
Row 8 [RS]: K4, turn.
Row 9 [WS]: Sl1, p2, p2tog, turn.
Rows 10 to 15: Rep Rows 8 and 9 3 more times, until all live sts from the adjacent base triangle have been decreased away, but do not turn after the last WS row.
Repeat this sequence, starting with picking up and knit 4 stitches along the edge of the adjacent block in the previous stripe 7[8, 9] times more. All blocks have been worked, and you are now at the end of the row.
With WS still facing, pick up and purl 4 sts along the selvedge of the new block between the needles, picking up from the tip to the base of the block as before. Turn work so RS is facing.
Row 1 [RS]: Sl1, k3, turn.
Row 2 [WS]: Sl1, p1, p2tog, turn.
Row 3: Sl1, k2, turn.
Row 4: Sl1, p2tog, turn.
Row 5: Sl1, k1, turn.
Row 6: P2tog, turn.
Break off CC1.
Second Entrelac Stripe
1 st remains on needle from last section.
Join CC2 and with RS facing, pick up and knit 3 sts along the selvedge row between the needles, picking up from tip to base of the block from the previous stripe. Turn work so WS is facing.
Row 1 [WS]: P4, turn.
Row 2 [RS]: Sl1, k2, ssk, turn.
Rows 3 to 8: Rep Rows 1 and 2 five times more, but do not turn work after completing Row 8.
The first complete block of this tier is complete.
Pick up and knit 4 sts along the selvedge row between the needles, picking up from tip to base of the block from the previous stripe, then work Rows 1 to 8.
Repeat this sequence, starting with the pick up and knit 7[8, 9] times more. Turn work so WS is facing. Break off CC2.
Third Entrelac Stripe
With CC3, work as for First Entrelac Stripe, working the pick up and knit along the selvedge edges of the rectangles from the Second Entrelac Stripe.
Entrelac completion
1 st rems on needle from last section.
Join MC and with RS facing, pick up and knit 3 sts along the selvedge row between the needles, picking up from tip to base of the block from the previous row, turn work so WS is facing.
Row 1 [WS]: P4, turn.
Row 2 [RS]: K3, ssk, turn
Row 3: P3, w&t.
Row 4: K2, ssk, turn.
Row 5: P2, w&t.
Row 6: K1, ssk, turn.
Row 7: P1, w&t.
Row 8: Ssk, do not turn.
The first top triangle has been completed (4 sts on needle).
Pick up and knit 4 sts along the selvedge row between the needles, picking up from tip to base of the block from the previous stripe, then work Rows 1 to 8.
Repeat this sequence, starting with the pick up and knit, 7[8, 9] times more.
Final row [WS]: (P1, p3, working the wraps together with their stitches, m1p) to 4 sts before end, p1, p3, working the wraps together with their stitches. 44[49, 54] sts
Slip-stitch Pattern
Size S ONLY:
Transition row [RS]: K1, m1, (k21, m1) two times, k1. 47 sts
Size M ONLY:
Transition row [RS]: K1, m1, k to last st, m1, k1. 51 sts
Size L ONLY:
Transition row [RS]: K1, m1, k to end. 55 sts
All Sizes:
Set up row: K1, p to last st, k1.
Works Rows 1-10 of Slip Stitch Pattern 4[5, 6] times.
Thumb Shaping
Row 1 [RS]: With CC1, k1, (sl1, k1) 8[9, 9] times, place marker, (sl1, k1) to end.
Row 2: K1, p1, (sl1, p1) to last st, k1.
Row 3: With CC2, k1, (sl1, k1) to end.
Row 4: K1, p to marker, sm, w&t.
Row 5: Sm, k to 10[14, 14] sts before end, turn without wrapping.
Row 6: K1, p to 3 sts before marker, w&t.
Row 7: K to 10[14, 14] sts before end, turn without wrapping.
Row 8: K1, p to 6 sts before marker, w&t.
Row 9: K to 10[14, 14] sts before end, turn without wrapping.
Row 10: K1, p to 9 sts before marker, w&t.
Row 11: K to 10[14, 14] sts before end, turn without wrapping.
Row 12: K1, p to 12 sts before marker, w&t.
Row 13: K to 10[14, 14] sts before end, turn without wrapping.
Row 14: K1, p to last st, working the wraps together with their stitches, k1.
Row 15: With CC 3, k1, (sl1, k3) to 0[2, 2] sts before marker, (sl1, k1) 0[1, 1] time, sm, k to 10[14, 14] sts before end, turn without wrapping.
Row 16: K1, p to 12 sts before marker, w&t.
Row 17: K to 10[14, 14] sts before end, turn without wrapping.
Row 18: K1, p to wrapped st, purl st with wrap, p2, w&t.
Row 19: K to 10[14, 14] sts before end, turn without wrapping.
Row 20: K1, p to wrapped st, purl st with wrap, p2, w&t.
Row 21: K to 10[14, 14] sts before end, turn without wrapping.
Row 22: K1, p to wrapped st, purl st with wrap, p2, w&t.
Row 23: K to 10[14, 14] sts before end, turn without wrapping.
Row 24: K1, p to wrapped st, purl st with wrap, p2, sm, w&t.
Row 25: Sm, k to 10[14, 14] sts before end, (sl1, k3) to 2 sts before end, sl1, k1.
Row 26: K1, (sl1, p3) to 2 sts before end, (removing marker when you come to it), sl1, k1.
Row 27: With CC1, k2, (sl3, k1) to last st, k1.
Row 28: K1, p2, (sl1, p3) to 4 sts before end, sl1, p2, k1.
Row 29: With MC, k1, (sl1, k3) to 2 sts before end, sl1, k1.
Row 30: K1, p to last st, k1.
Work Rows 1 to 10 of Slip-Stitch Pattern once more. Break off CC1, CC2 and CC3.
Size S ONLY:
Next row: With MC, (p2, p2tog) 11 times, p3. 36 sts
Size M ONLY:
Next row: With MC, p2, p2tog, (p2, p2tog, p3, p2tog) five times, p2. 40 sts
Size L ONLY:
Next row: With MC, (p3, p2tog) to end. 44 sts
All Sizes:
Return sts of provisional CO to needle. Graft final row to cast-on sts.
Left Hand
Entrelac panel
The Left hand mitten Entrelac pattern is worked the same as the Right hand but with a different color order.
With MC, cast on as for Right hand. Work Entrelac set-up.
Work First Entrelac Stripe with CC3.
Work Second Entrelac Stripe with CC2.
Work Third Entrelac Stripe with CC1.
Work Entrelac Completion with MC.
Slip-stitch pattern
Work transition and setup. 47[51, 55] sts
Work Rows 1 to 10 of Slip Stitch Pattern once.
Thumb shaping
Work Thumb Shaping as given.
Slip-stitch pattern
Work Rows 1 to 10 of Slip-Stitch Pattern a total of 4[5, 6] times.
Complete as per Right Hand.
Wrist cuffs (work both mittens the same)
With MC, using smaller needles for small circumference in the round, and starting level with center of thumb, pick up and knit 52[60, 64] sts evenly around wrist edge. Distribute sts as you prefer and join for working in the round, noting or marking start of round.
Rnds 1 to 6: (K3, p1) to end of rnd.
Bind off in pattern.
Palm cuffs (work both mittens the same)
With MC, using smaller needles for small circumference in the round, and starting level with center of thumb, pick up and knit 52[60, 64] sts evenly around palm edge. Distribute sts as you prefer and join for working in the round, noting or marking start of round.
Rnds 1 to 6: (K3, p1) to end of rnd.
Bind off in pattern.
Thumb cuff (work both mittens the same)
With CC2 and starting where the thumb joins the hand, pick up and knit 16[20, 24] sts evenly around top of thumb. Distribute sts as you prefer and join for working in the round, noting or marking start of round. 16[20, 24] sts
Rnds 1 to 6: (K3, p1) to end of rnd.
Bind off in pattern.
FINISHING
Weave in all ends.
Block by soaking in warm water for five minutes, get rid of excess water by rolling in a towel and then lay flat to dry without stretching with the thumb to one side.
ABOUT THE DESIGNER
 Sarah lives in the beautiful Yorkshire Pennine countryside and loves to add a bit of bright colour to her life with her knits. Working in the UK NHS and as an associate professor in primary care, knitting and designing is her creative outlet. Her designs are for chic geeks - cute, quirky, original and fun, as well as being interesting to make. Sometimes she designs cute and fun amigurumi too, because life is too short to be grown up all of the time.
She can be found on Ravelry and her website.
Pattern & images © 2021 Sarah Alderson