


Sock Puppet and Mindy, a free knitting pattern from Knitty.com. Free knitting pattern for a DETAILS HERE.
INTRODUCTION
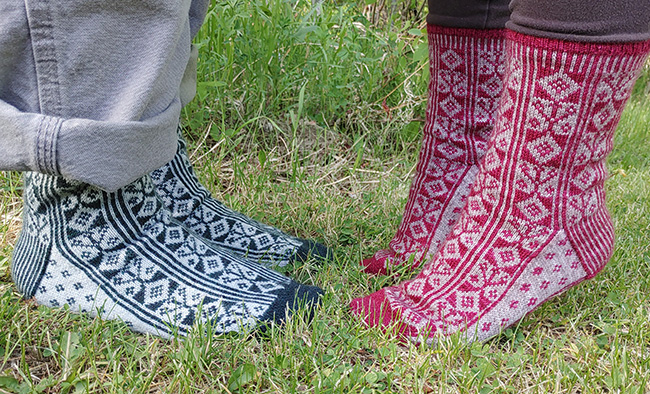
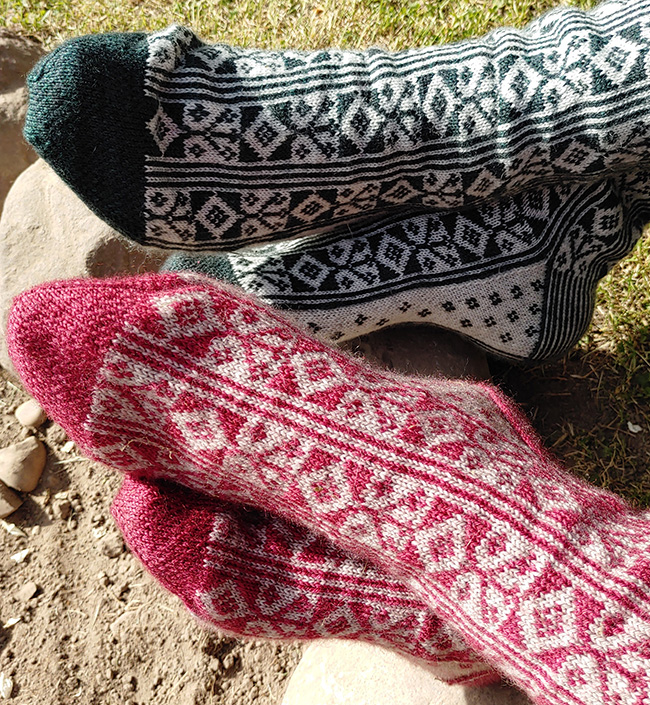
Sock Puppet and Mindy
 by Lisa Park Tomaszewski

For the entirety of my adult life, it has been knitting that gets me up and moving in the morning. One such project was comprised of two balls of sock-weight yarn, a wool and acrylic blend, which I had picked up in a bargain bin for a dollar each. One was gray and the other was pink, and although they were the same brand, they looked horrible together! Yet, being on a tight budget and living with a creative mind, I had fanciful ideas of the beautiful projects I could create using these two balls of yarn.
I've always been fascinated by various types of needlework. I had been given a booklet of old cross-stitch patterns that I knew I could incorporate into my knitting. After much deliberation and planning, I cast on for a colorwork sock using the unattractive balls of yarn. It was exciting to see the pattern reveal itself round by round, although it was obscured by the colors being too close in value. But I didn't really care because I was testing my idea and using up this awful yarn.
My daughter, who was 12 at the time, started sitting with me in the morning while I drank my coffee and worked on these socks. She kept trying to convince me that I was making them for her. As I toddled my way to the couch carrying my freshly brewed cup of coffee, she would already be sitting there and holding my work-in-progress. She would slip her hand inside the partially finished sock and hold it as if it were a sock puppet. Then, she would make it talk to me so that the sock itself let me know that it wanted to belong to her. It soon became known as "Sock Puppet." When I began knitting the second sock, I asked her what its name was. Without hesitation, she replied, "Mindy," and thus the pair was named.
I gave her that pair of socks, and she loved them despite how homely they were. All these years later, they are still her favorite bed socks. Several years after the original pair was knit, I recreated them for myself using a high-quality sock yarn. My favorite place to wear them is on the coffee table!
My daughter is now my business and dye partner for Smiling Sheep Fine Yarns. I have decided to make them again using some of our hand-dyed yarn, write the pattern properly, and share it with other knitters.
 photos: Rebecca Tomaszewski


SIZE
Adult S[M, L]
FINISHED MEASUREMENTS
Foot Circumference: 7.75[9, 10.25] inches/ 19.5[23, 26] cm
Foot Length: adjustable to preference
Leg Length [all sizes]: 9 inches/23cm
Note: Because of the nature of stranded colorwork, these socks have minimal stretch. Choose the size closest to your actual foot measurement with no more than 0.5 inches/1.5 cm negative ease. A neutral or slightly positive ease will be fine.
MATERIALS
Yarn
The yarn used for the sample is a wool/nylon blend with a plied construction for strength and stability. Choose a yarn with at least 20% nylon for durability and 50% wool for elasticity. Fine Merino wool will typically show signs of wear in socks sooner than other wools.
Smiling Sheep Smitten [75% SW Wool, 25% Nylon; 437yd/400m per 100g skein]
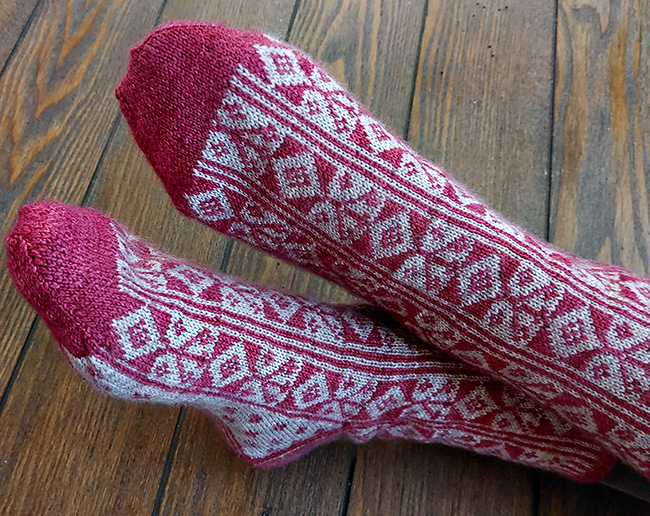
Red version (shown above):
![]() [MC] Save the Last Dance for Me; 1[1, 1] skein
[MC] Save the Last Dance for Me; 1[1, 1] skein
![]() [CC] Wooly Bully; 1[1, 1] skein
[CC] Wooly Bully; 1[1, 1] skein
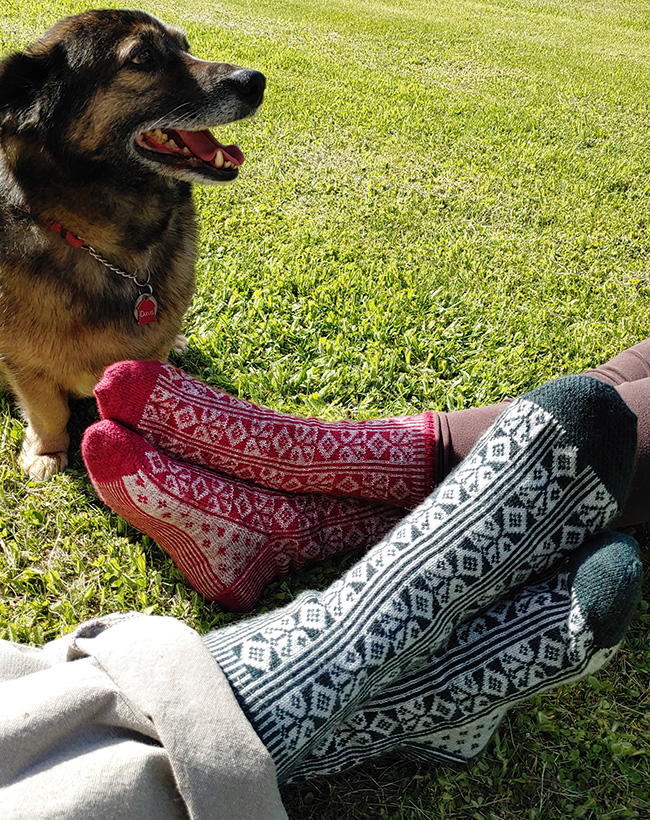
Green version (shown below):
![]() [MC] Poison; 1[1, 1] skein
[MC] Poison; 1[1, 1] skein
![]() [CC] Cold as Ice; 1[1, 1] skein
[CC] Cold as Ice; 1[1, 1] skein
Recommended needle size
[always use a needle size that gives you the gauge listed below - every knitter's gauge is unique]
![]() US #0/2mm needles for working small circumference in the round
US #0/2mm needles for working small circumference in the round
Notions
![]() stitch marker
stitch marker
![]() yarn needle
yarn needle
GAUGE
42 sts/54 rounds = 4 inches/10 cm in stockinette stitch
42 sts/44 rounds = 4 inches/10 cm in stranded colorwork
Note: gauge is always taken after blocking.
PATTERN NOTES
[Knitty's list of standard abbreviations and techniques can be found here.]
When stranding yarn at back of work, carry MC below CC and CC above MC throughout entire pattern to achieve the most pleasing color dominance effect.
Directions and tips for stranded colorwork (Fair Isle) can be found here (photos) and here (video).
CHARTS
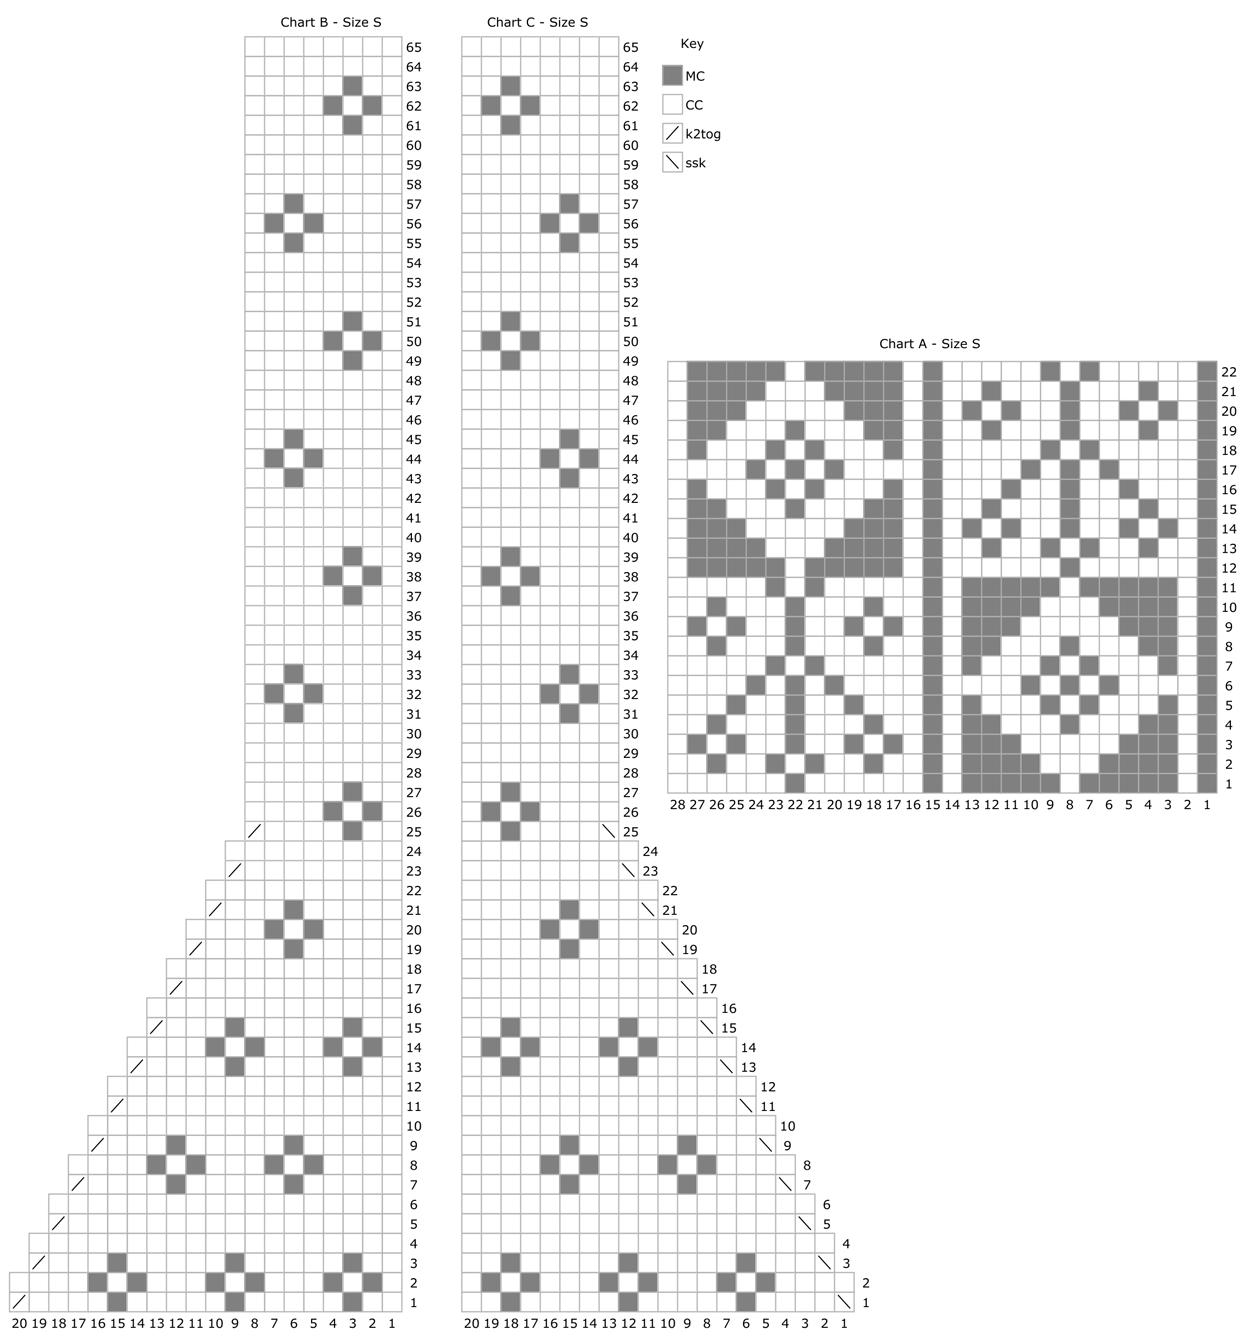
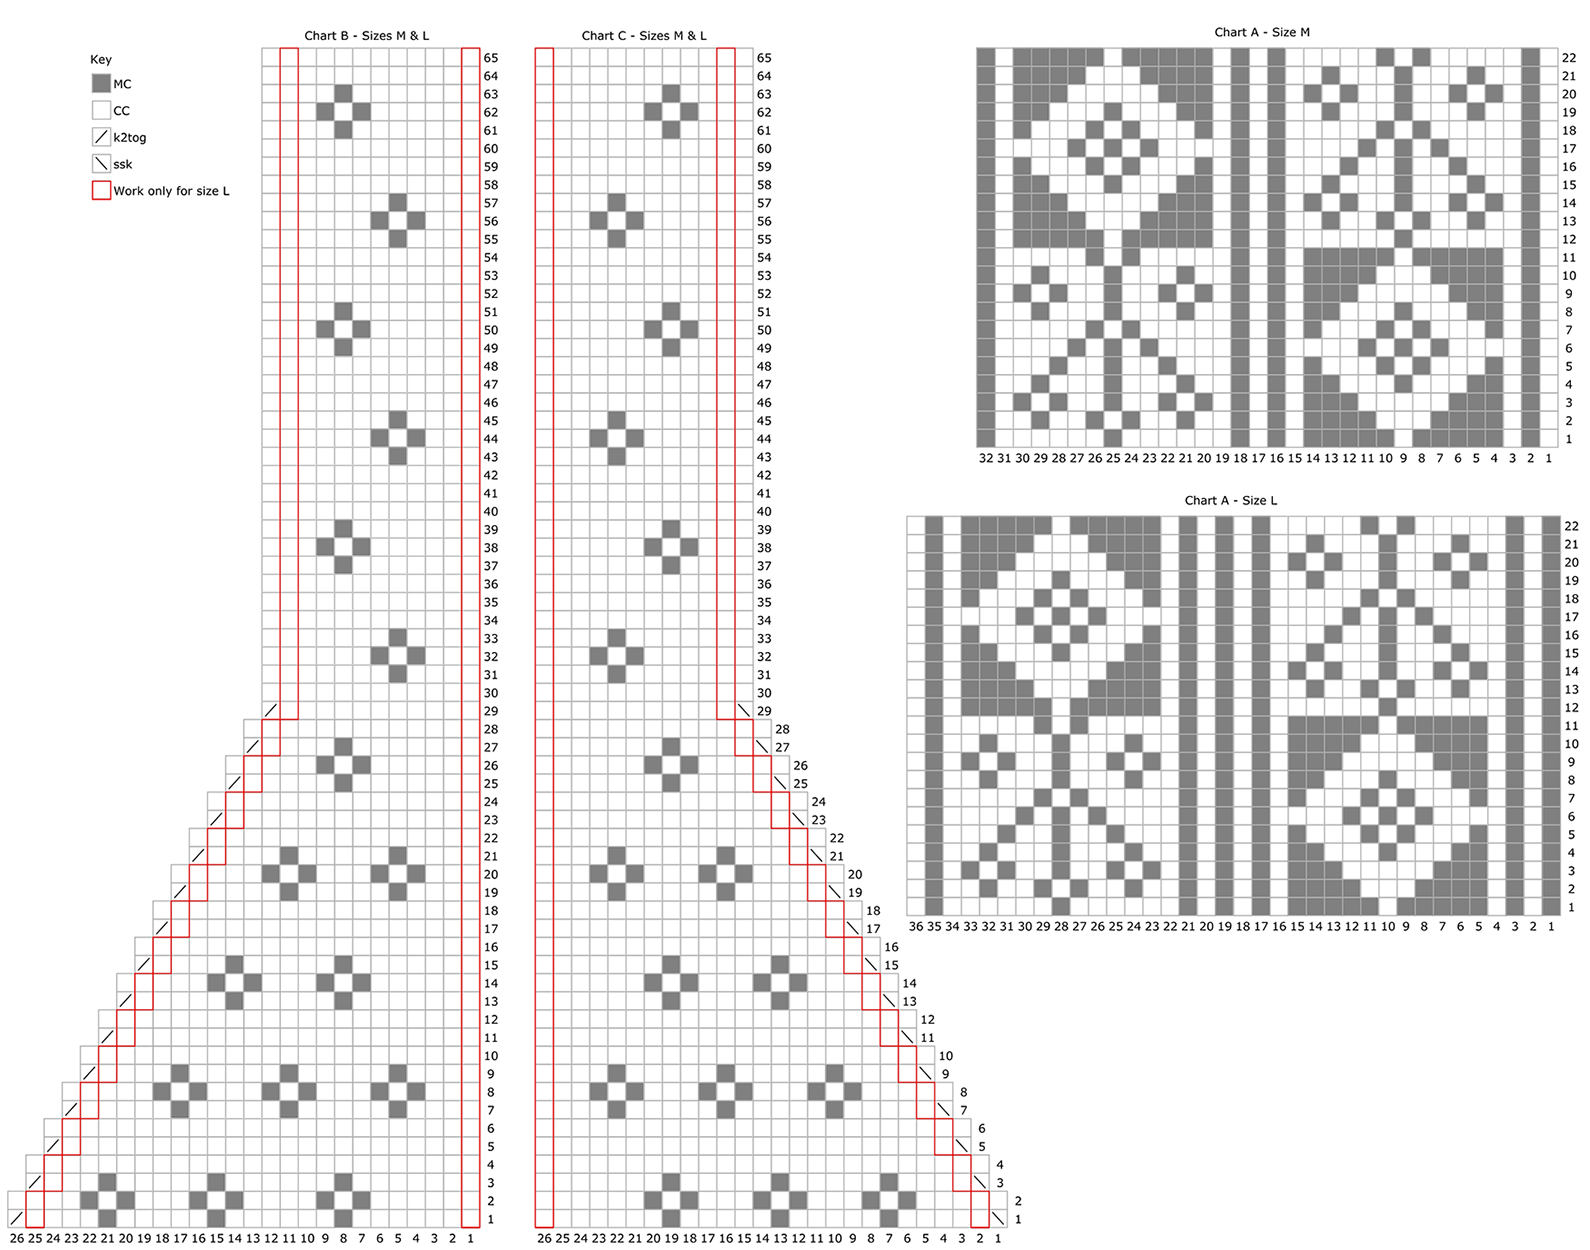
DIRECTIONS
Cuff
Using long-tail method and MC, cast on 84[96, 108] sts. Distribute sts across needles as you prefer and join for working in the round.
Rnds 1-5: [K1, p1, k1] around.
Rnds 6-12, Sizes S & L only: [K1 MC, k1 CC] around.
Rnds 6-12, Size M only: [K1 CC, k1 MC] around.
Leg
Leg round: Work Chart A for your size three times around.
Work as set for 55 rounds – 2 full repeats of Chart A – then Rnds 1-11 of Chart A once more.
Heel Flap
Size M only: With CC, knit the 1st st of next rnd.
Turn work.
Row 1 [WS]: [P1 CC, p1 MC] 20[24, 26] times, p1 CC. (Heel flap is worked back and forth over these 41[49, 53] sts only. Instep now has 43[47, 55] sts. Rearrange sts as you prefer.) Turn.
Row 2 [RS]: [K1 CC, k1 MC] to last st, k1 CC. Turn.
Row 3 [WS]: [P1 CC, p1 MC] to last st, p1 CC. Turn.
Repeat Rows 2-3 until heel flap measures 2[2.25, 2.5] inches/ 5[6, 6.5] cm, approximately 21[25, 27] rows.
Turn Heel
Note: Heel turn is worked in MC only. Do not break CC, as it will be picked up when starting the gussets.
Row 1 [RS]: [Sl1, k1] 11[13, 14] times, sl1, ssk, k1. Turn.
Row 2 [WS]: Sl1, p6, p2tog, p1. Turn.
Row 3: Sl2, [k1, sl1] to 1 st before gap, ssk, k1. Turn.
Row 4: Sl1, purl to 1 st before gap, p2tog, p1. Turn.
Repeat Rows 3-4 until only 1 stitch remains on either side of the gaps.
Next row [RS]: Sl2, [k1, sl1] to 1 st before gap, ssk. Turn.
Next row [WS]: Sl1, purl to 1 st before gap, p2tog. Turn. 23[27, 29] sts
Gusset and Foot
Set-up rnd 1 [RS]: [K1 MC, k1 CC] 11[13, 14] times to last st of heel, k1 MC. With CC, pick up and knit 21[25, 27] sts along first edge of heel flap, carrying MC loosely at back of work and catching every few sts to secure. Following rnd 1 of Chart A for your size and beginning of column 1[2, 1] , work across 43[47, 55] sts of instep, ending on column 15[16, 19] of second chart repeat. With CC, pick up and knit 21[25, 27] sts along second edge of heel flap, carrying MC loosely at back of work and catching every few sts to secure. This is the new start of rnd. 108[124, 138] sts
Set-up rnd 2: Work across 23[27, 29] heel sts in pinstripe pattern as set, work rnd 1 of Chart B for your size, work across instep in pattern as set, work rnd 1 of Chart C for your size.
Note: Carry MC loosely at back of work on rnds where only CC is worked on Chart B and Chart C, catching every few sts to secure.
Continue as set until you have completed Row 25[29, 29] of Charts B and C. 82[94, 108] sts rem.
Continue as set, maintaining pinstripe on center sole sts, Charts B and C, and instep pattern as set, until foot measures 1.5[1.75, 2] inches/ 4[4.5, 5] cm short of desired finished length. It will look the most pleasing if pattern is ended after rnd 11 or rnd 22 of Chart A. If only a few rows are needed to obtain the desired length, they can be worked in MC only.
Toe
Set-up: Break CC. With MC, knit to beg of instep. This is the new start of round. Divide the sts so that you have 41[47, 55] on the instep and 41[47, 53] on the sole and place a marker or arrange so that you can identify the midpoint of the round.
Next rnd: Knit.
Size L only:
Next rnd: K1, ssk, sl1, [k1, sl1] to 3 sts before midpoint of rnd, k2tog, k1; k3, sl1, [k1, sl1] to last 3 sts, k3. There are now 53 sts on each the instep and the sole.
Next rnd: Knit.
All Sizes:
Decrease rnd: K1, ssk, sl1, [k1, sl1] to 3 sts before midpoint of rnd, k2tog, k1; k1, ssk, sl1, [k1, sl1] to 3 sts before end of rnd, k2tog, k1. 4 sts decreased.
Following rnd: Knit.
Repeat the last 2 rnds 11[13, 15] more times. 34[38, 42] sts rem.
Next rnd: K1, ssk, sl1, [k1, sl1] to 3 sts before midpoint of rnd, k2tog, k1; k1, ssk, sl1, [k1, sl1] to 3 sts before end of rnd, k2tog, k1. 4 sts decreased.
Next rnd: K1, ssk, k to 3 sts before midpoint of rnd, k2tog, k1; k1, ssk, k to 3 sts before end of rnd, k2tog, k1. 4 sts decreased.
Next rnd: K1, ssk, [k1, sl1] to 4 sts before midpoint of rnd, k1, k2tog, k1; k1, ssk, [k1, sl1]to 4 sts before end of rnd, k1, k2tog, k1. 4 sts decreased.
Next rnd: K1, ssk, k to 3 sts before midpoint of rnd, k2tog, k1; k1, ssk, k to 3 sts before end of rnd, k2tog, k1. 18[22, 26] sts
FINISHING
Graft toe close. Wash to block. Weave in ends.
ABOUT THE DESIGNER
 Lisa is a firm believer in knitting anywhere and everywhere. Whether on a mountain side or in a fire truck, there are no "knit-free" zones in her world. When she's not knitting, she can often be found dyeing yarn in her Smiling Sheep Fine Yarns studio with her adult daughters.
Lisa's favorite person to knit for is herself, and her favorite thing to knit is socks. Currently, her sock drawer capacity has reached a critical point. She is considering purchasing a new dresser just for socks!
Lisa calls Alberta, Canada her home. Lisa can be found on Ravelry and on her website or myshopify.
Pattern & images © 2021 Lisa Park Tomaszewski