Hespera, a free knitting pattern from Knitty.com.
INTRODUCTION
Hespera
 by Stephanie Shiman
![]()
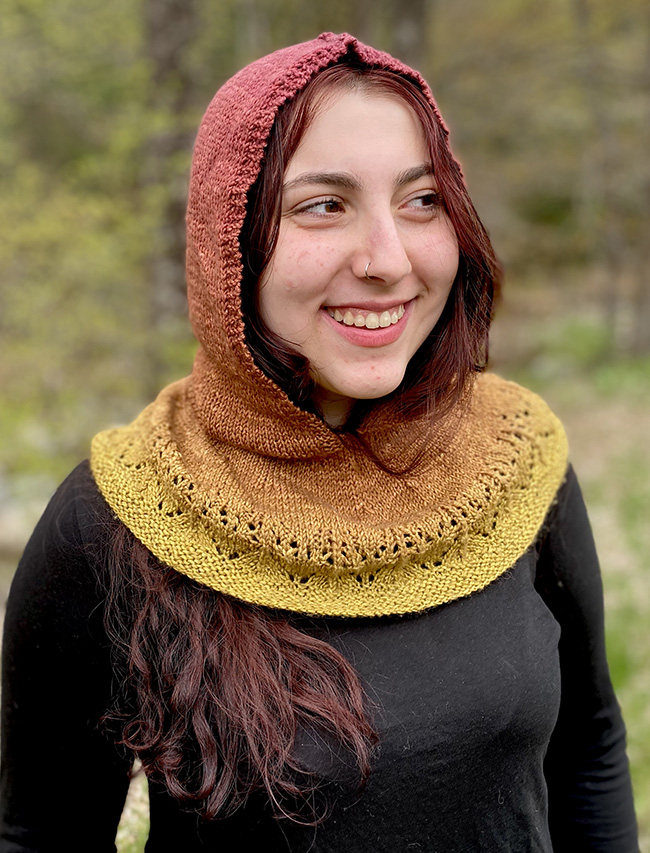
Hoods are having a moment! This one combines a hood with a cowl to make a versatile garment to keep out the chill. It is knit simply but made magical with shifting color transitions and a sprinkling of lace. Layer it over a sweater or under a coat; hood up, or hood down.
It begins in the round from the bottom-up; the hood section is worked flat and easily made longer or shorter to fit as you'd like. This one-cake accessory works up quickly and once you’ve knit the lace, it's great mindless knitting.
 model: Annika Shiman
 photos: Stephanie Shiman
SIZE
One
FINISHED MEASUREMENTS
Bottom opening: 34 inches/86cm
Length, from cast-on to top of hood: 21 inches/53cm
MATERIALS
Yarn
![]() Wonderland Yarns "Mad Hatter Blossoms" [100% superwash merino; 515 yds/471m per 6 oz/170g cake]; color: Verbascum; 1 cake
Wonderland Yarns "Mad Hatter Blossoms" [100% superwash merino; 515 yds/471m per 6 oz/170g cake]; color: Verbascum; 1 cake
Yarn Characteristics
![]() The sample is knit with a sport weight, color-morphing cake. You may opt to use your favorite part of the morph first (so as to be sure that color is the majority), or choose which color you prefer closest to your face and work from the opposite.
The sample is knit with a sport weight, color-morphing cake. You may opt to use your favorite part of the morph first (so as to be sure that color is the majority), or choose which color you prefer closest to your face and work from the opposite.
Recommended needle size
[always use a needle size that gives you the gauge listed below - every knitter's gauge is unique]
![]() #6/4mm circular needle, 16-24 inch/40-60cm (or size required to get gauge)
#6/4mm circular needle, 16-24 inch/40-60cm (or size required to get gauge)
![]() 1 additional US #6/4mm needle of any type for three-needle bind-off
1 additional US #6/4mm needle of any type for three-needle bind-off
Notions
![]() stitch marker
stitch marker
![]() yarn needle
yarn needle
GAUGE
22 sts/27 rows = 4 inches/10 cm in stockinette stitch
20 sts/25 rows = 4 inches/10 cm in lace pattern
Note: gauge is always taken after blocking.
PATTERN NOTES
[Knitty's list of standard abbreviations and techniques can be found here.]
The hooded cowl is worked from the bottom up, in the round, until you reach the hood section which is worked flat.
CHARTS
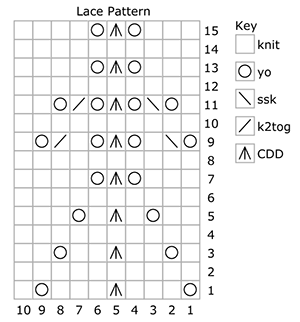
Lace Pattern
Round 1: (YO, k3, CDD, k3, yo, k1) repeat to end of round.
Round 2: Knit.
Round 3: (K1, yo, k2, CDD, k2, yo, k2) repeat to end of round.
Round 4: Knit.
Round 5: (K2, yo, k1, CDD, k1, yo, k3) repeat to end of round.
Round 6: Knit.
Round 7: (K3, yo, CDD, yo, k4) repeat to end of round.
Round 8: Knit.
Round 9: (YO, ssk, p1, yo, CDD, yo, p1, k2tog, yo, k1) repeat to end of round.
Round 10: Knit.
Round 11: (K1, yo, ssk, yo, CDD, yo, k2tog, yo, k2) repeat to end of round.
Round 12: Knit.
Round 13: (K1, p1, k1, yo, CDD, yo, k1, p1, k2) repeat to end of round.
Round 14: Knit.
Round 15: (K3, yo, CDD, yo, k4) repeat to end of round.

DIRECTIONS
Using the long-tail method, CO 170 sts. Place marker and join for working in the round.
Lower Border
Knit 1 round. Purl 1 round.
Repeat the last 2 rounds 5 more times, for 5 garter ridges.
Begin pattern stitch:
Next round: Work pattern stitch 17 times around, working from written or charted instructions as you prefer.
Work as set until pattern is complete.
Knit 10 rounds.
Next round, decrease: (K3, CDD, k4). 136 sts.
Knit 10 rounds.
Next round, decrease: (K2, CDD, k3). 102 sts.
Knit 5 rounds.
Next round, set up for division: K47, pm, p8, k to end of round.
Following round: Knit.
Next round: K to m, p8, k to end of round.
Repeat the last 2 rounds once more.
Hood Section
Note: From here you will work back and forth in rows.
Row 1 [RS]: K to marker, k4, turn. The remaining sts can be held on the same needle.
Row 2 [WS]: K4, p to end of sts, removing start of round marker as you go.
Row 3 [RS]: P4, k to end.
Continue in pattern as set until this section measures 12 inches/30 cm, or desired length. The sample as shown has a hood 16 inches/40 cm long.
When hood reaches desired length, ending with a WS row, close it as follows:
Split the stitches at the center point, 51 sts on each side, sliding the sts down towards the tips of the needles. Hold the work with RS together, and with WS facing, use a third needle to work a three-needle bind off.
FINISHING
I find that I like to steam circular items: when blocking by laying flat, you end up with creases, but if you steam the garment you can keep it moving and avoid creasing.
You can also soak the piece in warm water with a suitable wool wash or hair conditioner (if desired). Gently squeeze out most of the water and lay the damp piece flat to dry. If wish, you can use pins or blocking combs to gently stretch it into place, opening the eyelets. Leave until completely dry.
Weave in ends.
ABOUT THE DESIGNER
 Stephanie is the owner of frabjous fibers and Wonderland Yarns. When she's not up to her elbows in dye, she enjoys foolishness with her daughters, junk shops, making pottery, and all manner of fiber crafts.
She lives with her daughter and dogs in southern Vermont.
Pattern & images © 2022 Stephanie Shiman