Knitty: little purls of wisdom
Fat Cat Knits
Title

beauty shot

beauty shot

Tangy

I spin a lot of scrappy, uneven (on purpose, really!), small amounts of yarn for myself; it’s just the type of spinner I am - experimental, not wanting to devote tons of time to full-sized skeins, just wanting something fun to play with.

What to do with all these little skeins?  Hats, of course! Oh hats, how I love hats.

So, one day I was brainstorming and came up with this handspun-friendly idea of knitting a hat top-down, measuring the gauge once there’s enough area to do so, and continuing on to form the hat around that gauge -- no swatching needed, and the same basic hat can be made in all kinds of different yarns for very different looks.

All that customization possibility naturally led to custom sizing options as well; by simply increasing to different widths, this base pattern can make a cloche style, a beret style, or a super slouchy style hat!

And then it all comes together at the bottom with a buttoning brim - a 3-inch flap which fastens to be fitted to the wearer’s head, with 1, 2, 3, or more buttons, depending on gauge and personal preference. 

It’s quite a simple pattern, nothing more than knit/purl, increase/decrease really, but your choice of yarn and buttons can really make it your own original piece!

spacer model & photos: Lee Meredith [version 2 shown at top, version 4 shown at bottom]

SIZE
Cloche [Beret, Super-slouchy]  (shown in all sizes)

spacer

FINISHED MEASUREMENTS
Height: approx. 8[9, 9.5] inches
Circumference at fullest part of hat: approx. 22[24, 26] inches

spacer

MATERIALS

Version 1 (bulky blues beret style)
Fiber
spacer [top] Assorted scraps mostly dyed by Insubordiknit [wools; roving scraps]; unknown leftover amount
spacer [middle] Spunky Eclectic [Blue Faced Leicester; layered batt]; color: Surfs Up!; 1.5 ounces,
spacer [bottom] Eugene Textile Center [Merino wool; roving]; colors: assorted blue, purple, gold, green; unknown partial pieces

Finished Yarn:
spacer Wraps per inch: approx. 7
spacer Yardage used: 100 yards total. (40 of top yarn, 40 of middle yarn, 20 of bottom yarn)

Commercial alternative:
spacer Malabrigo Chunky

Drafting Method:
spacer Long draw, 2-ply

GAUGE

spacer 12 sts/14 rows = 4 inches in stockinette st

Version 2 (alpaca stripes super slouchy style)
Fiber
spacer [MC] No company (gifted raw fleece) [alpaca; un-carded fleece]; color: natural; unknown weight
spacer [CC] leethal [recycled sweater unknown alpaca blend; recycled yarn]; color: hand-dyed pink, orange, yellow, green; unknown weight

Finished Yarn:
spacer Wraps per inch: approx. 9
spacer Yardage used: 140 yards total. (70 of each yarn)

Commercial alternative:
spacer Alpaca with a Twist Baby Twist

Drafting Method:
spacer worsted from raw fleece, 2-ply

GAUGE

spacer 16 sts/20 rows = 4 inches in stockinette st

Version 3 (super bulky alpaca brim beret style)
Fiber
spacer [hat body] No company (assorted bits of fiber) [wools and alpaca; mostly pieces of roving]; color: assorted; 3.4 ounces
spacer [brim] No company (gifted raw fleece) [alpaca, some dyed wool locks; un-carded]; color: natural; 2.4 ounces

Finished Yarn:
spacer Wraps per inch: approx. 5
spacer Yardage used: 61 yards total. (40 of body yarn, 21 of brim yarn)

Commercial alternative:
spacer Malabrigo Aquarella

Drafting Method:
spacer Long draw, navajo plied; corespun

GAUGE

spacer 8 sts/12 rows = 4 inches in stockinette st

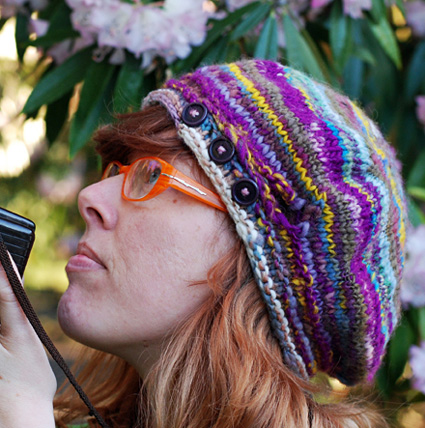
Version 4 (purple stripes beret style)
Fiber
spacer Insubordiknit [assorted wool scraps; roving]; color: assorted purple, blue, yellow, green, brown; unknown weight

Finished Yarn:
spacer Wraps per inch: approx. 9
spacer Yardage used: 110 yards.

Commercial alternative:
spacer Malabrigo Merino Worsted

Drafting Method:
spacer Long draw single

GAUGE

spacer 16 sts/24 rows = 4 inches in stockinette st

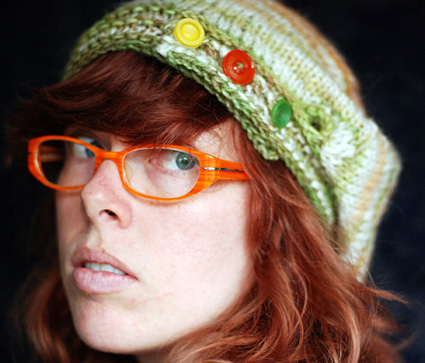
Version 5 (gray cloche style -- Commercial Yarn Alternative)
Fiber
spacer Dream in Color [superwash merino; 250yd/229m per 114g skein]; color: Grey Tabby; 1 skein (only half of the skein was used)

GAUGE

spacer 20 sts/26 rows = 4 inches in stockinette st

Recommended needle size
spacer 1 set of 5 double-point needles in size appropriate for yarn chosen
spacer 1 16-inch circular needle in same size as double-point needles

gearbox

Spinning Tool: Louet S10; [bobbin drive]

Tools
spacer 4 stitch markers – be sure one is different from the others
spacer Ruler or gauge measuring tool
spacer Yarn needle
spacer 1-5 buttons, as desired
spacer Sewing needle and thread or yarn, suitable for sewing on buttons chosen

spacer

PATTERN NOTES
[Knitty's list of standard abbreviations and techniques can be found here.]

This is a formula-style pattern, designed to be used with any gauge. If desired, you can swatch and measure your gauge before beginning; this is a good idea if you are unsure of the best needle size to use with the yarn you've chosen. However, you can also just begin knitting and measure your gauge when instructed to do so.

Once you have your gauge measurement, you will be instructed to do some very simple calculations to fill in the blanks within the pattern.

skp: Sl 1, k1, pass slipped stitch over st just knit.

spacer

DIRECTIONS

CROWN

Using a double-point needle, CO 4 sts.
When working Round 1, work into the first CO st first, bringing the yarn around behind the other CO sts (as if working I-cord).

Round 1: [Kfb] 4 times, using a different needle for each [kfb]. 8 sts: 2 sts on each needle.
Round 2: [K1, kfb] 4 times. 12 sts.
Round 3: [K to last st on needle, kfb] 4 times.
Repeat Round 3 until there are enough sts to switch to circular needle (approx. 4 inches worth of sts on each needle).

Next Round: Using circular needle, [k to last st on end of double-point needle, kfb, place marker] 4 times, placing unique marker last to indicate end of round.

Spread work flat (but do not stretch) and measure gauge. Measure 2 inches worth of sts in the center of one of the four sections separated by markers. Divide gauge over 2 inches by 2 to find your stitch gauge per inch.

Gauge:

_____ sts/inch

Multiply your gauge per inch by 22[24, 26] (for cloche[beret, super-slouchy hat]) to find the number of sts you'll need for the crown, adding or subtracting 1 or 2 sts if necessary to obtain a multiple of 4 sts.

Crown stitch number:

_____ sts

Increase Round: [K to 1 st before marker, kfb] 4 times.
Repeat this round until you have reached crown stitch number.

Work in stockinette st until hat measures 2.5 inches from last increase round.

Multiply your gauge per inch by 18 to find the number of sts you'll need for the lower hat body.

Lower hat body
stitch number:

_____ sts

Decrease Round: [Ssk, k to marker] 4 times.
Repeat this round until you have reached lower hat body stitch number. Note that you may reach this number before the end of a decrease round (before all 4 decreases have been worked); if this happens, k to the end of that round.

At end of last round, remove marker, skp. Turn work so that WS is facing; brim will be worked back and forth in rows.

BRIM
Before beginning the brim, there are two numbers you'll need:
• In the first row, you'll bind off enough sts to make one inch. If your gauge per inch is not a whole number, round it to the nearest whole number. Write this number in the space given in Row 1 below.
• Multiply your gauge per inch by 3 to find the number of sts you'll cast on to make the button flap. Write this number in the space given in Row 2 below.


Row 1 [WS]: Sl 1, BO _____ sts (including slipped st), k to end of row, removing markers.


Row 2 [RS]: CO _____ sts, k to end.

Row 3 [WS]: P.
Rows 4-5: K all sts.
Row 6 [RS]: K1, [yo, skp] to end of button flap; k to end of row.
Row 7 [WS]: P.
Rows 8-9: K.

BO all sts.

spacer

FINISHING
Weave in ends. Try on hat to determine best button placement, then sew on buttons. Yarnovers worked on button flap serve as buttonholes.

Wet block hat. For cloche, use a balloon or other head-shaped object; for beret size, use a plate or a piece of cardboard cut into correctly sized circle; for super slouchy hat, use a plate with a towel wrapped around it to make it bigger, or a cardboard piece cut to size.

ABOUT THE DESIGNER

Lee Meredith is a maker of things, doer of stuff in Portland, Oregon. At leethal.net you’ll find everything she does, which includes more knit accessory designs, her leethal quick knits club (2 mini-skeins of yarn + 2 quicky patterns each month), her ebook (Game Knitting), knit kits with recycled hand-dyed yarn, and handspun of course!

Besides all this knit-related goodness, Lee also makes other crafty kits and sets, and writes lots of assorted craft tutorials, reviews, etc on her blog, do stuff!

spacer