
|
|
 |
|
|
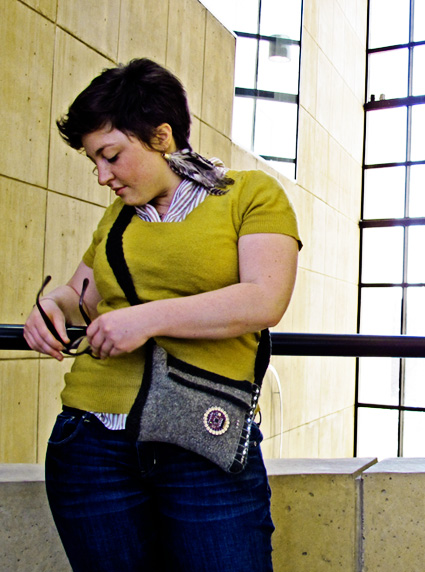 |
by Kalani Craig Yep, this bag knows everything. It knows your row number, the chart for your stitch pattern, and where you are in that stitch pattern. Unlike the other know-it-alls in your life, it will gladly share information with you by displaying your row number and a chart for the current row of your stitch pattern in lights! (Though of course there are limitations; you can generate a custom chart for the bag, but only for stitch patterns up to 10 stitches wide that use k, p, k2tog, ssk and sk2p). The bag is part of a growing project category called “computational textiles.” Computational textiles is a scary phrase often applied to projects that are complicated, difficult and fun but don’t do much. Still, I found myself obsessed with the idea of mixing knitting and technology after making an origami crane with light-up eyes at a computational textiles workshop at Indiana University. |
This bag is the result of that obsession. The 10 LED lights act as a row counter and a charted pattern. And more important: just about any knitter could pull this off. Really. Any knitter with a thirst for adventure and a few projects under their belt can do this. You can make and use this bag if you can:
Here’s how it works: a tiny computer chip gets connected
to LEDs using metal-coated thread. The computer
chip sends signals to the LEDs—all on (knit), all off
(purl), flicker (yarnover), etc.—and poof, your knitting
pattern lights up. Want to see the next row?
No problem! Just press the button and the
next row displays. Need
to turn the bag off until tomorrow? No problem!
It saves the row you were on, even if you
remove the battery. The video below explains just how the bag
works. It's very neat. |
|
|
|
 |
|
SIZE |
|
FINISHED MEASUREMENTS |
|
MATERIALS Notions |
|
GAUGE |
Note: It is not critical to get exact gauge for this piece. Size can be manipulated during felting process. |
|
PATTERN NOTES |
|
sk2p: Sl 1, k2tog, pass slipped st over. 2 sts decreased. Can't work with wool? A non-wool version of this bag would benefit greatly from experiments with the shape of the bag and, in particular, the placement of the different components. Consider rearranging the placement of the LilyPad, the button and the LEDs in order to minimize the number of times that a positive-circuit line of conductive thread has to cross over a negative-circuit line of conductive thread. Sketching out your own grid on a whiteboard or chalkboard using different colors for positive and negative circuits will help you visualize the circuit first. Then you can use the newly-drawn circuit to re-engineer the shape and size of the bag itself. Using the bag: Insert a AAA battery into the
battery holder to turn on the lights. Light Key: Sewn electronic circuits at work: The
LEDs on this bag light up because they’re sewn using
a basic electronic circuit connected
to a tiny computer board, which is in
turn attached to a battery.
Avoiding short circuits: The LEDs each have their own numbered positive pin, but they all connect to the single negative-ground pin on the board to complete the circuit. If the negative half of one circuit touches the positive half of that circuit, or if the positive side of one circuit touches the positive side of a second circuit, the electric current that flows in a circle will be interrupted by the new contact with part of another circuit. The result: a short circuit. To keep that from happening, we’ll use a carefully designed set of sewn lines (see circuit pattern in Finishing section), the thickness of felted fabric, and a little puffy paint to help isolate each of the LED circuits. The circuit diagram below provides a guide to the sewn circuits, but it’s important to keep one sewing tip in mind: unless you’re tying off a knot, never insert the needle all the way through the fabric. Instead, insert the needle parallel to the fabric halfway so the thread runs through the fabric, as shown here in this cross-section of felted fabric.
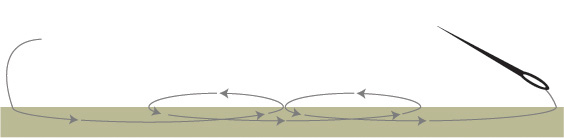
It’s also important to cut your thread and tie it off after finishing a positive circuit rather than sewing down the LED through the positive end and using the same piece of thread to then sew down the negative end of the LED. Using the same thread without cutting it effectively connects the positive and the negative circuits in the bag, and that means (yep, you guessed it) a short circuit. Directions for whip stitch can be found here. Making strong, stable electric connections with
conductive thread: Conductive thread is fairly
thin, so a strong connection to each pin is vital to
create a stable circuit. To create a strong connection
between the thread and the pin, work the thread around
the hole in the pin several times, until it’s impossible
to get another strand of conductive thread through the
hole in the pin. Caring for the electronic circuits in computational textiles First, conductive thread can rust a little if it's exposed to harsh chemicals or doesn't dry properly. For a felted bag, that means avoiding most normal laundry detergents and aiming for good ventilation during the air-drying process (depending on the humidity, that may mean careful application of a stream of warm air from a hair dryer, avoiding the LilyPad itself, the button, and the LEDs). Second, and most important, the battery should always be removed before the bag gets wet [or if you get unexpectedly caught in the rain, as soon as possible]. There's little chance that the bag or any part of its circuits will get hot, catch on fire or melt down, but too much current (and the potential for a short circuit if water connects the positive and negative circuits) can actually fry the delicate computer chip that runs the LilyPad.
|
|
DIRECTIONS STRAP/GUSSET
|
|
FINISHING Using MC, sew each end of strap/gusset to side edges
of bag body, between markers; take care not to twist strap
when sewing second end. Felting: Felt bag to given dimensions. Drain and spin to remove excess water. To make blocking form, stuff newspaper into plastic bag and shape to desired measurements. Insert blocking form into felted bag and allow to dry completely.
Needle-felted grid: Needle felting uses
a barbed needle to force wool strands to interlock and
felt. By pressing the needle repeatedly through a single
strand of yarn layered over the fabric of the bag, you
can create a grid outline just like the grid lines that
divide symbols in a real knitting chart. Try needle felting
on a hidden part of the bag (or on a felted swatch) before
working the needle felted grid, to get the hang of the
technique. Needle must be stabbed into wool components
many times before they will be securely joined. Lay bag flat with bag front facing up, making sure that
folds along side edges of bag are along center of each
gussets
IMPORTANT: Read all Pattern Notes before proceeding! Sew the positive half of the circuits: Using
conductive thread doubled and a #12 or #16 crewel/embroidery
needle, use the circuit guide below to sew positive ends
of the LEDs and the single button to the positive numbered
pins on the LilyPad.
Back Stitch:
Running Stitch:
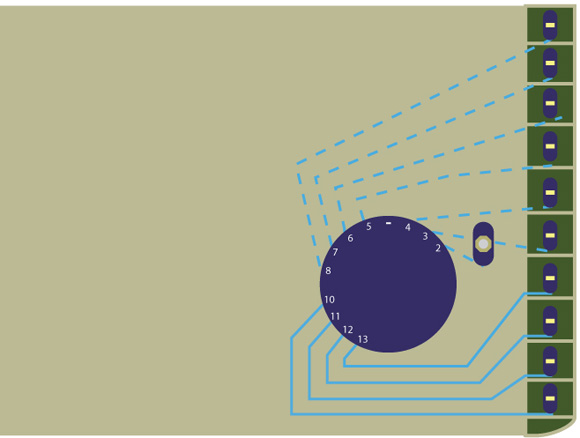
Isolate the positive circuits: Do this all in one sitting. Trim all of the excess conductive thread from the knots. Place a dot of puffy paint over each knot, using the puffy paint to make sure the conductive thread of the knot doesn’t touch any other conductive thread. Then use the puffy paint to paint over the lines of conductive thread on the inside of the bag (the dotted lines in the positive-circuit diagram above). Let dry for at least 8 hours before continuing. Sew the negative ground for the circuits: Using an extra-long piece of conductive thread doubled and the circuit grid below, sew the negative pin of the LilyPad to the negative end of the LED at the very bottom of the purse. As you sew up the side of the purse, hook the negative LED ends to this long negative circuit one by one using a hidden running stitch without cutting the conductive thread. Once all of the LED negative grounds are attached to the negative circuit, work across the top of the bag, straight down to the negative-ground pin on the LilyPad and to the negative ground on the button, all with the same strand of conductive thread. For the sake of clarity, the positive half of the circuit is shown in light blue; the negative ground is shown in bright yellow. Solid lines denote backstitch embroidery paths that show on the front of the bag; dotted lines denote running-stitch paths that are on the inside of the bag and don’t show.
If you see a positive circuit covered with puffy paint, use the puffy paint as insulation to make sure the positive-circuit threads and negative circuit threads don’t touch. Isolate the negative circuits: Do this all in one sitting. Trim all of the excess conductive thread from the knots. Place a dot of puffy paint over each knot, using the puffy paint to make sure the conductive thread of the knot doesn’t touch any other conductive thread. Then use the puffy paint to paint over the lines of conductive thread on the inside of the bag (the yellow dotted lines in the negative-circuit diagram above). Let dry for at least 8 hours before continuing. Upload the default leaf-lace LED pattern to the LilyPad: Follow the directions here to download the Arduino software and connect your LilyPad via USB port to your computer. Then click to download KnowItAllBag.pde and save it on the Desktop of your computer. In the Arduino software, select “Open” from the “File” menu and navigate to your desktop. You should see KnowItAllBag.pde. Select that file and press the “Open” button. Now follow the uploading instructions (steps 2 and 3 here) to upload KnowItAllBag.pde to the LilyPad. Test the pattern!
Sew in the power source: Place the battery holder inside the bag in a location near the LilyPad that will be convenient for you. Using conductive thread doubled, sew one of the negative grounds of the battery holder to the negative pin or any part of the negative circuit on the inside of the bag. Trim knots and use puffy paint to isolate the negative power source ground. Let dry for at least 8 hours before continuing. Using conductive thread doubled, sew the positive pin of the battery holder to the positive pin on the LilyPad (between the negative pin and the #5 pin). Trim knots and use puffy paint to isolate the negative power source ground. Let dry for at least 8 hours before continuing. Generate a custom knitting pattern or row counter: |
| ABOUT THE DESIGNER |
|
Kalani Craig is a PhD candidate in Medieval History at Indiana University. A native of Portland, Ore., Kalani is devoted to the twin arts of coffee and wine drinking and amuses herself by reading funny bits of medieval Latin out loud. The record of her adventures, knitting and otherwise, is intermittently updated at hapagirl.com. Inspirational thanks to Kylie
A. Peppler from Indiana
University’s Learning Sciences program,
Leah
Buechley from MIT
Media Lab’s High-Low
Tech Group,
and their teams for holding the computational
workshop that started this project. |
|
Pattern & images © 2010 Kalani Craig. Contact Kalani |
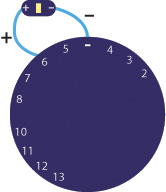 For
the Know-It-All Knitting Bag, each of the 10 LEDs and the
row-counter button has its own numbered pin on the main
board. When the board is plugged in to its power source,
the little computer chip sends a message to each numbered
pin in a programmed order to turn that pin’s
LED light on and off. Voilà, a knitting chart!
For
the Know-It-All Knitting Bag, each of the 10 LEDs and the
row-counter button has its own numbered pin on the main
board. When the board is plugged in to its power source,
the little computer chip sends a message to each numbered
pin in a programmed order to turn that pin’s
LED light on and off. Voilà, a knitting chart!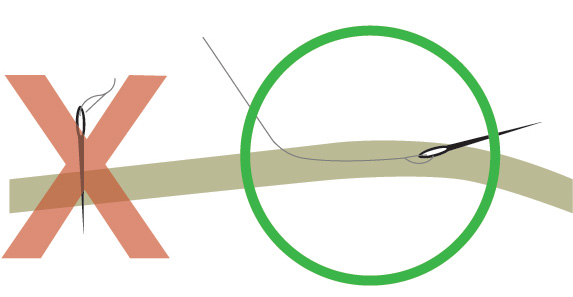


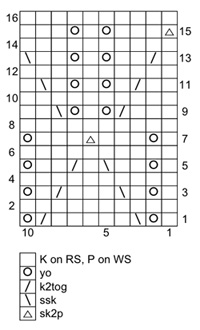 The default chart included in KnowItAllBag.pde is adapted
from Fern Lace in Barbara Walker’s Treasury of Knitting
Patterns.
The default chart included in KnowItAllBag.pde is adapted
from Fern Lace in Barbara Walker’s Treasury of Knitting
Patterns.