
|
|
 |
|
|
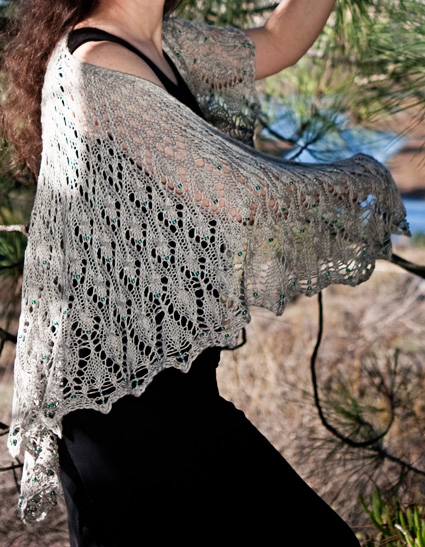 |
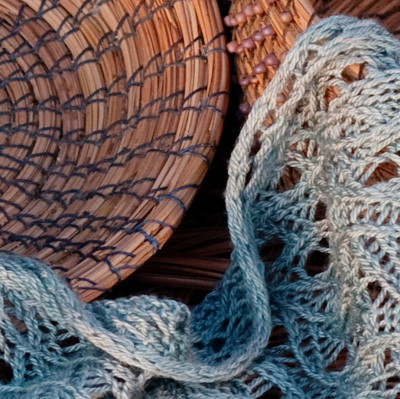
The Torrey pine (Pinus torreyana) is a tree endemic
to coastal Southern California. Found nowhere else in the world,
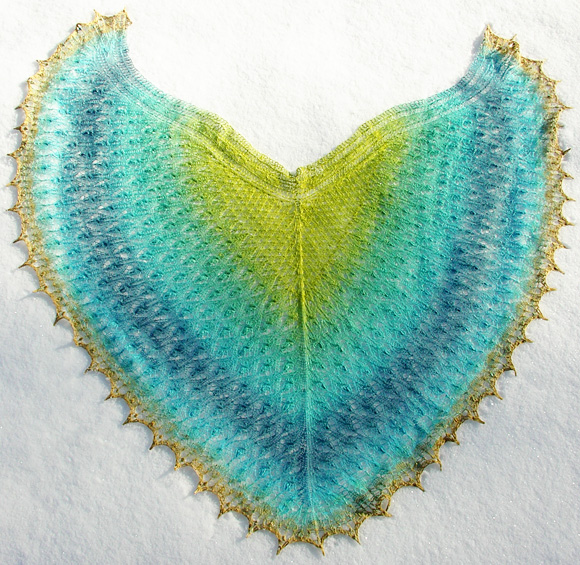
it clings to sandy bluffs, perched between sea and sky. And as the Torrey pines twine their branches skyward, and their roots downward into the earth, Torreyana also grows in two directions. Beginning in the middle, first knit upwards, then downwards, the lace patterns themselves incorporate a half stitch offset, so the edge motifs continue seamlessly. Torreyana has shoulder shaping built into the charts that gives it an almost Faroese silhouette. |
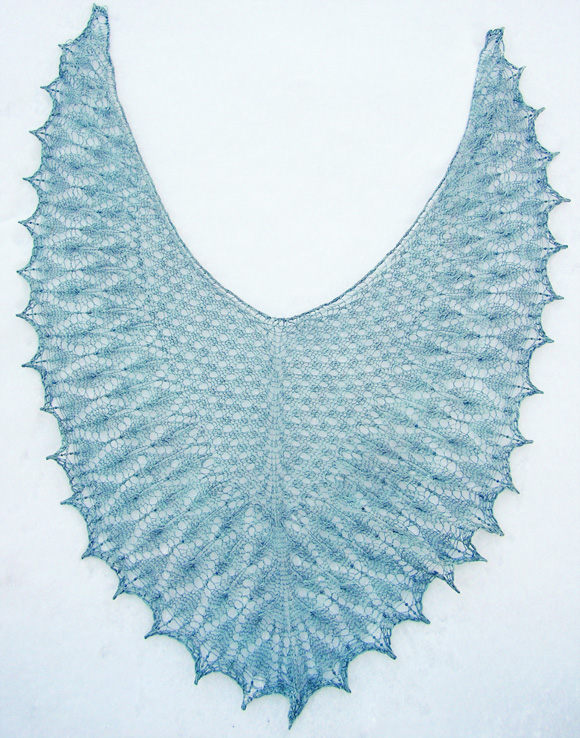
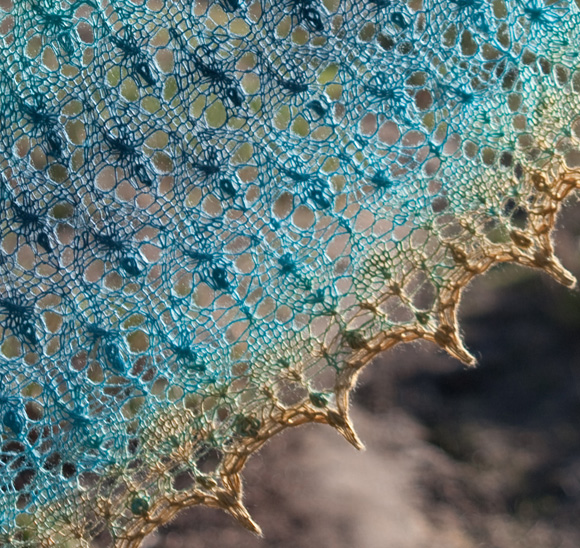
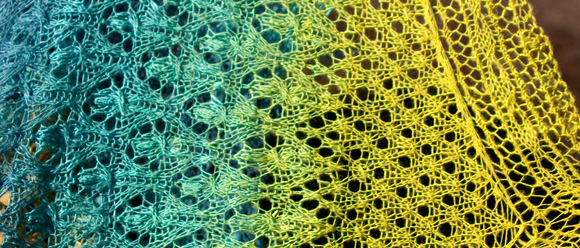
The body of the shawl is knit upwards beginning with a gradual decrease rate in Pine Cone chart. After transitioning to the Pine Nut chart, the decrease rate becomes much steeper. The depth and shape of the wingspan can be adjusted by the ratio of the two stitch patterns. More Pine Cone repeats (and fewer Pine Nut repeats) leads to a deeper, more Faroese shape, but requires more yarn. Fewer Pine Cone repeats (and more Pine Nut repeats) makes a chevron shape, and uses less yarn. The difference between these two shapes can be seen by comparing the silhouettes of the Handspun Shawl and the Petrol Shoulderette. Torreyana has two selvedge options, a simple I-cord knit along with the shawl, or for intrepid knitters, a Chainlink Selvedge that incorporates faggoting patterned on both rows, along with an Estonian lace stitch from the body of the shawl that results in an entirely different effect when used singly in the selvedge. The wider Chainlink Selvedge does require short rows to curve around the shawl’s shoulder shaping. |
|
|
|
 |
|
SIZE |
|
FINISHED MEASUREMENTS |
|
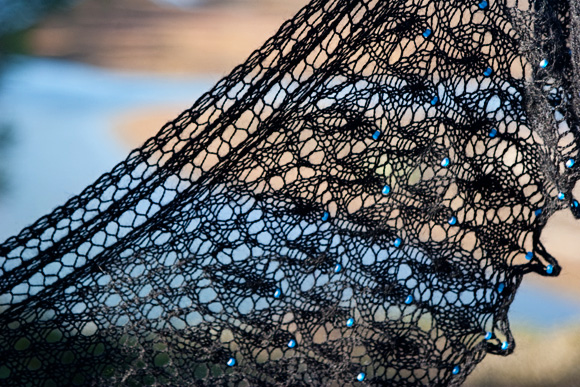
MATERIALS Note for All Versions: For each shawl, two circular needles are required. It is useful to have needles that are different colors or types, so that they are easy to tell apart when beginning the shawl body. Use needles that are 32 inches or longer. Black Lace Weight Scarf [below]:
Petrol Fingering Weight Shoulderette [below]:
Silver Worsted Weight Small Shawl [below]:
Handspun Fingering Weight Full-Sized Shawl [below]:
|
27 wpi DRAFTING METHOD |
|||||
|
GAUGE |
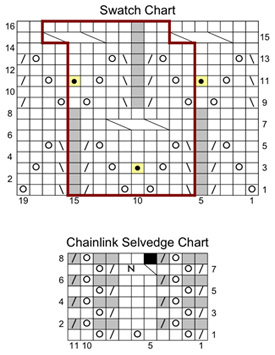
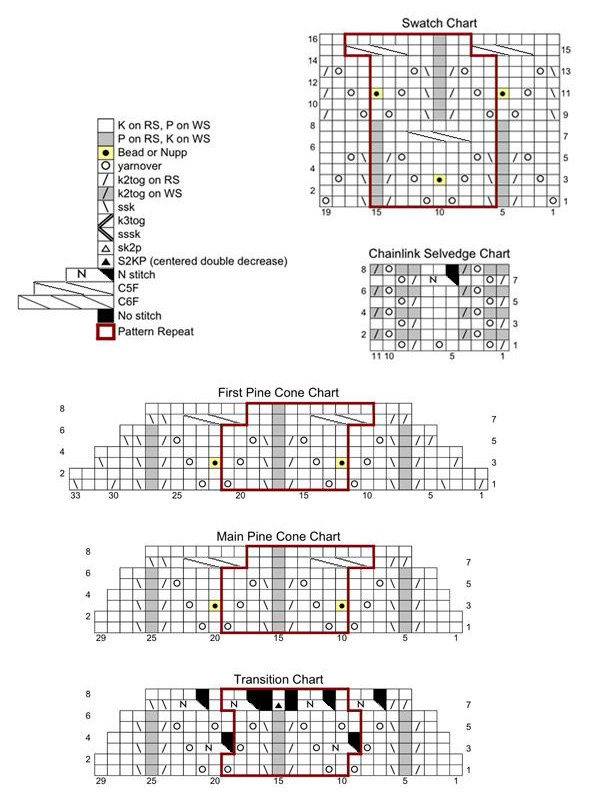
CO 33 sts. P 1 WS row. Working 2 sts at each edge in garter st and all other sts following Swatch Chart, work Rows 1-16 of chart twice. (Outlined pattern repeat will be worked twice in each row.) BO all sts. Block swatch, allow to dry, unpin and allow to relax before measuring gauge. Black Lace Weight Scarf: 20 sts /32 rows = 4 inches using US #5/3.75mm needles Petrol Fingering Weight Shoulderette: 17 sts /20 rows = 4 inches using US #8/5.0mm needles Silver Worsted Weight Small Shawl: 13 sts /19 rows = 4 inches using US #8/5.0mm needles Handspun Fingering Weight Full-Sized Shawl: 19 sts /21 rows = 4 inches using US #6 / 4.0 mm needles |
|
PATTERN NOTES |
|
 Directions for blocking a lace shawl may be found here. Instructions for grafting can be found here. Estonian Stitches: Symmetry: As written, this shawl is not strictly symmetrical; some of the stitches have a directional slant, like the N stitches and cable crosses. If you wish to make a completely symmetrical shawl, work as follows on the left half of the shawl:
Note that the left half of the shawl (as it will be worn) will be the second half when working the body, but will be the first half when working the edging.
Modifying the size: Working the Edging before finishing the body can help determine how much yarn you have, and therefore how many repeats you can make of the Pine Cone Chart. However, work at least one Pine Cone repeat before starting the edging. The edging chart begins with cable crosses in the first row. These do not work well directly from the provisional cast-on! Pattern repeats when working from charts: The red vertical lines indicate the edges of the pattern repeats. Work the stitches to the right of the red lines, repeat the stitches between the red lines until just enough stitches remain to work the stitches to the left of the red lines. Stitch Markers: k3tog: K 3 sts together. Reverse sk2p: Ssk, sl new stitch purlwise
back to left needle, pass next stitch on left needle over
new stitch. Sl new stitch purlwise back to right needle.
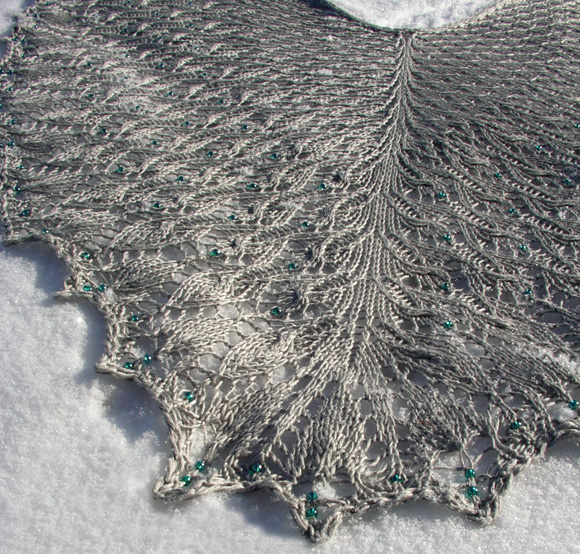
2 sts decreased. C6F: Sl 3 sts to cable needle and hold to front of work; k3 from left needle, k3 from cable needle. C5B: Sl 3 sts to cable needle and hold to back of work; k2 from left needle, k3 from cable needle. This results in 2 stitches crossing over 3 stitches. C6B: Sl 3 sts to cable needle and hold to back of work; k3 from left needle, k3 from cable needle. N st: Sl 1 knitwise, k2, pass slipped st over both sts just knit. 3 sts decreased to 2 sts. Reverse N st: K2, sl 2 sts just worked back to left needle purlwise, pass next stich on left needle over two new sts. Sl 2 new sts back to right needle purlwise. 3 sts decreased to 2 sts. Beads and Nupps: Beads: Beads are placed on RS rows using a crochet hook. To apply a bead to a st, slip bead onto crochet hook, slip st from left needle onto hook, slide bead down hook and around st, slip st back onto left needle, then k st as usual. Detailed directions can be found here. Nupp (5-stitch – shown on Handspun Shawl):
[K1, yo, k1, yo, k1] into same st. 1 st increased to 5
sts. On following WS row, purl these 5 sts together. Selvedges: Selvedges for Fast Decrease Rate (Transition and
Pine Nut Charts): |
The charts for this pattern are very large. Each set fits on a letter-sized page. Click the chart name below and print the resulting page. Pine Cone chart • Pine Nut & edging charts |
|
DIRECTIONS 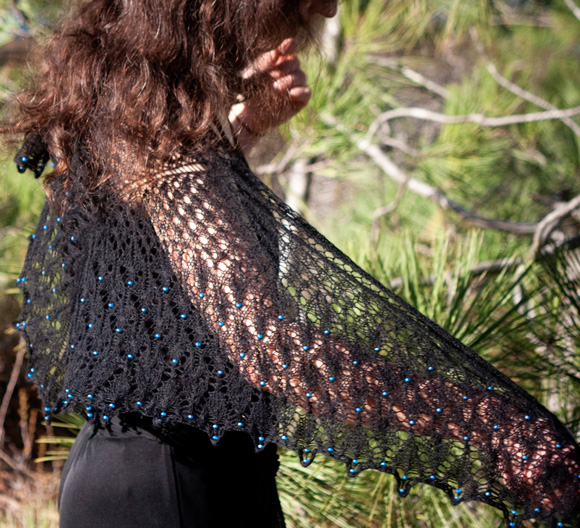
Casting On: Note: Judy’s Magic Cast-on creates 2 rows of stitches. If some other provisional cast on is used that creates a single row of stitches, work one wrong side row in plain purl before beginning First Pine Cone Chart. Hold the Edging Needle on top [Judy’s Needle #2]
and the Body Needle on the bottom [Judy’s Needle
#1]. If using I-cord Selvedge, CO 325[325, 345, 445] sts (Body
Needle will hold 324[324, 344, 444] sts). Shawl body is worked over sts on Body Needle. First Pine Cone Chart: Note: When working body of shawl (Pine Cone and Pine Nut Charts), there is no center stitch; center of shawl is indicated by stitch marker. After working selvedge at beginning of row as set, work first half of shawl body following chart, slip center marker, work second half of shawl body in the same way as first half, then work selvedge at end of row as set. Work Rows 2-8 of First Pine Cone Chart. 288[288, 308,
408] sts with I-cord Selvedge; 306[306, 326, 426] sts with
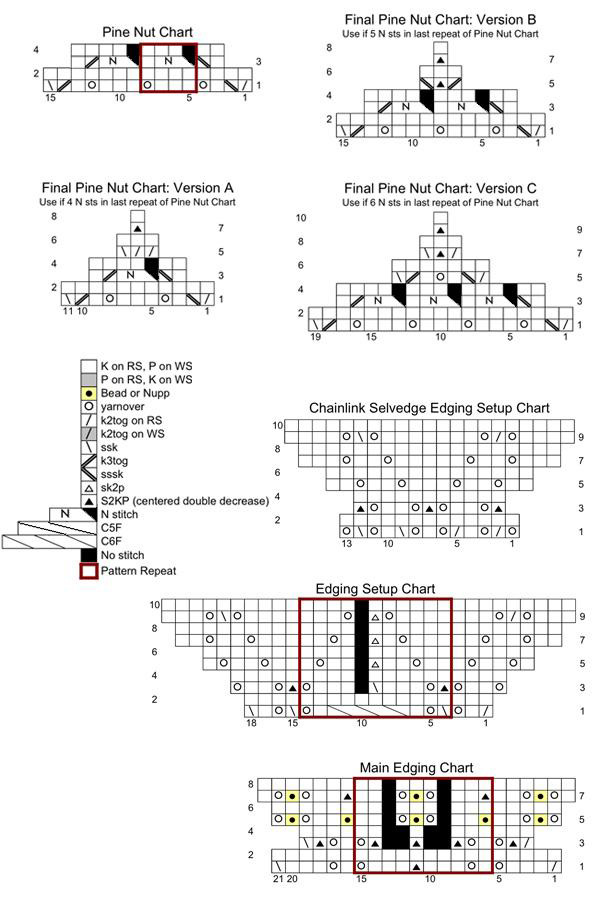
Chainlink Selvedge. Main Pine Cone Chart: Work Rows 1-4 of Pine Nut Chart 5[6, 6, 6] times, working selvedges for fast decrease rate. 42[48, 36, 36] sts with I-cord Selvedge; 60[66, 54, 54] sts with Chainlink Selvedge. There are 18[21, 15, 15] sts in each half of shawl body (excluding selvedge sts). Final Pine Nut Chart: Using Version B[C, A, A] of chart, work all rows of Final Pine Nut Chart, working selvedges as usual (not for fast decrease rate). If working Chainlink Selvedge and Version C, do not work yo at center of selvedge when working Row 9 of Final Pine Nut Chart. 8 sts remain with I-cord Selvedge; 26 sts remain with Chainlink Selvedge. Divide remaining sts in half, sliding each half to separate ends of circular needle. Fold work in half so that live sts meet, and graft halves together. EDGING Edging Setup Chart: To line up motifs, the C6F cable cross in Row 1 of Edging Setup Chart will be centered over the single columns of k sts visible on WS of Pine Cone section of shawl body. Because the Edging is knit downwards from a provisional cast on, the stitches in Row 1 are offset half a stitch. The ssk in the center of each repeat in row 3 adjusts for this, lining up the lace motifs with those in the shawl body. Important: Unlike the shawl body, the Edging Setup section of the shawl has a center st between the two halves of the shawl. Work this st in stockinette st. Work Row 1 of Edging Setup Chart and set up selvedges follows:
 Row 1 [RS]: Work I-cord Selvedge over first 3 sts, k1, place marker; work Row 1 of Edging Setup Chart, working outlined pattern repeat 15[15, 16, 21] times; place marker, k1, place marker; work Row 1 of Edging Setup Chart, working outlined pattern repeat 15[15, 16, 21] times; place marker, k1, work I-cord Selvedge over last 3 sts. 353[353, 375, 485] sts.
Chainlink Selvedge [shown below]:When
working Edging Setup Chart over main portion of
shawl, Chainlink Selvedge Edging Setup
Chart will be worked over selvedge sts.
Both Versions: Work Rows 2-10 of Edging Setup Chart, working selvedges as set. 347[347, 367, 467] sts with I-cord Selvedge; 385[385, 405, 505] sts with Chainlink Selvedge. Main Edging Chart: I-cord Selvedge: There will no longer be 1 st between
selvedge sts and edging sts. Remove markers when working
Row 1. Chainlink Selvedge: First and last 2 sts of each
row will be worked in garter stitch as set; all other sts
will be worked following Main Edging chart. Remove markers
when working Row 1. Both Versions: Work Rows 2-8 of Main Edging Chart, working selvedges as set. 283[283, 299, 379] sts with I-cord Selvedge; 313[283, 299, 409] sts with Chainlink Selvedge. BO Row [RS]: Using two strands of yarn held together, p2, [sl both sts back to left needle and p2tog, p1] to last st, sl both sts back to left needle and p2tog. Break yarn and draw through last st. |
|
FINISHING |
| ABOUT THE DESIGNER |
|
|
|
Pattern & images © 2010 Elizabeth Freeman. Contact Elizabeth |
