
|
 |
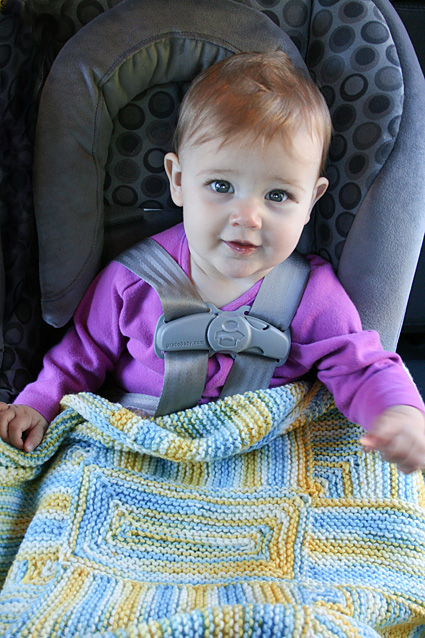 |
A fiber dyeing experiment resulted in two 4 ounce bumps of Superwash BFL that weren’t compelling by themselves, but had potential when combined. I decided to spin all 8 ounces into a 3-ply yarn and then design something for little Evelyn who was born last year. The handspun had long runs of color which I thought would be
perfect for mitered squares—which then lead to a car seat
blankie made in “patchwork” blocks. The great thing
about this project is there is no sewing required. Blocks
are joined by picking up sts or Three-Needle Bind Off. I even
joined the beginning and end of the i-cord border with a Three-Needle
Bind Off.
|
The finished blankie is the perfect size to make a little one cozy in a car seat. I can also see Evelyn transforming this into a cape, a picnic blanket, swaddling clothes for her dolls, and whatever else she can imagine. Although Evelyn’s No-Sew Blankie was originally made in handspun [see images below], I’m also including photos and requirements for the blankie in a readily available yarn from Lisa Souza [shown above]. Her Superwash Merino is wonderfully soft and has long runs of color which make it perfect for this project. |
|
|
|
 |
|
SIZE |
|
FINISHED MEASUREMENTS |
|
MATERIALS Finished Yarn:
Tools |
|||||
|
GAUGE |
18 sts/21 rows = 4 inches
in stockinette stitch |
|
PATTERN NOTES |
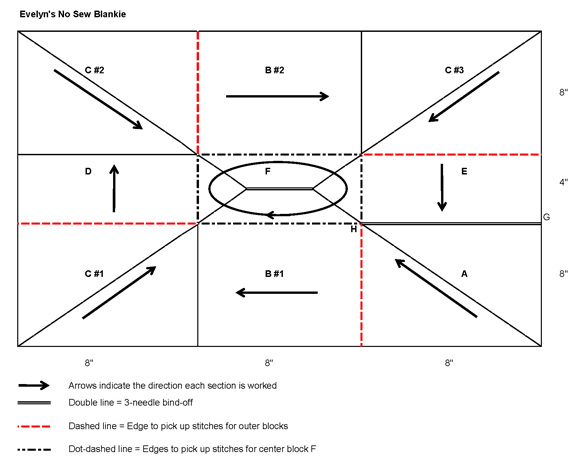
Mitered Square A followed by Garter Block B followed by Mitered Square C, and so on. The arrows in the schematic indicate the direction each section is worked. After completing a mitered square, stitches are picked up along one edge of the mitered square—denoted by a dotted line in the schematic—to set-up the next garter st section. Slip markers as you come to them unless otherwise instructed. Rm: Remove marker. Slip all sts as if to purl unless otherwise instructed. |
|
DIRECTIONS
Using a smaller circular needle, CO 61 sts. Set-up row: K all sts. Row 1 [RS]: K29, SK2P, k1, pm, k to end of row. 59 sts. Row 2 [WS]: K all sts. Row 3 [RS]: K to 3 sts before marker, SK2P, rm, k1, pm, k to end of row. 2 sts decreased. Row 4 [WS]: K all sts. Repeat Rows 3 and 4 until 5 sts rem, ending with a WS row. Next row [RS]: K1, SK2P, rm, k1. 3 sts. Next row [WS]: K all sts. Next row [RS]: SK2P. Do not turn work. 1 st. Garter Block B #1 With RS facing, pick up and knit 30 sts in the garter ridges along the edge of the mitered square just worked as indicated by the dashed line in the schematic. 31 sts total. Knit 60 rows. Note: With RS facing, Garter Block B will have 30 garter ridges and you will have just completed a RS row. Mitered Square C #1 Turn work so WS is facing. Place marker on left needle and using Cable Cast-on, CO 61 sts. Do not turn work. 92 sts total. Set-up row [WS]: K until there is 1 unworked st before marker, sl1, rm, slip st back to left needle, k2tog, pm on left needle. Turn work. 1 st decreased. 91 sts. Row 1 [RS]: K29, SK2P, k1, pm, k to end of row. 2 sts decreased. 89 sts. Row 2 [WS]: K until there is 1 unworked st before second marker, sl1, rm, slip st back to left needle, k2tog, pm on left needle. Turn work. 1 st decreased. Row 3 [RS]: K to 3 sts before marker, SK2P, rm, k1, pm, k to end of row. 2 sts decreased. Repeat Rows 2 and 3 until a total of 8 sts rem. Work Row 2 once more. 7 sts. Next row [RS]: K1, SK2P, rm, k1. 5 sts. Next row [WS]: K2, sl1, rm, slip st back to left needle, k2tog. Turn work. 4 sts. Next row [RS]: SK2P. Turn work. 2 sts. Next row [WS]: K2tog. 1 st. Garter Block D With RS facing, pick up and knit 30 sts in the garter ridges along the edge of the mitered square just worked as indicated by the dashed line in the schematic. 31 sts total. Knit 30 rows. Note: With RS facing, Garter Block D will have 15 garter ridges and you will have just completed a RS row. Mitered Square C #2 Work as for Mitered Square C #1. Garter Block B #2 Work as for Garter Block B #1. Mitered Square C #3 Work as for Mitered Square C #1. Garter Block E Push all of the sts to the opposite tip of the circular needle, towards point G in the schematic. Lay the blanket flat with WS facing and make sure it is not twisted. With the end of the circular needle closest to the center of the blanket or with a new needle, use the current working yarn to pick up and knit 1 st at the edge of Mitered Square A at point H in the schematic pulling the yarn firmly to minimize slack; pick up and knit 30 sts along the edge of Mitered Square A from point H to point G in the schematic. 62 sts. Note: You now have 31 sts from the edge of Mitered Square A on one needle tip and 31 sts from the edge of Garter Block E on another needle tip. Both needle tips and the working yarn are at the outer edge of the blanket at point G in the schematic. With WS facing and using a larger needle as your right hand needle, join the blanket using a Three-Needle Bind Off working from the outer edge towards the center of the blanket, from point G to point H in the schematic. 1 st. Center Mitered Block F Transfer the 1 live st to a smaller circular needle or dpn. With RS facing, pick up and knit the following sts as indicated by the dot-dashed lines in the schematic, rearranging the sts on your needle(s) as appropriate:
94 sts total. Do not turn. Rnd 1: P2, p1 (corner st), p1, place marker A (use
the unique color/style marker here), p29, p1 (corner st), p1,
pm, p14, p1 (corner st), p1, pm, p29, p1 (corner st), p1, pm,
p12. 94 sts. Prepare for Three-Needle Bind Off: With WS facing, rm all markers and arrange sts so the first 18 sts of the round are on one needle tip and the second 18 sts of the round are on a second needle tip, and both needle tips are at the beg of the round where the working yarn is. Using a larger needle as your right needle, close the blanket with a Three-Needle Bind Off. 1 st. Cut yarn leaving a 6 inch tail and elongate the last st, making it larger and larger until the tail pulls free. I-cord BorderNote: The border can be started anywhere along the edge, but it is easier if you avoid starting the border at a corner of the blanket. The border is worked by knitting 2 sts of the i-cord, then knitting the third st of the i-cord together, through the back loops, with a stitch picked up along the border of the blanket. The i-cord will be attached to the blanket at 334 pick-up points along the edge of the blanket:
Using larger needles, CO 3 sts. I-cord row: With right needle pick up the next st along the border of the blanket; keeping yarn in back of work, slip all four sts from the right needle to the left needle, k2, k2togtbl. Do not turn. Repeat I-cord row until you reach a corner of the blanket (do not work the corner st). I-cord corner: Slip 3 sts from the right needle to the left needle, k3, work I-cord row at corner of blanket, slip 3 sts from the right needle to the left needle, k3. Do not turn. Continue working I-cord row along the sides of the blanket and the I-cord corner at the corner sts of the blanket until you reach the beginning of the border. Finish by picking up 3 sts at the beginning of the i-cord border and join the beginning of the border to the end of the border using Three-Needle Bind Off. OR Cut the yarn leaving a 6 inch tail and draw through the live stitches of the i-cord. Using a darning needle, sew the beginning of the border to the end of the border. |
|
FINISHING |
| ABOUT THE DESIGNER |
|
Janice knits, spins, and dyes fiber in
her home in Northern California. In her
spare time she also sings
backup in a band — her fellow band members often see
her knitting during down time at rehearsal
and soundcheck. |
|
Pattern & images © 2011 Janice Kang. Contact Janice |