Knitty: little purls of wisdom
The Loopy Ewe
Title
beauty shot

Tangy

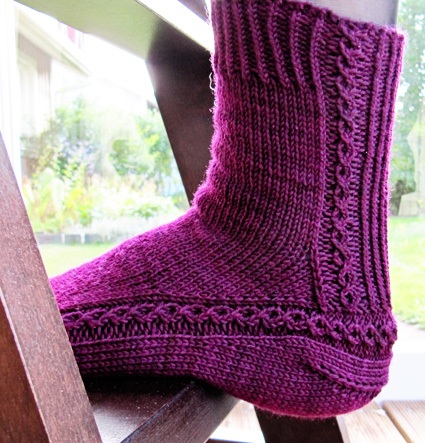
These socks were designed to introduce a novel, fun heel construction for those who have already seen everything. I hope this pattern inspires the experienced sock knitter and encourages the advanced beginner to learn new techniques beyond her current repertoire.

Since the design is based on ordinary sock construction, the size and fit of the sock is easy to adjust by the knitter.

 
spacer photos: Nuoska

SIZE
M[L] (US 7| EU 38 and US 8/9|39/40, respectively)
See Pattern Notes for guidelines for working a smaller version.

FINISHED MEASUREMENTS
Circumference: 7[8] inches
Foot length: 9.5[10] inches, adjustable to fit (instructions are given in pattern notes)

spacer

MATERIALS
Yarn

spacer Wollmeise Sockenwolle 80/20 Twin[80 % Merino, 20 % PA; 510 yd/467 m per 150 g skein]; color Petit Poison nr. 5 or Petersilie; 1[1] skein (size M shown in green, Petersilie, size L shown in burgundy, Petit Poison nr. 5)

Recommended needle size
[always use a needle size that gives you the gauge listed below -- every knitter's gauge is unique]
spacer 1 set of US #2.5/3 mm double-point needles
OR
spacer US #2.5/3 mm circular needle for magic loop
spacer 1 US E /3.5 mm Crochet hook

Notions
spacer Yarn needle
spacer extra dpn for three-needle bind off
spacer cable needle
spacer contrasting color waste yarn of similar weight for the provisional cast on
spacer 2 stitch markers

spacer

GAUGE

30 sts/42 rounds = 4 inches in stockinette stitch
 

PATTERN NOTES
[Knitty's list of standard abbreviations and techniques can be found here.]

Construction:
These socks are knitted from the toe up. The socks are started below the toes with a provisional cast on, and the toe is knitted flat using short rows. The cast on sts are then picked up and the foot is worked in the round, working increases to create gussets.

The heel is worked using short rows and the heel flap ornament is knitted sideways and connected to the heel at the same time. The ornament is bound off together with gusset sts and sts are picked up for the upper heel flap along the side of the ornament. The upper heel flap is worked flat and the leg and cuff are worked in the round.

Notes on Sizing:
These socks fit best when worn with negative ease – particularly in the length of the foot. The ornament will be floppy if the sock does not fit tightly on your foot.

To knit size S (US 5.5/6.5 | EU 36/37) socks, use size M instructions and thinner yarn, such as Araucania Ranco Solid [75 % Wool, 25 % Nylon; 376 yd/344 m per 100 g skein]; 1 skein, at gauge 32 sts and 46 rows /4 inches.

Sock circumference for size small is approx. 7 inches and length approx. 9 inches.

You can easily adjust the foot length by working an even number of rounds less or extra before (or after) the gusset increases. For adjusted sizing, start working the gusset increases 4.5(5) inches short of desired foot length and the heel 2.25(2.75) inches short of desired foot length.

C2L:  On RS, slip 1 st to cn and hold in front, k1 tbl, then k1 tbl from cn. On WS, slip 1 st to cn and hold in front, p1 tbl, then p1 tbl from cn.

C2R: On RS, slip 1 st to cn and hold in back, k1 tbl, then k1 tbl from cn. On WS, slip 1 st to cn and hold in back, p1 tbl, then p1 tbl from cn.

T2L: On RS, slip 1 st to cn and hold in front, p1, then k1 tbl from cn. On WS, slip 1 st to cn and hold in front, p1 tbl, then k1 from cn.

T2R: On RS, slip 1 st to cn and hold in back, k1 tbl, then p1 from cn.  On WS, slip 1 st to cn and hold in back, k1, then p1 tbl from cn.

Swyif: with yarn in front of right hand needle, slip one st as if to purl. Pull the yarn back tightly after slipping, so that the st from previous row is pulled on top of the right hand needle. Now the st has two strands next to each other and they will be knitted together the next time the st is worked. This stitch is often used in short row heels instead of wrapping, especially in German patterns.   A tutorial can be found here; it’s written in Finnish, but the pictures are very helpful. Wrap and turn can be used instead.

When the pattern requires you to slip a stitch with yarn in front in the standard manner, the instructions will indicate this.

Instructions for working the crochet chain provisional cast on can be found here.
Directions for Jeny's surprisingly strechy bind off can be found here.
The three needle bind off is illustrated here.
Tips for working cables without a cable needle can be found here.

spacerCharts
The chart for this pattern is very large and fits on a letter-sized page.
Click here and print the resulting page.

DIRECTIONS
TOE
CO 26[30] sts using the crochet chain (or your favorite) provisional cast on method.

Row 1 [WS]: P.

Row 2 [RS]: K.

Row 3 [WS]: Swyif, p25[29], turn.

Row 4 [RS]: Swyif, k24[28], turn.

Row 5 [WS]: Swyif, p23[27], turn.

Row 6 [RS]: Swyif, k22[26], turn.

Row 7 [WS]: Swyif, p21[25], turn.

Row 8 [RS]: Swyif, k20[24], turn.

Row 9 [WS]: Swyif, p19[23], turn.

Row 10 [RS]: Swyif, k18[22], turn.

Row 11 [WS]: Swyif, p17[21], turn.

Row 12 [RS]: Swyif, k16[20], turn.

Row 13 [WS]: Swyif, p15[19], turn.

Row 14 [RS]: Swyif, k14[18], turn.

Row 15 [WS]: Swyif, p13[17], turn.

Row 16 [RS]: Swyif, k12[16], turn.

Row 17 [WS]: Swyif, p11[15], turn.

Row 18 [RS]: Swyif, k10[14], turn.

Row 19 [WS]: Swyif, p9[13], turn.

Row 20 [RS]: Swyif, k8[12], turn.

Row 21 [WS]: Swyif, p7[11], turn.

Size M only:
Proceed to final step of first half of toe.

Size L only:
Row 22
[RS]: Swyif, k10 turn.
Row 23 [WS]: Swyif, p9, turn.
Row 24 [RS]: Swyif, k8, turn.
Row 25 [WS]: Swyif, p7, turn.

Final step of first half of toe:
Row 1 [RS]: Swyif, k16[18], knitting the two strands of each slipped st together, turn.
Row 2 [WS]: Slip with yarn in front, p25[29], purling the two strands of each slipped st together.

Second half of the toe:
Row 1 [RS]: Slip one st wyib, k16[18], turn.
Row 2 [WS]: Swyif, p7, turn.
Row 3 [RS]: Swyif, k6, work the two strands of the next stitch together, k1, turn.
Row 4 [WS]: Swyif, p7, work the two strands of the next stitch together, p1, turn.
Row 5 [RS]: Swyif, k8, work the two strands of the next stitch together, k1, turn.
Row 6 [WS]: Swyif, p9, work the two strands of the next stitch together, p1, turn.
Row 7 [RS]: Swyif, k10, work the two strands of the next stitch together, k1, turn.
Row 8 [WS]: Swyif, p11, work the two strands of the next stitch together, p1, turn.
Row 9 [RS]: Swyif, k12, work the two strands of the next stitch together, k1, turn.
Row 10 [WS]: Swyif, p13, work the two strands of the next stitch together, p1, turn.
Row 11 [RS]: Swyif, k14, work the two strands of the next stitch together, k1, turn.
Row 12 [WS]: Swyif, p15, work the two strands of the next stitch together, p1, turn.
Row 13 [RS]: Swyif, k16, work the two strands of the next stitch together, k1, turn.
Row 14 [WS]: Swyif, p17, work the two strands of the next stitch together, p1, turn.
Row 15 [RS]: Swyif, k18, work the two strands of the next stitch together, k1, turn.
Row 16 [WS]: Swyif, p19, work the two strands of the next stitch together, p1, turn.
Row 17 [RS]: Swyif, k20, work the two strands of the next stitch together, k1, turn.
Row 18 [WS]: Swyif, p21, work the two strands of the next stitch together, p1, turn.
Row 19 [RS]: Swyif, k22, work the two strands of the next stitch together, k1, turn.
Row 20 [WS]: Swyif, p23, work the two strands of the next stitch together, p1, turn.
Row 21 [RS]: Swyif, k24, work the two strands of the next stitch together, k0[1], turn.

Size L only:
Row 22 [WS]: Swyif, p25, work the two strands of the next stitch together, p1, turn.
Row 23 [RS]: Swyif, k26, work the two strands of the next stitch together, k1, turn.
Row 24 [WS]: Swyif, p27, work the two strands of the next stitch together, p1, turn.
Row 25 [RS]: Swyif, k28, work the two strands of the next stitch together, turn.

For size M and L:
Next row [WS]: Slip one stich with yarn in front, p25[29], turn.
Next row [RS]: Slip one stitch with yarn in back, k25[29].

At the end of the final row do not turn, but pick up and knit one st between the cast on sts and the sts on needle. Unravel the provisional cast on, picking up 25[29] sts from the loops. Knit the picked up sts, and pick up and knit one extra st between the cast on sts and the first sts of the row. If required, place a marker for start of round, and arrange needles for working in the round. 53[61] sts.

FOOT AND GUSSETS

Left sock:
Round 1: Work appropriate cable chart row 1 across first 6 sts of round; k to 1 st before end of round, purl the last st together with the first st of the next round (first st of cable chart). 52[60] sts
Round 2: Starting at stitch 2 of cable chart, work rem 5 sts of row 2 of chart, k to end of round.
Continue to work as established until 10 full repeats of the cable chart are complete.

Gusset round 1: Work appropriate cable chart row 1 across first 6 sts of round, k1, m1, knit 12[16] sts, m1, place marker, k to end of round. 54[62] sts - 2 sts increased for the gussets.
Gusset round 2: Work even in pattern.
Gusset round 3: Work appropriate cable chart as established, k1, m1, k to marker, m1, slip marker, k8, m1, knit to last st of round, m1, k1. 58[66] sts - 4 sts increased, 2 sts increased for the gussets, 2 for the ornament.
Gusset round 4: Work even in pattern.
Gusset round 5: Work the cable chart as established, k1, m1, knit to marker, m1, slip marker, knit to end of round. 2 sts increased for the gussets.
Gusset round 6: Work even in pattern.
Work Gusset rounds 3-6 three times more.
8 sts increased for the heel ornaments, 18 sts increased for the gussets.

Repeat Gusset rounds 5 & 6 1[3] more times.  20[24] gusset sts increased, 80[92] sts.

Next round: Work cable chart as established and k to last 4 sts of the round. The markers can be removed on this round. Turn so that WS is facing.

Proceed to HEEL.

Right sock:
Round 1: K19[23] sts, place marker, k1, work appropriate cable chart row 1 across next 5 sts, p2tog (last st of chart with next st); k to end of round. 52[60] sts.
Round 2: Knit to cable, work the cable chart as established and knit to end.
Continue to work as established until 10 full repeats of the cable chart are complete.

Gusset round 1: K7, m1, k to marker, m1, slip marker, work in pattern to end of round. 54[62] sts - 2 sts increased for the gussets.
Gusset round 2: Work even in pattern.
Gusset round 3: K7, m1, k to marker, m1, slip marker, k1, work the cable chart, k1, m1, knit to last st of round, m1, k1. 58[66] sts - 4 sts increased, 2 for the gussets and 2 for the ornament.
Gusset round 4: Work even in pattern.
Gusset round 5: K7, m1, k to marker, m1, slip marker, work in pattern to end of round. 2 sts increased for the gussets.
Gusset round 6: Work even in pattern.

Work Gusset rounds 3-6 three times more.
8 sts increased for the heel ornaments, 18 sts increased for the gussets.

Repeat Gusset rounds 5 & 6 1[3] more times.  20[24] gusset sts increased, 80[92] sts.
Next round: Work as established to the 4 last sts of round, removing markers as you go. Turn so that WS is facing.

Proceed to HEEL.

HEEL
When working the heel, 54[62] instep sts are left on hold.
Row 1 [WS]: Swyif, p25[29], turn.
Row 2 [RS]: Swyif, knit 24[28], turn.
Row 3 [WS]: Swyif, p23[27], turn.
Row 4 [RS]: Swyif, k22[26], turn.
Row 5 [WS]: Swyif, p21[25], turn.
Row 6 [RS]: Swyif, k20[24], turn.
Row 7 [WS]: Swyif, p19[23], turn.
Row 8 [RS]: Swyif, k18[22], turn.
Row 9 [WS]: Swyif, p17[21], turn.
Row 10 [RS]: Swyif, k16[20], turn.
Row 11 [WS]: Swyif, p15[19], turn.
Row 12 [RS]: Swyif, k14[18], turn.
Row 13 [WS]: Swyif, p13[17], turn.
Row 14 [RS]: Swyif, k12[16], turn.
Row 15 [WS]: Swyif, p11[15], turn.
Row 16 [RS]: Swyif, k10[14], turn
Row 17 [WS]: Swyif, p9[13], turn.


For size M only: Proceed to Heel flap ornament

Row 18 [RS]: Swyif, k-[12], turn.
Row 19 [WS]: Swyif, p-[11], turn.
Row 20 [RS]: Swyif, k-[10], turn.
Row 21 [WS]: Swyif, p-[9], turn.
Heel Flap Ornament
Left sock:
Row 1 [RS]: Swyif, knit to cable working the two strands of slipped sts together. Work the cable chart as established, k2 and turn.
You will have 12 sts on working needle when working rows 2 and 3. The 26[30] heel sts will be worked together one at a time with the 12 working sts. 42[50] instep sts are left on hold.
Row 2 [WS]: Slip 1 st with yarn at front, p1, work the cable chart, p3, p2tog, turn.
Row 3 [RS]: Slip 1 st with yarn at the back of work, knit 3 st, work the cable chart, k2, turn.
Repeat Rows 2 and 3 until all heel bottom sts have been worked together with the ornament, ending with row 2. Remember to work the two strands of slipped sts as one st. You have now 12 working sts and 42[50] instep sts on hold.

Right sock:
Row 1 [RS]: Swyif, knit to cable chart working the two strands of slipped sts together. Work the cable chart as established, k3, ssk (remember to work the two strands of slipped st as one st), turn.
You will have 12 sts on working needle when working rows 2 and 3. The 26[30] heel sts will be worked together one at a time with the 12 working sts. 42[50] instep sts are left on hold.
Row 2 [WS]: Slip 1 st with yarn at front, p3, work the cable chart, p2, turn.
Row 3 [RS]: Slip 1 st wyib, k1, work the cable chart, knit 3 sts, ssk, turn.

Repeat Rows 1 and 2 until all 26[30] heel bottom sts have been worked together with the ornament, ending with Row 3. Note: Remember to work the two strands of each slipped st together.
You now have 12 working sts and 42[50] instep sts on hold.

Upper heel flap
Turn work so that the right sides of the ornament heel flap and the gusset sts are together. Pick one st between the ornament and gusset sts and place it on the needle with the gusset sts. Use the three needle bind off to bind off 12 sts on both needles. The remaining st will become the first st of the upper heel flap.

Left sock:
Turn the work so that the right side of the ornament is facing you and pick up and knit 25[29] sts from the ornament top loops for the heel flap. Turn so that WS is facing.

Heel flap row 1 [WS]: Slip one st with yarn at front, work the cable chart, [p1 tbl, k1] until 1 heel flap st rems; p this last heel flap st together with the first gusset st. Turn.
Heel flap row 2 [RS]: Slip 1 wyib,[p1, k1 tbl] 9[11] times to cable pattern, ssk. Turn.
Repeat heel flap rows 1 and 2 1[3] times more.
Work heel flap row 1 once more.
This will be the beginning of the round. 52[60] sts.

Right sock:
Turn the work so that the wrong side of the ornament is facing you and pick up and purl 25[29] sts from the ornament top loops for the heel flap. Turn so that RS is facing.

Heel flap row 1 [RS]: Slip 1 wyib, work the cable chart,[k1 tbl, p1] until one heel flap st remains; ssk the last heel flap st together with the first gusset st. Turn.
Heel flap row 2 [WS]: Slip one st with yarn at front,[k1, p1 tbl] 9[11] times to cable chart, work cable chart, purl together last st of heel flap and first gusset st. Turn.

Repeat Heel flap rows 1 and 2 1[3] times more.
Work Heel flap row 1 once more, but do not turn. This will be the beginning of the round. 52[60] sts.

Note: You will now resume working in the round.

LEG
Left Sock:
Leg round[RS]: k1 tbl,[p1,k1 tbl] 9[11] times to cable pattern, work cable chart, k1 tbl, knit to end of the round.

Work as established until 10 repeats of cable chart are complete.
Ribbing round 1: K1 tbl, [p1, k1 tbl] 9[11] times to cable pattern, work cable chart, k1 tbl [p1, k1 tbl] 12[14]times, p2tog. 51[59] sts remain.
Ribbing round 2: K1 tbl,[p1, k1 tbl] 9[11] times to cable pattern, work cable chart, [k1 tbl, p1] 13[15] times.

Repeat Ribbing round 2 until 2 repeats of cable chart are complete. Work 2 more rounds.
Proceed to FINISHING.

Right Sock:
Leg round: K26[30], k1 tbl, work cable chart, [k1 tbl, p1] 9[11] times, k1 tbl.
Work as established until 10 repeats of cable chart are complete.

Ribbing round 1: P2tog,[k1 tbl, p1] 12[14] times, k 1tbl, work cable chart, k1 tbl, [p1, k1 tbl] 9[11]times. 51[59] sts remain.
Ribbing round 2:[P1, k1 tbl] 13[15] times, work cable chart, k1tbl, [p1, k1tbl] 9[11] times.
Repeat Ribbing round 2 until 2 repeats of cable chart are complete. Work 2 more rows.

Proceed to FINISHING.

spacer

FINISHING
Bind off all sts using Jeny's Surprisingly Stretchy Bind Off (see pattern notes).

Weave in ends and block.

spacer
ABOUT THE DESIGNER

Nuoska is a Finnish word for the kind of wet snow one can make snow balls with.

You can find her under the name Nuoska on Ravelry.

spacer