

|
|
|
|
SIZE |
|
FINISHED MEASUREMENTS |
|
MATERIALS Notions |
|
GAUGE |
20 sts/24 rows = 4" in stockinette st using larger needle, after blocking |
|
PATTERN NOTES |
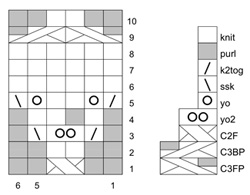 (Worked in the round over an even number of sts): All Rounds: [K1 tbl, p1] to end. C2F: Sl 1 st to cable needle and hold to front of work; k1 from left needle, k1 from cable needle. C3BP: Sl 2 sts to cable needle and hold to back of work; k1 from left neede, p2 from cable needle. C3FP: Sl 1 st to cable needle and hold to front of work; p2 from left needle, k1 from cable needle. M1L (left-leaning increase): Insert left needle, from front to back, under horizontal strand of yarn running between last stitch on left needle and first stitch on right needle; knit this stitch through back loop. 1 stitch increased. M1R (right-leaning increase): Insert left needle, from back to front, under horizontal strand of yarn running between last stitch on left needle and first stitch on right needle; knit this stitch through front loop. 1 stitch increased. yo2: Yarn over twice (wrap yarn twice around right needle, from front to back). Instructions for the Backward Loop Cast
On can be found here. |
|
DIRECTIONS 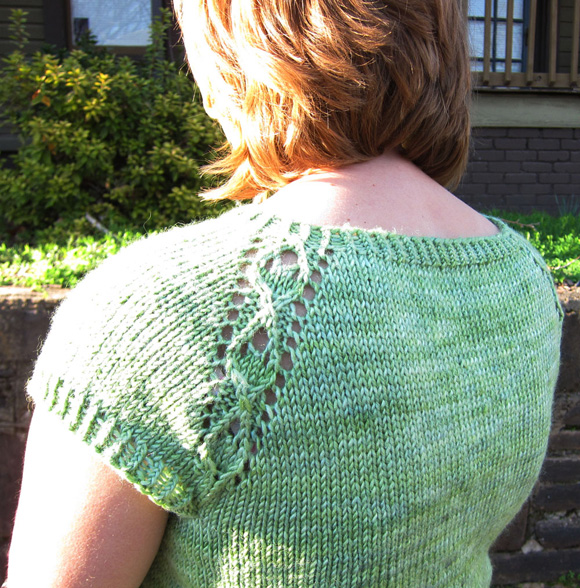
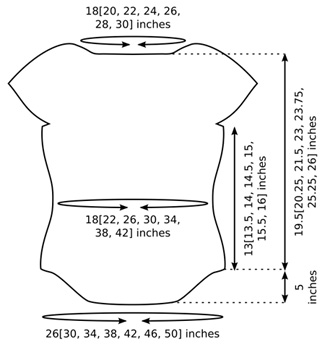
Using smaller circular needle, CO 90[102, 110, 118, 134, 138, 150] sts. Place marker and join to begin working in the round; use marker which is different from the others. Work 1 round in 1x1 Twisted Rib, placing markers as follows: *work 6 sts, place marker, work 8[8, 8, 8, 10, 10, 10] sts, place marker, work 6 sts, place marker, work 25[31, 35, 39, 45, 47, 53] sts, place marker; repeat from * once. Continue in 1x1 Twisted Rib until work measures 1 inch. Switching to larger circular needle, establish pattern for yoke
as follows, beginning with Round 1 of chart: Next Round: Remove end-of-round marker, k3, replace end-of-round marker (this point will now be beginning of round), k3, remove marker, *k to next marker, remove marker, k3, place marker, k3, remove marker; repeat from * twice more, k to end of round. 38[40, 44, 50, 54, 60, 62] sts for each sleeve, 55[63, 71, 81, 89, 97, 105] sts each for front and back. K 5 rounds.  Remove existing markers when working next round, and place new markers as indicated. Use backward loop method for casting on underarm sts. Dividing Round: Place all sts to first marker on waste yarn for sleeve, CO 10[12, 14, 14, 16, 18, 20] sts for underarm, placing end-of-round marker after first 5[6, 7, 7, 8, 9, 10] sts; k to second marker, place all sts to third marker on waste yarn for sleeve, CO 10[12, 14, 14, 16, 18, 20] sts for underarm, placing side marker after first 5[6, 7, 7, 8, 9, 10] sts; k to end of round. 130[150, 170, 190, 210, 230, 250] sts. K 1 round, placing markers for waist shaping as follows: *k20[24, 27, 31, 34, 37, 40], place marker, k24[26, 30, 32, 36, 40, 44], place marker, k21[25, 28, 32, 35, 38, 41]; repeat from * once. Continue in stockinette st until work measures 3[3.25, 3.5, 3.75, 4, 4.25, 4.5] inches from underarm, or approx. 4 inches less than desired length to waist. Decrease Round: [K to 2 sts before marker, ssk, slip marker,
k1, k2tog] twice, k to side marker; [k to 2 sts before marker,
ssk, slip marker, k1, k2tog] twice, k to end of round. 8 sts
decreased. Continue in stockinette st until work measures 7.25[7.5, 7.5, 8, 8, 8.5, 8.5] inches from underarm, or desired length to waist. Increase Round: [K to marker, M1R, slip marker, k1, M1L] twice,
k to side marker; [k to marker, M1R, slip marker, k1, M1L] twice,
k to end of round. 8 sts increased. When working next round, remove waist shaping markers, leaving
side marker and end-of-round marker in place. Work either curved hem or straight hem as follows. 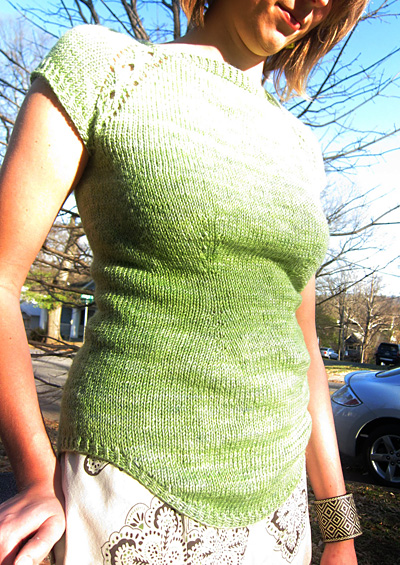 Curved hem is shaped using short rows. Row 1 [RS]: K to 8[9, 10, 11, 12, 13, 14] sts before side marker, W&T. Row 2 [WS]: P to 8[9, 10, 11, 12, 13, 14] sts before end-of-round marker, W&T. *Row 3 [RS]: K to 1 st before wrapped st, W&T. Row 4 [WS]: P to 1 st before wrapped st, W&T. Repeat Rows 3-4 nine times more. Next Row [RS]: K to 2 sts before wrapped st, W&T. Next Row [RS]: K to side marker, working wraps together with
wrapped sts; k to 8[9, 10, 11, 12, 13, 14] sts before end-of-round
marker, W&T. Straight Hem: SLEEVE EDGING |
|
FINISHING |
|
| ABOUT THE DESIGNER |
|
|
|
Pattern & images © 2011 Mercedes Tarasovich-Clark. Contact Mercedes |