
|
|
 |
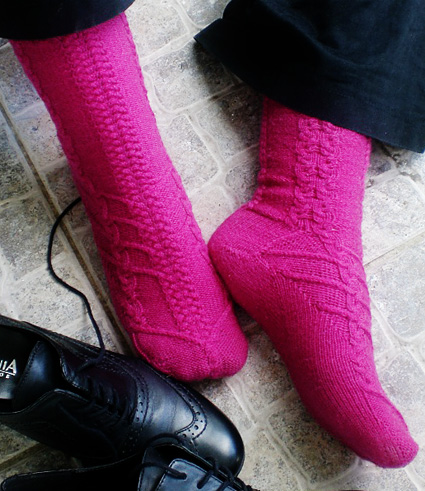 |
I was swatching and unventing cable designs for a pullover.
Several patterns were good, but I couldn’t put all of them
onto said garment (which is still to be knitted).
So I picked two of the “leftovers” and threw them
onto a pair of socks. But that was too boring,
so I added a bit of interest to the toe and
some more interest to the gusset.
A big THANKS to my test knitters! |
 |
|
|
SIZE pink socks shown in size M |
|
FINISHED MEASUREMENTS |
|
MATERIALS Notions |
|
GAUGE |
| 34 sts/50 rounds = 4 inches in stockinette stitch in the round |
|
PATTERN NOTES |
|
If you have a different round gauge, or you need to shorten/lengthen the foot part: Keep the pattern on the gusset and change the length before the gusset. You can shorten the pattern on the foot by 12 rounds (1 repeat). Adjust the cable set-up on the toe/foot part accordingly. My toes are quite square and the toe of this sock is shaped accordingly. If you have pointy toes, you might want to start with fewer stitches and do more increases. To keep the overall foot length the same, you will need to reduce the foot by the same number of rounds that you add for the toe. M1L: Left-leaning Lifted
Increase. Insert your
left needle, from front to back, under the left leg of the stitch
two rows below the stitch just knit. Knit into the back of this
stitch. M1P: Insert your left needle from back to front under the bar between the last stitch on the right needle and the first stitch on the left needle, and purl it.
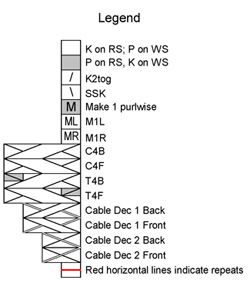
C4F: Slip next 2 sts to cn and hold in front; k2, then k2 from cn. T4B: Slip next 2 sts to cn and hold in back, k2, then p2 from cn. T4F: Slip next 2 sts to cn and hold in front; p2, then k2 from cn. Cable Dec 1 Back: Slip next 2 sts to cn and hold in back, k1, then k1 st from left needle tog with 1 st from cn, k1 from cn. 1 st decreased. Cable Dec 1 Front: Slip next 2 sts to cn and
hold in front; k1, then k 1 st from cn tog with 1 st from left
needle, k1 from cn. 1 st decreased. Cable Dec 2 Front: Slip next 2 sts to cn and hold in front, (k 1 st from cn tog with 1 st from left needle) twice. 2 sts decreased. |
|
|
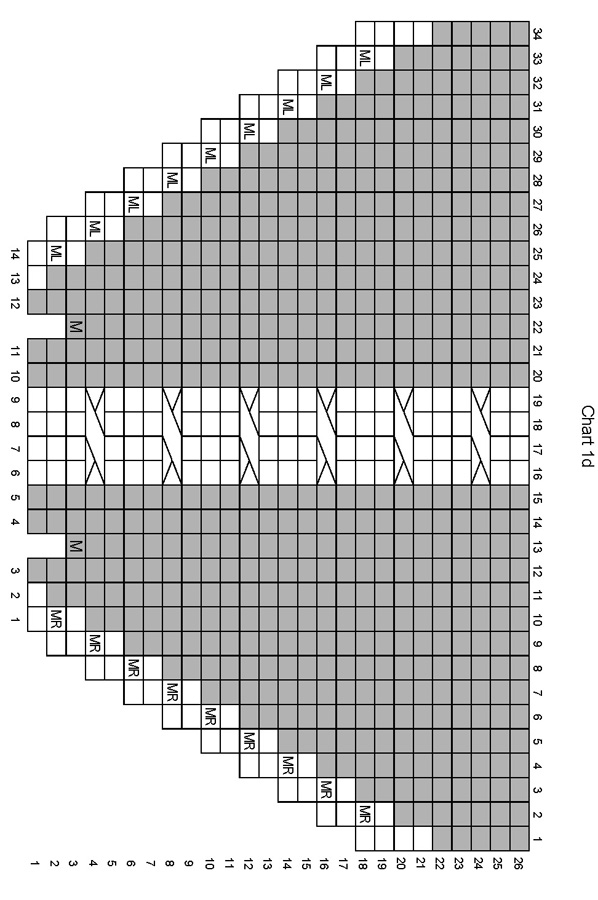
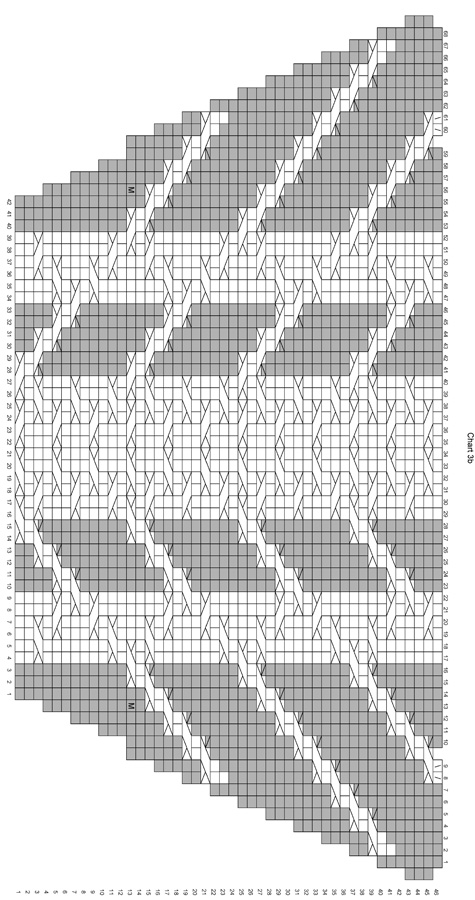
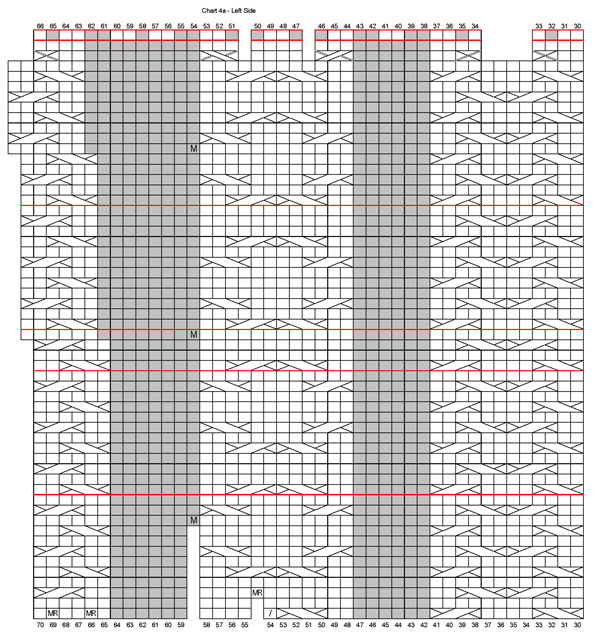
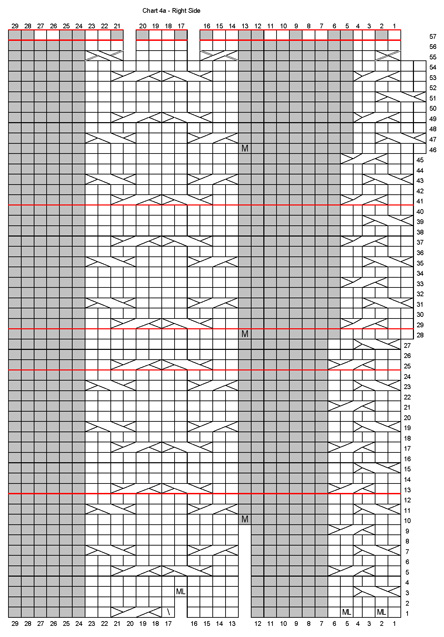
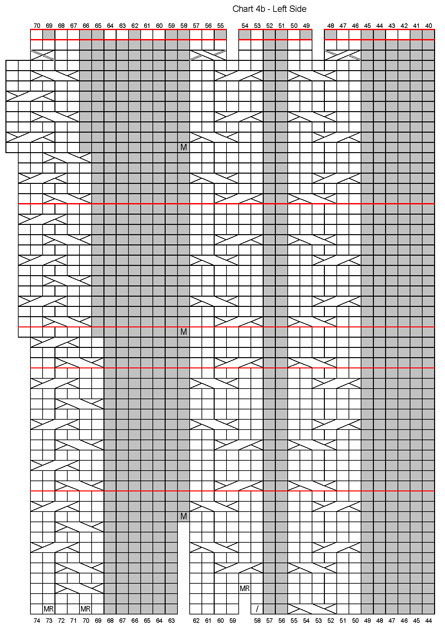
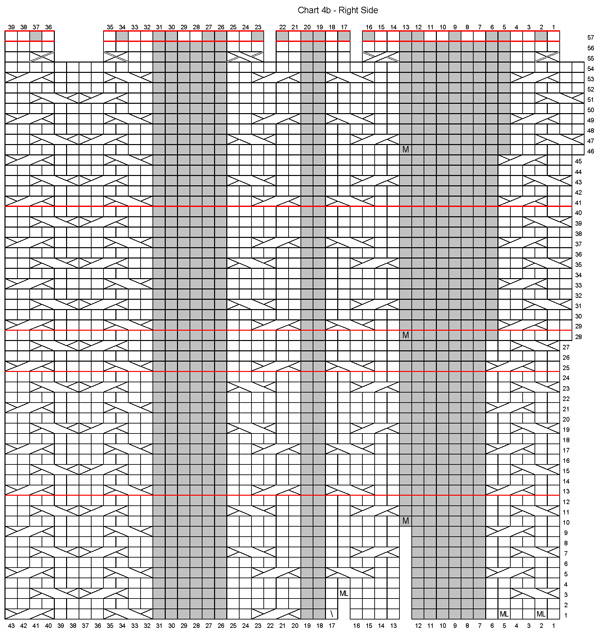
DIRECTIONS 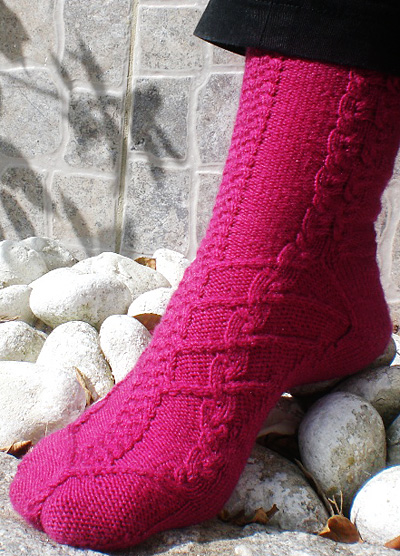
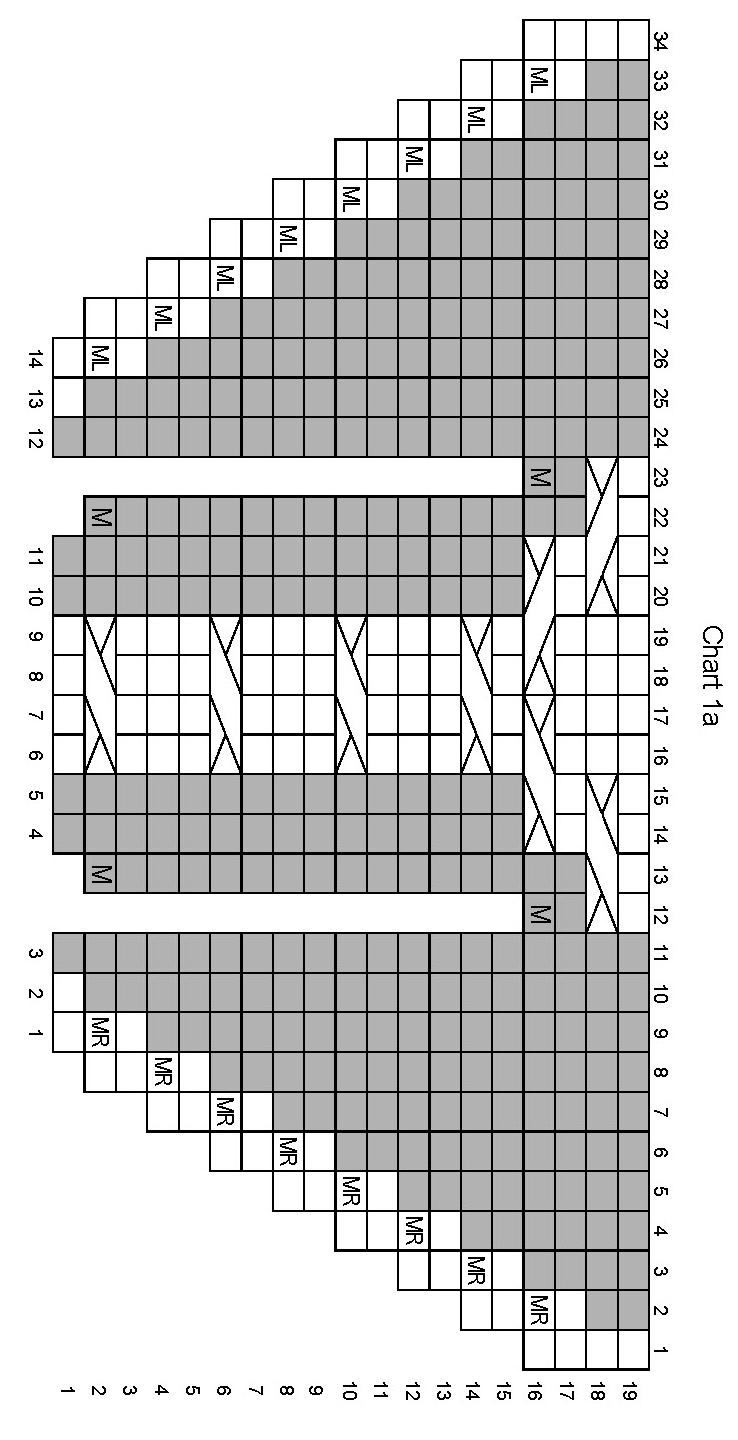
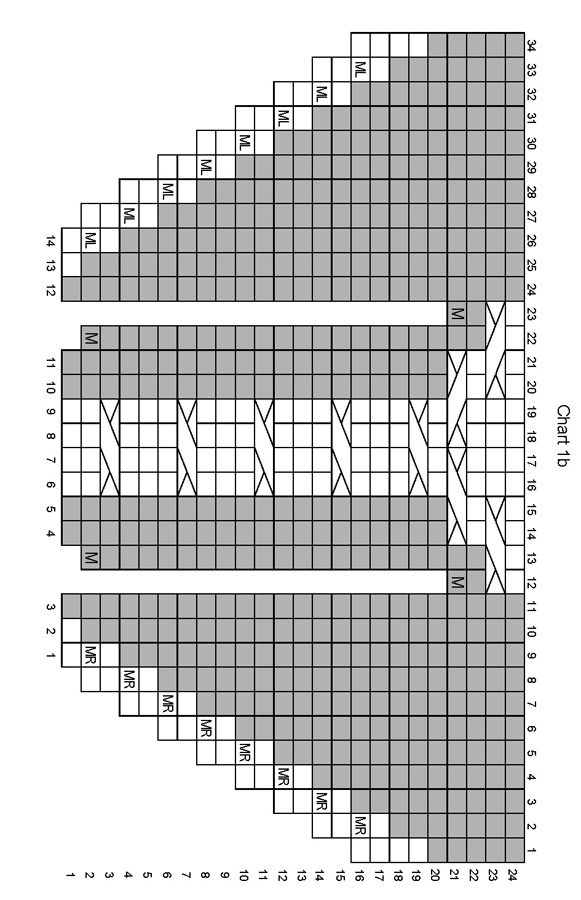
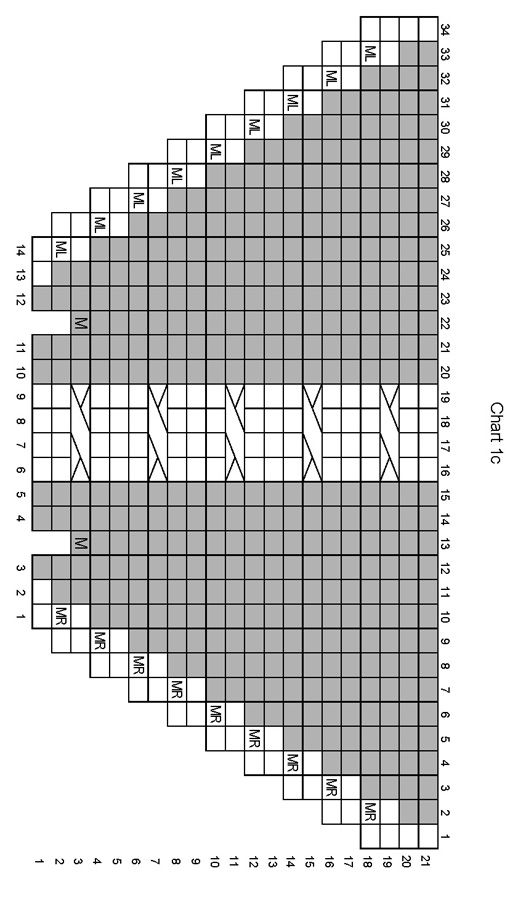
Using Judy’s Magic Cast On, CO 28 stitches. First 14 sts will form instep; remaining 14 sts will form sole. Distribute sts appropriately, placing markers for start of round, and after st 14 for center of round if you wish. Toe round 1: Work row 1 of chart 1a[1b, 1c, 1d] to
center of round, k1, M1R, k to 1 st before end of round, M1L,
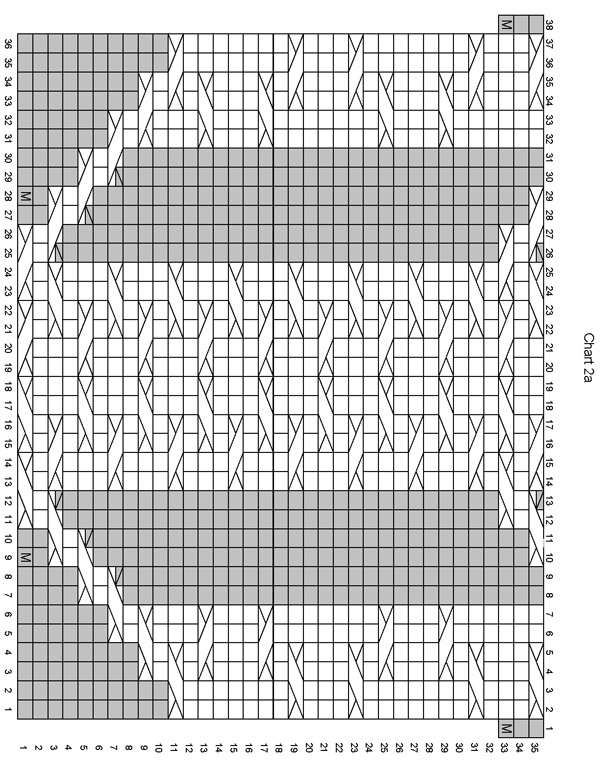
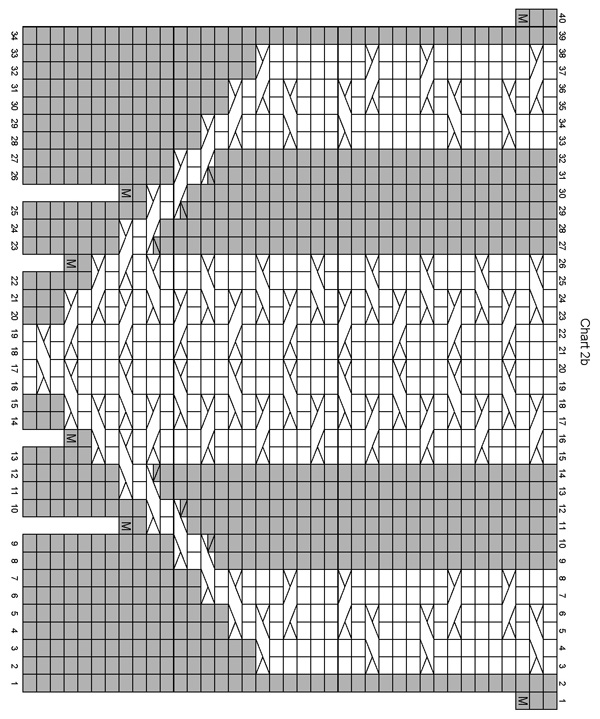
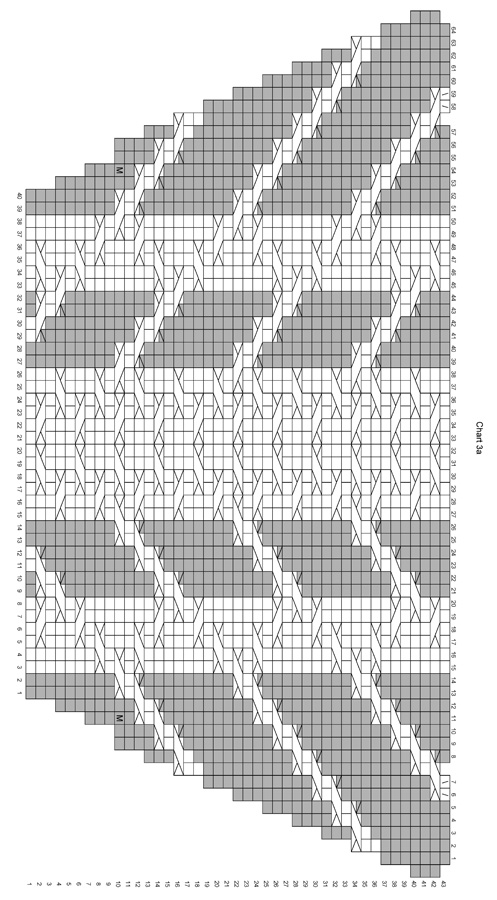
k1. Continue as established, working increases as set on sole every other round until chart 1a[1b, 1c, 1d] is complete. 34 stitches on the instep and 30[30, 32, 32] stitches on the sole. Foot Continue until you have finished round 34[34, 38, 38] of chart. 38[38, 40, 40] stitches on the instep and 30[30, 32, 32] stitches on the sole. Gusset setup round: Work chart 2a[2a, 2b, 2b] round 35[35, 39, 39], k29[29, 31, 31] and transfer rem stitch to the instep. This will be the new start of round. Move marker as appropriate. 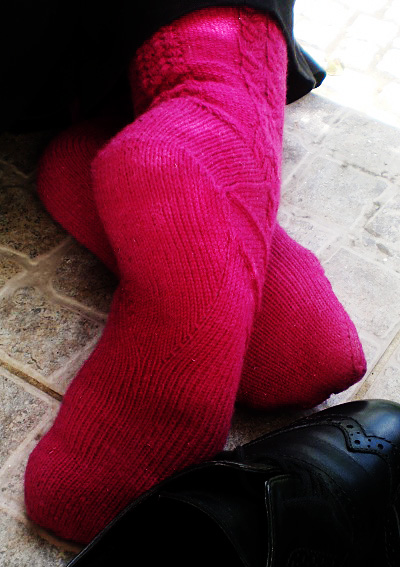 In these rounds, you will be creating the gussets by working increases in the center of the sole, and transferring the corresponding number of stitches from the edges of the sole to the instep. Round 1: Work chart 3a[3a, 3b, 3b], including the first stitch from the sole - thus transferring it to the instep; k13[13, 14, 14], place first gusset increase marker, yo, k2, yo, place second gusset increase marker, knit 13[13, 14, 14]. Move end of instep marker, as appropriate. Round 2: Work chart for instep, knit to first gusset increase marker, slip marker, ktbl, knit to one stitch before second gusset increase marker, ktbl, slip marker, knit to end of round. Round 3: Work chart, knit to within one stitch of end of round, slip last stitch to instep. Round 4: Work chart including the first stitch from the sole - thus transferring it to the instep - knit to marker, slip marker, YO, knit to marker, YO, slip marker, knit to end of round. Round 5: Work chart, knit to marker, slip marker, ktbl, knit to one stitch before marker, ktbl, slip marker, knit to end of round. Round 6: Work chart, knit to within one stitch of end of round, slip one stitch to instep. Repeat Rounds 4-6 11[11, 12, 12] times more. Then repeat Rounds 4 and 5 once more. Your last chart round should be round 41[41, 44, 44]. Now work round 42[42, 45, 45] of chart 3a[3a, 3b, 3b]. Stop after working the chart; DO NOT finish the round. 68[68, 72, 72] stitches on the instep and 30[30, 32, 32] stitches on the sole. Heel turn For sizes L and XL: For all sizes: For sizes S and M: For all sizes: 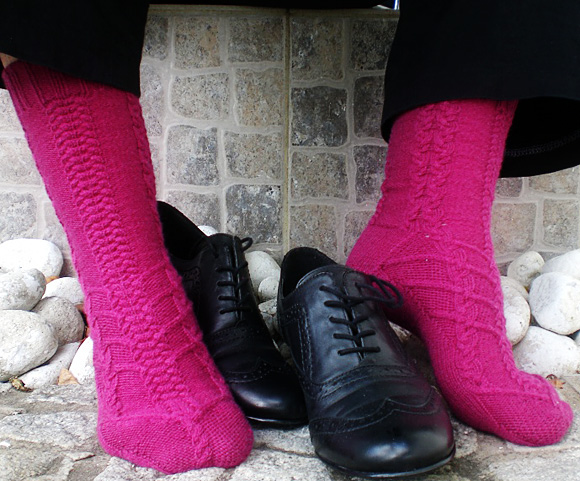
Transfer the 14[14, 15, 15] gusset stitches on each side to the sole. Heel flap row 1 [RS]: K14[14, 15, 15], ssk, turn, Repeat rows 3 and 4 11[11, 12, 12] times more. 36[36, 38, 38] stitches on the instep and 32[32, 34, 34] stitches on the sole, which is now the back of the sock. One gusset stitch on each side is left and will be decreased in the first leg round, as per the chart. This helps to avoid holes. Final heel flap row [RS]: Slip 1 wyib, k14[14, 15, 15]. You are now in the center back, which is the middle of the former sole stitches. This is the new beginning of the round. Redistribute the stitches and move markers as appropriate. LEG |
|
FINISHING |
| ABOUT THE DESIGNER |
|
|
|
Pattern & images © 2011 Stefanie Bold. Contact Stefanie |
 C4B: Slip next 2 sts to cn and hold in back;
k2, then k2 from cn.
C4B: Slip next 2 sts to cn and hold in back;
k2, then k2 from cn.