|
|
 |
|
||
|
Every time somebody starts an online discussion with the assertion that, "In my day, patterns didn't have mistakes the way they do now," I gag just a little bit. What day would that be, exactly? Must have been a short day, because at this point I've dug deep into designs from the 1820s to the present; and errata, like dropped stitches, have always been with us. Sometimes you find major gaffes -- like the bottom end of the pineapple bag -- in books whose authors really do seem to have tried their best to be scrupulously accurate. Other times... Other times you pick up Beeton's Book of Needlework.
This book -- or at least the edition I worked from -- shares nothing aside from a surname with the woman who brought out the classic best-seller Mrs Beeton's Book of Household Management in 1861. Poor Isabella Mary Beeton died of puerperal fever in 1865, a few days after giving birth to her fourth child. She was only 28. She was also an established brand name. After her death, as the family's fortunes declined, Samuel Beeton was obliged to sell the rights to her name to rival publishers. Beeton's Book of Needlework (1870) is one of the sad results. Yes, sad. I know -- you thought I was a sucker for any knitting book with engraved illustrations and crabbed metal type. You thought I loved them all, equally, for all their faults. Hell, no. To be perfectly honest, I cannot speak to the quality of the entire volume. A bit of time spent with the sections that cover subjects I know tolerably well, such as embroidery, seem fair-to-middling, especially as compared with other works from the same era. You could probably muddle your way through monogramming a handkerchief with this as your guide. But the knitting section? A hack job, plain and simple. Consider the introduction. It dwells on needle size for several paragraphs, noting that the English and "foreign" numbering systems run in opposite directions. There is even a life-sized, clear illustration of an English gauge to help you spot one in the wild. And then knitting needle sizes are never mentioned again. Never. In pattern after pattern, all the advice you get -- if any -- is to pick needles that are "fine" or "coarse." Now, this is not particularly unusual for 1870. It was pretty standard for knitting books to be laissez-faire about needles, well into the twentieth century. But to cover it in the front matter and ignore it in the back suggests a lack of attention to detail, and the patterns themselves bear this out. There's a lacy, triangular neckerchief that was in line to be the subject for a future column. It's adorable, judging from illustration. A little bit of shaping, a charming pattern in the center, a matching pattern around the edge. Gimme. Then you try to knit it and realize it's busted. Broke. The basic lace pattern is so far gone that no amount of charting, puzzling, and flinging test yarn about yielded anything that was even workable, let alone similar to the motif in the illustration.
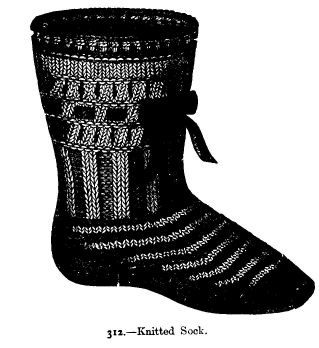
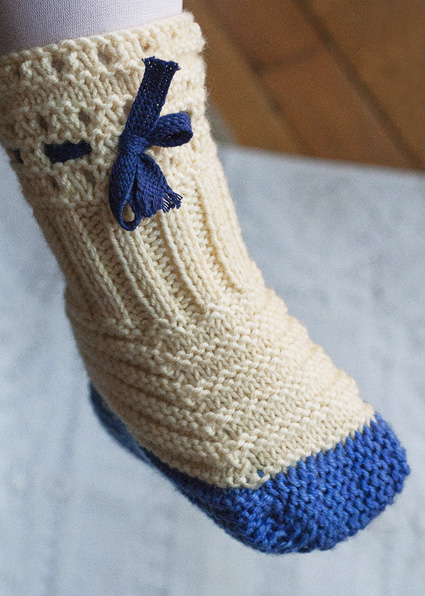
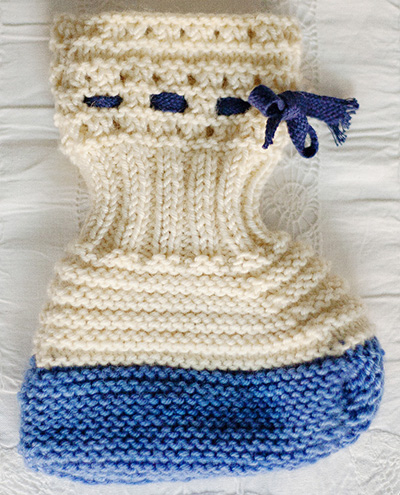
This month's pattern, "Knitted Sock for a Child," also has an intriguing illustration. Even more intriguing was the supply list, which called for two needles. A sock on two needles? Worked flat? That got me. I'm an awfully boring sock knitter -- ribbed cuff down to Kitchener toe, every time -- but I was curious as to how this was done. Or, given my previous encounters with this book, if it could be done. Well, yes it can be. You can see that much from the photographs. The construction is certainly intriguing, and it works -- once you figure out what the direction to sew up the toe "like a gusset" means. But it's a very, very sloppy pattern. It begins well enough. The foot doesn't present any real problems, only a few moments at which common sense must be brought to bear in order to determine exactly how to do what you're being told to do. I don't mind those moments. A bit of brain-stretching makes knitting more interesting. Then you come to the leg. There are several places -- in the eyelet rounds, for example -- where the numbers just don't work out. Couldn't possibly have worked out. I wore through my test yarn trying to figure out the "open" eyelet pattern, which doesn't play nicely with the number of stitches on the needle at the end of the ribbing. As you reach the bitter end, you can almost hear the anonymous designer thinking, "Screw it. My corset is killing me, the gin is calling, and it's time to go home." Her instructions give the impression of having been written in haste, without a second thought, maybe after she'd removed the corset and emptied the gin bottle. At the cuff, I was forced to stare for hours at the engraving, then consult the instructions, then stare at the engraving. Finally, I picked up the work and knitted something that I hope splits the difference between the two. It's my best guess as to what the hell was intended. Was it worth it? Meh. It's cute. It might make a nice slipper; but it's not a very good sock. You have seams in rotten places, including right down the sole. The luscious Blue Moon yarn might be a little heavier than the yarn the designer had in mind, but even at a finer gauge I pity the child who would have been expected to wear this stuffed inside a shoe. And I know what you're thinking: maybe it was a bed sock? Perhaps. Except that the book specifies other sock-like creations as being specifically for sleeping, but not this one. Alas, if only Mrs Beeton had lived longer. She might have given us a top-notch take on knitting. Alas, this book is not it. |
||
 Translated by Franklin Habit from Mrs Beeton's Book of Needlework (1870)
|
|
| Tweet | |
| SIZE |
Toddler |
|
FINISHED MEASUREMENTS |
Shoe: 5 inches measured heel to toe |
|
MATERIALS Notions |
| GAUGE |
24 sts/48 rows = 4 inches in garter stitch |
|
PATTERN NOTES |
Method Historic Colors Ribbon Substitute M1 (make one) Cable Cast-On. The method for the Cable Cast On may be found here. Pick up and knit (pu and k). This technique is described here. Mattress Stitch. This technique is described here. |
|
DIRECTIONS |
 With CC, CO 22 sts. Row 1 [RS]: Knit. Row 2 [WS]: Knit to last st, m1, k1. 1 st increased. Repeat Rows 1-2 10 more times. 33 sts. Knit one row. Working yarn will be at the heel (unshaped) edge of the work. Toe Increases: Repeat Rows 3-4 5 more times. 11 sts. Repeat Rows 1-2 4 more times, then work Row 1 once more. 5 sts. Working yarn will be at the unshaped edge of the work. Turn work. Use cable cast-on to CO 28 sts. 33 sts. Sole (second side) Repeat Rows 1-2 10 more times. (22 sts) Knit one row. Instep Knit 1 row (WS). Row 1 [RS]: K to 2 sts before marker, k2tog, sl marker, k12, sl marker, k2tog, k to end. 2 sts decreased. Repeat Rows 1-4 4 more times, until 48 sts remain, ending with Row 4. Leg Ribbing row: [K2, p2] to end. Knit 3 rows. First eyelet open row [WS]: [P2tog, p1, yo] to last 3 sts, p2tog, p1. 47 sts. Second open row [WS]: [P2tog, p1, yo] to last 2 sts, p2. Third open row [WS]: [P2tog, p1, yo] to last 2 sts, p2. Knit 3 rows. Purl 1 row. Knit 3 rows. Final open row [RS]: [P2tog, p1, yo] to last 2 sts, p2. BO. Cut working yarn, leaving a long tail that will be conveniently located for sewing up the leg of your sock. 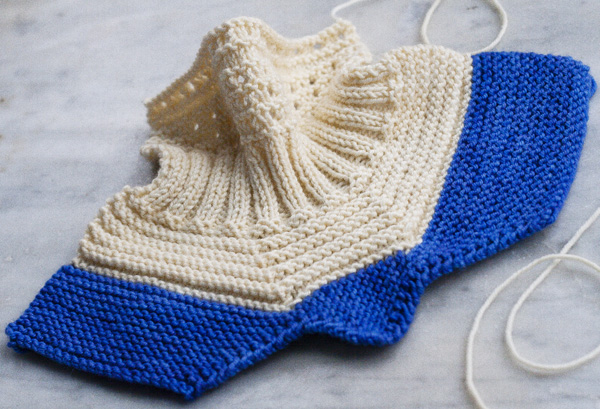
FINISHING Align tip of shaped toe with sole seam, and stitch two toe seams as indicated in photo. Weave in ends. Wash and gently block. Run ribbon through Second open row and tie bow at front of leg. |
| ABOUT THE DESIGNER |
 If you manage to get these things onto the feet of actual children, he'd like to see pictures. |
| Pattern & images © 2013. Franklin Habit. |