Knitty: little purls of wisdom
The Loopy Ewe
Title

For almost as long as I've been a knitter, I've been fascinated by the history of knitting. I've especially enjoyed the mind-twisting process of working with the often obtuse and obfuscatory language of antique patterns. There's a thrill, I find, in watching a project emerge row by row and knowing that other knitters, long gone, followed the same path.

The process of decoding, testing and correcting isn't for everyone, though; and so in this column I hope to share the excitement of the journey by removing as many of the roadblocks as possible. You don't need to be a historian to come along -- just a knitter with a curious mind.


title
beauty shot

Translated by Franklin Habit from Mrs Beeton's Book of Needlework (1870)

Tangy


spacer photos: Franklin Habit
SIZE

Toddler


FINISHED MEASUREMENTS

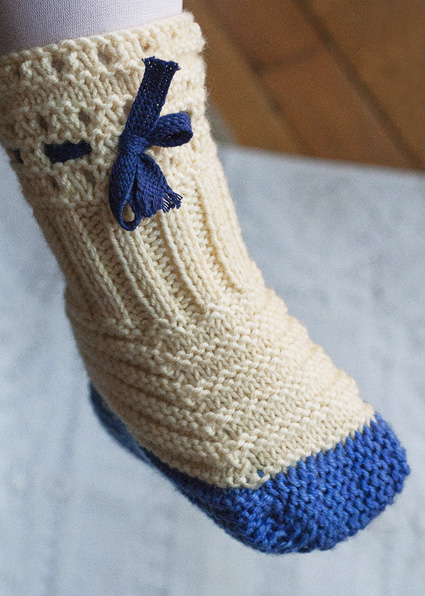
Shoe: 5 inches measured heel to toe
Leg: 7 inches measured from heel to cuff

MATERIALS
Yarn

Blue Moon Fiber Arts Socks That Rock Heavyweight [100% superwash merino; 350 yd/320 m per 7 oz/198g skein]
spacer [MC] Will-O'-the-Wisp; 1 skein
spacer [CC] Blue for Ewe; 1 skein
Note: You can theoretically get three pairs of these sout of one pair of skeins, if you have a lot of little children you hate.

Recommended needle size
[always use a needle size that gives you the gauge listed below -- every knitter's gauge is unique]
spacer 1 pair size US #1/2.25 mm needles

Notions
spacer 2 stitch markers
spacer scissors
spacer yarn needle
spacer half yard of matching narrow ribbon

 
GAUGE

24 sts/48 rows = 4 inches in garter stitch

spacer

PATTERN NOTES
[Knitty's list of standard abbreviations and techniques can be found here.]

Method
The entire sock is knit flat from the sole up to the cuff. It is then seamed from the cuff to the heel, and across the center of the sole to the toe.

Historic Colors
The original pattern doesn't specify a yarn color, but does call for only one used throughout. The use of two colors is my own design choice. Follow your heart.

Ribbon Substitute
Ribbon ties are correct to the period but less than practical for modern wear. Consider making two appropriate lengths of slender I-cord if your toddler will not be sporting these in a living history setting.

M1 (make one)
Cast on 1 stitch as described under "Backwards Loop Cast On" here.
On the following row, k into the back of the new stitch.

Cable Cast-On. The method for the Cable Cast On may be found here.

Pick up and knit (pu and k). This technique is described here.

Mattress Stitch. This technique is described here.

DIRECTIONS

Sole (first side)
With CC, CO 22 sts.
Row 1 [RS]: Knit.
Row 2 [WS]: Knit to last st, m1, k1. 1 st increased.

Repeat Rows 1-2 10 more times. 33 sts.

Knit one row. Working yarn will be at the heel (unshaped) edge of the work.

Toe Increases:
Row 1 [WS]: BO 28 sts (5 sts rem at this point), k to last st, m1, k1. 6 sts, including the increase.
Row 2 [RS]: Knit.
Row 3 [WS]: Knit to last st, m1, k1. 1 st increased.
Row 4 [RS]: Knit.

Repeat Rows 3-4 5 more times. 11 sts.
Knit one row. RS is facing.

Toe Decreases:
Row 1 [RS]: K1, k2tog, k to end.
Row 2 [WS]: Knit.

Repeat Rows 1-2 4 more times, then work Row 1 once more. 5 sts. Working yarn will be at the unshaped edge of the work.

Turn work. Use cable cast-on to CO 28 sts. 33 sts.

Sole (second side)
Row 1 [WS]: Knit.
Row 2 [RS]: K1, k2tog, k to end.

Repeat Rows 1-2 10 more times. (22 sts)

Knit one row.
BO.

Instep
Decide which side of the shoe is the RS. I choose the side on which the increases and decreases are least apparent. With RS facing, use MC to pu and k 68 sts along the top (unshaped) edge of shoe as follows: 28 along first side, place a marker, 12 across toe, place a second marker, 28 across the second side.

Knit 1 row (WS).

Row 1 [RS]: K to 2 sts before marker, k2tog, sl marker, k12, sl marker, k2tog, k to end. 2 sts decreased.
Row 2 [WS]: Knit.
Row 3 [RS]: P to 2 sts before marker, p2tog, sl marker, p12, sl marker, p2tog, p to end. 2 sts decreased.
Row 4 [WS]: Purl.

Repeat Rows 1-4 4 more times, until 48 sts remain, ending with Row 4.

Leg
Knit 1 row.

Ribbing row: [K2, p2] to end.
Work ribbing as set for 14 rows total.

Knit 3 rows.

First eyelet open row [WS]: [P2tog, p1, yo] to last 3 sts, p2tog, p1. 47 sts.
Knit 3 rows.

Second open row [WS]: [P2tog, p1, yo] to last 2 sts, p2.
Knit 3 rows.

Third open row [WS]: [P2tog, p1, yo] to last 2 sts, p2.

Knit 3 rows. Purl 1 row. Knit 3 rows.

Final open row [RS]: [P2tog, p1, yo] to last 2 sts, p2.
Knit 1 row.

BO. Cut working yarn, leaving a long tail that will be conveniently located for sewing up the leg of your sock.

FINISHING
Use mattress stitch to sew seam down back of leg from cuff to heel, changing from MC to CC when you reach the beginning of the sole. Sew sole together across center.

Align tip of shaped toe with sole seam, and stitch two toe seams as indicated in photo.

Weave in ends. Wash and gently block.

Run ribbon through Second open row and tie bow at front of leg.

ABOUT THE DESIGNER
Franklin Habit is the author of It Itches: A Stash of Knitting Cartoons(Interweave Press) and proprietor of the popular knitting blog, The Panopticon. He travels widely to teach knitting and photography, and his work appears with shocking regularity in perfectly respectable fiber arts magazines and books.

If you manage to get these things onto the feet of actual children, he'd like to see pictures.

spacer