
|
|
|
||
When I started writing this column, interest in old patterns was still a highly specialized taste within the larger knitting community. People who got into a froth over the stockings of Eleanor of Toledo or the Gunnister purse were looked upon like the table at the foodie convention that orders fried spiders as an appetizer. They were, in a word, weirdos. Possibly respected weirdos, or even admired weirdos; but weirdos nonetheless.
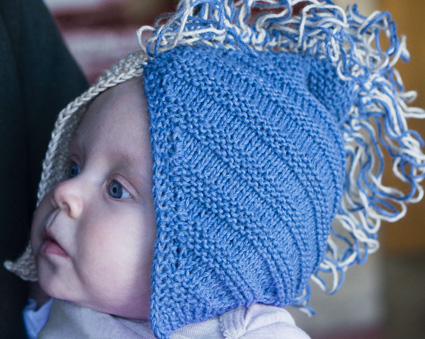
Things have changed. As part of my teaching schedule I'm frequently called upon to present a class that introduces knitters of all kinds to nineteenth century patterns. It makes me fizzy with joy every time a host asks for that class, and even fizzier when the class sells out -- which it generally does. Yet mere mention of the subject still sometimes brings knitting chatter to a halt. "What are you making?" a fellow knitter asks. "It's a [whatever], from a Victorian pattern." "Wow. Well, better you than me." "What? Why? No! You should try it. Old patterns are really fun." "No," comes the inevitable reply, "I don't lead that kind of lifestyle." Then they speed off in the direction of the exit or the open bar. Otherwise, I'd ask these folks what sort of lifestyle they think I lead. Do I travel to fiber festivals in a stage coach? Is my Internet connection powered by a water wheel? Does my smart phone have a Butter Churn app? I have affinity for the aesthetics of the nineteenth century, sure. However, Tasha Tudor I am not. A fondness for cufflinks and detachable collars does not indicate a willingness on my part to be separated from my automatic washing machine. This drives a certain other segment of the knitting population crazy. I get messages: "I am writing to point out that your use of a modern sock yarn containing nylon to knit the [whatever] is historically inaccurate. I hope you are carried away bodily by a swarm of angry moths and never seen again." Let it be understood that I wholeheartedly support the rigorous use of appropriate patterns, methods, and materials in historically sensitive situations.* But for regular daily usage, there's nothing sacred about a pattern just because it's hit the century-or-more mark. I've never knit a pattern without bending it to my will, regardless of who wrote it or when. That's why this issue's project is (as it says right there in the name) a wholly irreverent mash-up two bits of knitting from the polar ends of the Victorian era. First Bit: The Hat Part This is early Victorian, and in fact from one of the earliest widely published books on knitting aimed at a hobbyist market: Jane Gaugain's The Lady's Assistant in Knitting, Netting, and Crochet (1840). We've used it before, most memorably for the Big D-mn Pineapple. This time, the pattern is remarkable for its simplicity: a counterpane square that is more square-ish, decorated with nothing more than alternating bands of garter stitch and stockinette. By itself, it is nothing much. Multiplied as it was intended to be, it would make a handsome blanket. There's the trouble, at least for me. I admire the living hell out of counterpanes, but I don't want to knit one. I have trouble knitting the same thing more than once. Pairs are fine. I like socks and mittens. But the same square sixty times or more? I originally thought that I'd knit two (which, as you can see, I did) and sew them together to make the top of a little rectangular throw pillow, in the manner of the Star Pincushion. As I sewed, I became less enthusiastic about that idea. Not because I didn't think it would look nice or work well; but I'd already done a pillow. I stitched and puzzled and stitched and puzzled and absentmindedly sewed not one but two edges together. And there it was: a little pointy hat. Sometimes it happens that way. You don't know what you're making until you've made it. Second Bit: The Fringe It was a slightly prim hat, just plain, so why not make it fancy? It happened that there was something I'd been wanting to try out on this page for ages without knowing quite how to fit it in: a knitted fringe. The published pattern for the fringe technique, from Weldon's Practical Mountmellick Embroidery, is late (or at least late-ish) Victorian, though the embroidery with which it was paired was developed in Ireland the 1820s and so pre-dates Victoria's accession. Mountmellick embroidery used rather coarse white cotton thread to create motifs (mostly floral or botanical) on white cotton fabric in a wide variety of stitches. The knitted fringe (worked in four to eight strands of the embroidery cotton held together) trimmed the edges of work bags, hair tidies, tray and table cloths, and anything else the Mountmellick workers could stick a needle through. Of course, fringe is not unusual in knitting. Usually, though, it's knotted. This fringe is knitted -- you make what looks like a curious strip of braid, bind off some of the stitches, and unravel the others. Presto! Fringe! Stitched to the top of the hat, it creates a slightly punk rock effect that I think will lend much-needed street cred to any baby. *I once wrote a letter of protest regarding an ugly pink acrylic baby blanket on display in the cradle of the day room at the Frank Lloyd Wright Home and Studio in Oak Park, Illinois -- a place where the docents mention every four minutes how perfectly accurate every tiny detail is. Word has reached me that the blanket is gone, replaced by something suitable. I have no idea whether this had anything to do with me, but at least now I can sleep at night. |
||
| |
||
 by Franklin Habit, adapted from patterns in The Lady's Assistant in Knitting, Netting, and Crochet (1840) by Jane Gaugain and Weldon's Practical Mountmellick Embroidery, First Series (1880s) |
||
|
SIZE |
|
FINISHED MEASUREMENTS (laid flat) |
|
MATERIALS Notions |
|
GAUGE |
| 26 sts/52 rows (26 ridges) = 4 inches in garter stitch |
|
PATTERN NOTES |
|
Slipped st selvedge. Every row starts with the first st slipped purlwise, with yarn in front. |
|
DIRECTIONS CO 2. Row 1 [WS]: K2. Work Stockinette Increase Stripe as follows: Work Garter Stitch Increase Stripe as follows: Continue, alternating Stockinette and Garter Stitch Increase Stripes until you have 53 sts on ndl (47 sts between markers). You will have finished the first ridge (first two rows) of a garter stitch stripe. Start Decreases as follows: Work Stockinette Decrease Stripe as follows: Work Garter Stitch Decrease Stripe as follows: Continue, alternating Stockinette and Garter Stitch Decrease Stripes until you have 9 sts on ndl (3 sts between markers). When 9 sts remain (you will have finished a garter stripe), work end of piece as follows.
Final rows: BO. Fringe Row 1: (YO, k2tog, k1) across. Repeat Row 1 for desired length. BO 3 sts. Break working yarns and draw through last st on right ndl. Sl rem sts off left ndl and unravel them to form looped fringe.
FINISHING Weave in ends of knitted fringe. Arrange the two halves with WS together and BO points at top. Using a length of either color, use mattress stitch to sew the pieces together along top two sides. Pin fringe along seam line at top of hat, taking care to align center with top point. With a length of either color, use whip stitch to sew fringe securely to hat. (Stitches are easily made through the eyelets in the selvedge of the fringe.) Put hat on baby. Accept compliments with as much humility as you can muster. |
| ABOUT THE DESIGNER |
| Franklin Habit lives in Chicago, Illinois but spends much of his time teaching elsewhere. He is the proprietor of the popular blog The Panopticon and his work appears regularly in major needlework publications.
For somebody with no children, he sure spends a lot of time knitting little clothes. |
| Pattern & images © 2015 Franklin Habit |