
|
|
|
|
|
|
|
|
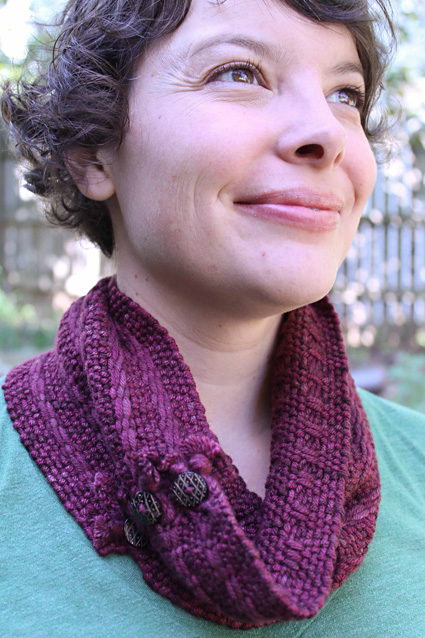
A little bit goes a long way in this sweet little cowl. The pick-up stick allows you to easily add texture and opens up a world of possibilities. |
||
|
|
|
Tweet
 |
|
|
||
|
SIZE
|
|
|
FINISHED MEASUREMENTS |
|
MATERIALS Project specifications
|
|
DIRECTIONS Place the pick up stick: To make sure you only pick up the slot ends, place the rigid heddle in the down position so that the slot threads are up. For this pattern pick up the slots ends behind the rigid heddle as follows: *2 down, 2 up; repeat from * 8 more times, and end with 2 down. Slide the stick to the back of the loom until ready for use.
WEAVING Using your project weft, open a down shed and insert your first pick, leaving a short tail of about 6 inches. Change sheds, tuck the tail in the new shed and then bring it out between two warp ends. Lay in the next pick at about a 45-degree angle and press the weft into place with the rigid heddle. Weave 3 more picks for a total of 4 picks plain weave. Maintain the weft angle as you weave. This allows the weft enough room to travel over and under the warp ends and keep your fabric from pulling in at the edges. If you have loops at the edges your weft angle is too steep. Press the yarn gently as you weave to maintain a consistent number of picks per inch. Weaving warp floats: This pattern is reversible. Whatever is happening on the face of the cloth, the opposite will be happening on the back. I find warp floats easier to weave then weft floats, so whenever possible, I weave warp floats. There are three placements in the pattern:One pattern repeat is worked over 6 picks as follows:
You can leave the pick-up stick pressed at the back of the heddle when weaving the down sheds, but you must push the pick-up stick toward the back beam to get a clean up shed. Weave this pattern until you run out of warp. End on a down shed, then weave a few picks of scrap yarn to keep the weft in place. |
|
FINISHING Working on the end of the cowl with the 4 plain weave and using a small sharp pair of embroidery scissors, cut the scrap yarn in half. Gently remove half of the scrap. Using an embroidery needle, needleweave each end back into the plain weave section. Trim tails to about 2 inches. These tails will be trimmed flush after will after washing. This forms a nice sturdy base for you to sew on the buttons. The closures for the buttons are worked on the other end of the cowl. They are made by tying together two twisted fringe, each using 4 warp ends for a total of 8 ends worked. To see how to work a basic twisted fringe, review the Winter 2015 Get Warped column. Work one closure as follows:
The last fringe will be worked over 3 ends. Use a single end twisted to the right for the left leg and 2 ends twisted to the left, then right, for the right leg and then tie them together. This extra end will be secured to the last button along with the last fully worked fringe. Alternatively, you could work the last fringe with those extra threads. Handwash by soaking the fabric in lukewarm water with either a 1/8 cup mild detergent or no-rinse wool wash for 20 minutes. Gently swish the fabric to help facilitate the floats moving into position. I often do this in the bathtub where I can lay the whole project out flat. Rinse gently. Roll the project in a towel and press to remove excess water, don't wring. Dry flat on a clean towel. Trim the needlewoven ends flush with the fabric and the knotted fringe to half an inch below the knot. Sew the button on the end with no fringe lining each button up with a row of floats.
|
| ABOUT THE DESIGNER |
|
Liz Gipson is a lover of yarn and that from which it comes -- namely the mills and fiber-bearing critters and plants. She is the author of the newly revised Weaving Made Easy and has two videos – Slots and Holes: Three Ways to Warp a Rigid-Heddle Loom and Life After Warping: Weaving Well on your Rigid-Heddle Loom She recently lanched Yarnworker, a source for indepentantly published patterns and know-how for the rigid-heddle loom. |
|
Pattern & images © 2016 Liz Gipson. Contact Liz |