|
|
|
|
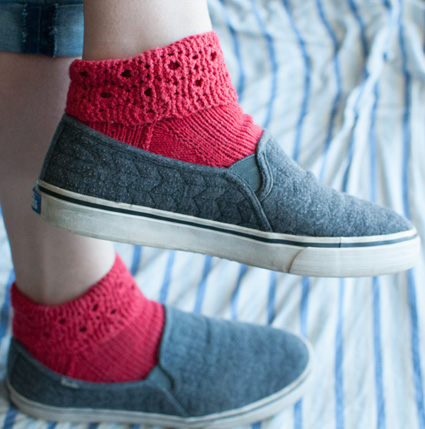
Ah, spring! That transitional time when you’ve given up your boots, but aren’t yet ready to start wearing sandals. Calf-length wool socks look and feel too wintry, but it’s not yet warm enough to go entirely without. And my sneakers rub if I wear them on my bare feet. How about a cotton sock? Pure cotton isn’t great for handknit socks, as it lacks stretch and can be hard to work with, and doesn’t necessarily feel very good on your feet. In addition, because cotton absorbs rather than wicks moisture, pure cotton socks – especially when worn with sneakers – can get, shall we say, a bit fragrant. The Feel Good Sock Yarn company offers an excellent solution. Their Sliver Spun sock yarn is a cotton and elastic blend, easier to work with and holds its shape better, and a thread of sterling silver – yes, really! – that has antibacterial, and therefore anti-smell, properties. This design is worked toe up, and features a fun and springy lace edging on the fold-over cuff. Because I don’t want full-length socks on a warm spring day in my sneakers. I think they look rather kicky and fun with a skirt. (The fashionistas are wearing socks with sandals too; this design would be ideal for that, too, if that’s your thing!) I’ve used my current favourite cast-on method, the Chinese Waitress. It’s stretchy and gorgeous but doesn’t require a long tail. It’s explained in Cap Sease’s excellent book ‘Cast On, Bind Off: 211 Ways to Begin and End Your Knitting’, and derives its name from how it was discovered: a friend of Cap was taught the method by a waitress in a restaurant in China. |
||
 |
Tweet
 |
|
|
|
||
|
SIZE |
|
|
FINISHED MEASUREMENTS Choose a size with approximately 10% negative ease in the foot circumference. |
|
MATERIALS Notions |
|
GAUGE |
| 32 sts/48 rounds = 4 inches in stockinette stitch using 2.5mm needles, lightly stretched. |
|
PATTERN NOTES |
|
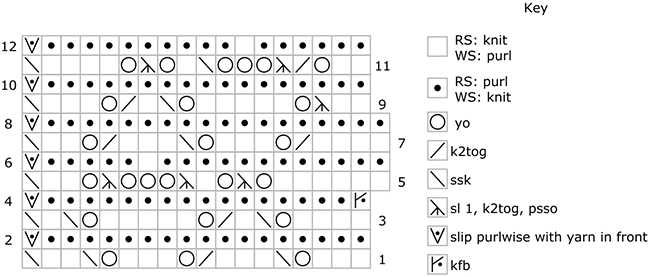
Chinese Waitress Cast on See Cap Sease’s book ‘Cast On, Bind Off: 211 Ways to Begin and End Your Knitting’ for more information. Very Pink Knits offers a terrific video tutorial here. If you’re unsure about this method, a cable cast on works well here, too – just keep it loose. Lace Edging Pattern
|
|
DIRECTIONS 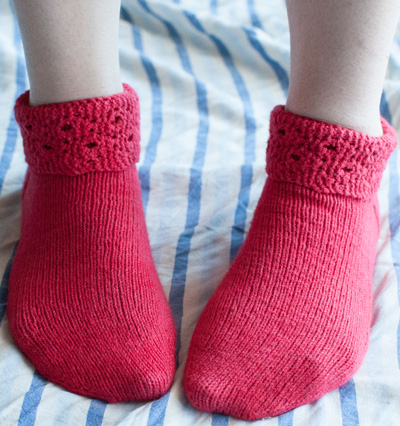
If you’re working on DPNs, start as follows: Round 1: K10[10, 12, 12, 12] with one needle, k5[5, 6, 6, 6] with a second, and k5[5, 6, 6, 6] with a third. The first stitch may be loose – twist the tail around the working yarn when you work it. If you’re working with magic loop or 2 circulars, start as follows: Round 1: K10[10, 12, 12, 12] with one needle, and k10[10, 12, 12, 12] with a second. The first stitch may be loose – twist the tail around the working yarn when you work it. Place a safety pin or marker in the toe to indicate the start of the round, and a second to indicate the center of the round. Round 2, increase: Kfb, knit to 2 sts before center of round, kfb, k1; kfb, knit to 2 sts before end of round, kfb, k1; 4 sts increased. Repeat the above two rounds 8[9, 9, 10, 11] more times, until you have 56[60, 64, 68, 72] sts total on your needles. 
Shape Gusset Gusset Round 1: Kfb, place first heel marker, knit to 1 st before the center of round, kfb; knit to end of round. 2 gusset sts increased; 58[62, 66, 70, 74] sts total. You should be set up as follows: There will be 2 sts before the first marker, the sole stitches (half the total stitch count) between the two markers, 1 (newly created) gusset st after the second marker. For ease of working, keep all these sts grouped together on one needle. The remaining 28[30, 32, 34, 36] sts of the round form the instep. If you’re on DPNs, split them across two needles; if you’re on Magic Loop or Two circulars, they should be grouped together on the other side/needle. Round 3: Kfb, k until 1 st remains in gusset, kfb; knit to end of round. 2 gusset sts increased. 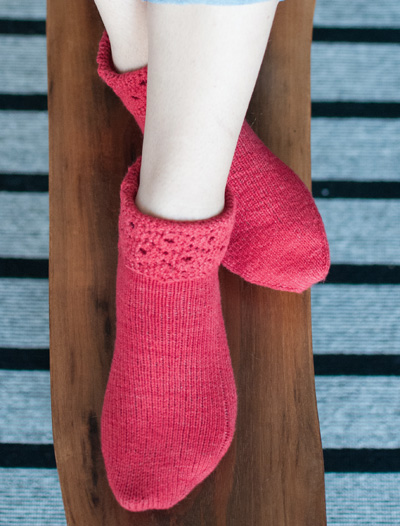 From here, you will restart working in rounds. The two final gusset decreases are worked in the first round of the leg. Note: I find that delaying these final two gusset decreases makes the top of the heel neater, the join smoother, and helps reduce the risk of that pesky hole. First leg round: Sl1, k26[28, 30, 32, 34], ssk, k across instep sts; k2tog, k27[29, 31, 33, 35] to end of heel sts. This is the new start of round. 56[60, 64, 68, 72] sts. Next leg round, start ribbing: [K1, p1] around. For second and fifth sizes, proceed to Edging. First size only, setup for Edging: [(K1, p1) 13 times, k2tog] twice. 54 sts. Edging Work Lace edging from written or chart instructions. The decrease worked at the end of RS rows attaches edging to cuff, and decreases away one stitch of the cuff. Work Lace edging around until you have worked 9[10, 11, 11, 12] full repeats. |
|
FINISHING |
| ABOUT THE DESIGNER |
|
|
|
Pattern & images © 2016 Kate Atherley. Kate |