Bakanasu, a free knitting pattern from Knitty.com. Free knitting pattern for an ethereal wrap sweater in two colors.
INTRODUCTION
Bakanasu

![]()
I have a hard time naming things, especially patterns. So I was at a loss once more, up until I stumbled upon Bakanasu. Bakanasu is the word for the endemic-to-Japan flower, Solanum nigrum. It literally means 'stupid eggplant'. Really. It is completely irrelevant to the pattern, but it made me laugh so hard, I thought it would make a good name.
The idea for the design came in 2013 and it was inspired by a top I already own. I wanted to achieve a very lightweight, but detailed result and Tussah silk fitted the bill for this purpose perfectly. The result is very suitable for the climate we experience in Greece, when most of the year, the temperature prohibits us from wearing garments made of wool.
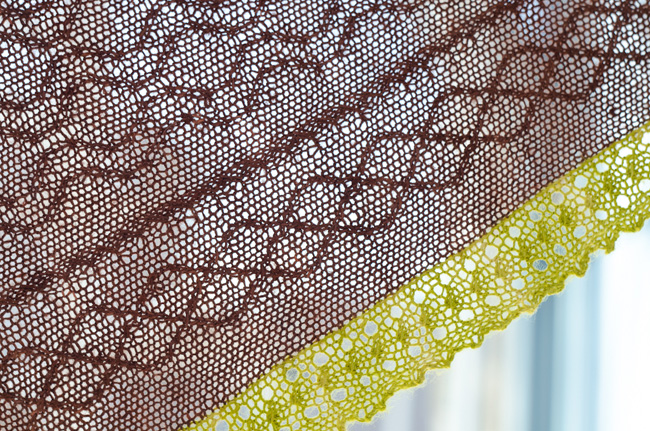
To alleviate boredom from the inevitable pattern repetition lengthwise of the piece, I combined a little bit of lace, color as basic intarsia and beautiful cables.
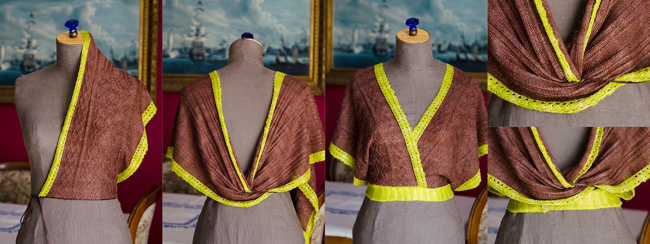
I also wanted to create a garment that can be used in many different ways. As a long rectangular piece, it can be worn as a stole (when not adding the waist bands) or as a very delicate summer top in different wrapping variations. Below I present one way to wrap, but I encourage you to explore and discover more ways!
 model + photos: Asimina Saranti
SIZE
XXXXS[XXXS, XXS, XS, S, M, L, X, 2X, 3X]
shown in size XXXS for length (back waist measurement) and M for width (waist measurement)
See Pattern Notes for information on size and fit.
FINISHED MEASUREMENTS
Width: 12.5[12.5, 12.5, 12.5, 12.5, 13.5, 13.5, 13.5, 14.5, 14.5] inches/32[32, 32, 32, 32, 34.5, 34.5, 34.5, 37, 37] cm
Length: 60[62, 64, 66, 68, 69, 70, 71, 72, 72] inches /152.5[157.5, 162.5, 167.5, 172.5, 174, 178, 180.5, 183, 183] cm
MATERIALS
Yarn
DyeForYarn Tussah Silk Lace [100% Tussah Silk; 760yd/695m per 3.53 oz/100 g skein];
![]() [MC] Mother earth is stirring; 1[1, 1, 1, 1, 1, 2, 2, 2, 2] skeins
[MC] Mother earth is stirring; 1[1, 1, 1, 1, 1, 2, 2, 2, 2] skeins
![]() [CC] Blooming acorn; 1[1, 1, 1, 1, 1, 1, 1, 1, 1] skeins
[CC] Blooming acorn; 1[1, 1, 1, 1, 1, 1, 1, 1, 1] skeins
Recommended needle size
[always use a needle size that gives you the gauge listed below - every knitter's gauge is unique]
![]() US #1/2.25mm needles for working flat
US #1/2.25mm needles for working flat
Notions
![]() cable needle
cable needle
![]() sewing thread in color that matches MC
sewing thread in color that matches MC
![]() fabric ribbon in color that matches MC, 42[45, 46, 39, 42, 47, 53, 60, 66, 73] inches / 108[114, 118, 100, 108, 120, 137, 153, 169, 185] cm cm in length.
fabric ribbon in color that matches MC, 42[45, 46, 39, 42, 47, 53, 60, 66, 73] inches / 108[114, 118, 100, 108, 120, 137, 153, 169, 185] cm cm in length.
![]() 2[2, 2, 3, 3, 3, 3, 3, 3, 3] buttons, approximately half-inch/1cm in diameter
2[2, 2, 3, 3, 3, 3, 3, 3, 3] buttons, approximately half-inch/1cm in diameter
![]() 2 yarn bobbins for CC for working intarsia(optional)
2 yarn bobbins for CC for working intarsia(optional)
![]() stitch markers (optional)
stitch markers (optional)
![]() flexible blocking wires (recommended)
flexible blocking wires (recommended)
![]() sewing needle
sewing needle
![]() yarn needle
yarn needle
GAUGE
27 sts/40 rows = 4 inches/10 cm in cable stitch pattern
36 sts/40 rows = 4 inches/10 cm in stockinette stitch, after blocking
Note: Because silk grows with washing, it is vital to properly block your swatch before measuring.
PATTERN NOTES
[Knitty's list of standard abbreviations and techniques can be found here.]
Fitting tips: Bakanasu is a versatile garment, in two ways: how it’s worn, and also how it’s sized. You can mix-and-match the measurements, for a perfect fit. Measure for both width and length, and decide on the sizes of the two dimensions separately – they may correspond to the same size, they may not. It doesn’t matter!
In the sample shown, size M is knitted for the width (waist) and size XXXS for the length (back waist length).
Measure the Back Waist Length, from the most prominent bone at the base of the neck to the natural waistline. Measure the Waist circumference, by wrapping the tape measure around the natural waist comfortably. The natural waist sits just a bit above the belly button.
Choose the two dimensions that most closely match your own measurements – and again, they don’t need to correspond to the same size:
Back Waist Length: 15[15.5, 16, 16.5, 17, 17, 17.5, 18, 18, 18] inches / 38[39.5, 40.5, 42, 43, 43.5, 44.5, 45, 45.5, 45.5] cm
Waist: 25[26.5, 27.5, 23-24, 25-26.5, 28-30, 32-34, 36-38, 40-42, 44-45] inches / 63.5[67.5, 69.5, 58.5-61, 63.5-67.5, 71-76, 81.5-86.5, 91.5-96.5, 101.5-106.5, 111.5-114] cm
Cables
C2/1R: Slip 2 sts to cable needle and hold in back of work; k1, then k2 from cable needle.
LT: Slip 1 st to cable needle and hold in front of work; k1tbl then k1tbl from cable needle.
RT: Slip 1 st to cable needle and hold in back of work; k1tbl then k1tbl from cable needle.
LPT: Slip 1 st to cable needle and hold in front of work; p1 then k1tbl from cable needle.
RPT: Slip 1 st to cable needle and hold in back of work; k1tbl then p1 from cable needle.
T2L: Slip 1 st to cable needle and hold in front of work; p1 then k1 from cable needle.
T2R: Slip 1 st to cable needle and hold in back of work; k1 then p1 from cable needle.
Elizabeth Zimmermann's One Row Buttonhole (Over 3 stitches)
CHARTS
Cable & Lace panel (note: Chart is wide and divided in two parts, left and right. Cut and assemble after printing.)
Notes:
The two edge stripes are worked with the intarsia method. You will need two separate balls of the CC yarn, one for each side. Twist the yarns around each other when you change color.
As per Legend, work 3[3, 3, 3, 3, 6, 6, 6, 10, 10] sts in total between the CC edge and the start of the cable panels.
The smaller cable panel has a 12-row repeat, and the larger cable panel has a 16-row repeat. Keep careful track of the rows you are working for both repeats.
DIRECTIONS

MAIN PANEL
Important Note: The number of sts cast on for this piece is determined by the waist measurement, and the length of the piece – that is, the number of rows/pattern repeats worked – is determined by the back waist length. Check both – they may correspond to the same size, they may not. This means that you might cast on the first number of stitches, but work the lengths corresponding to the last. It doesn’t matter – use the numbers that are correct for you!
Using MC, CO 82[82, 82, 82, 82, 88, 88, 88, 96, 96] sts.
P 1 row.
Work Chart across.
Work until you have completed 10[10, 10, 10, 10, 12, 12, 12, 12, 12] full repeats of the 16-row central cable pattern.

Central Section
In this section, you’ll discontinue the charts cable charts in the MC portion of the work, and work ribbing instead. Make note of the which row of the 12-row repeat you had just worked.
Next row [RS]: Work lace pattern in CC as set, work ribbing as set by last chart row across MC stitches, work lace pattern in CC to end.
Work as set for 288[320, 336, 352, 368, 320, 336, 336, 352, 352] rows, 72[80, 84, 88, 92, 80, 84, 84, 88, 88] repeats of the four-row CC lace repeat.
Resume working all charts' patterns, continuing the CC lace pattern, picking up the central element on Row 1, and resuming the 12-row repeat where you left off.
Work until you have completed 10[10, 10, 10, 10, 12, 12, 12, 12, 12] full repeats of the 16-row central cable pattern.
BO in pattern. Leave the CC yarn tails long –3 times as long as the full BO edge.
WAISTBAND
This section is worked according to the waist measurement.
Using CC, CO 18[18, 18, 20, 20, 20, 20, 22, 22, 22] sts.
Row 1 [RS]: K.
Row 2 [WS]: K2, p to last 2 sts, k2.
Repeat Rows 1-2 until piece measures 22[23, 24, 20, 24.5, 25, 28, 31, 34.5, 38] inches / 55.5[59.5, 60.5, 51.5, 55.5, 62.5, 71.5, 79.5, 88.5, 96.5] cm from CO edge, ending with WS row
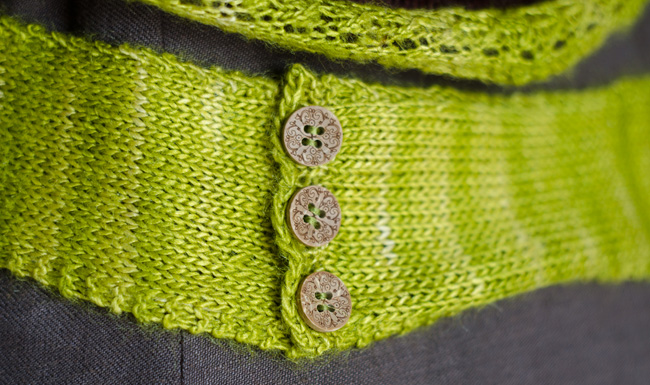
First three sizes only, next row, create buttonhole [RS]: K3, work one-row buttonhole (see Pattern Notes), k2, work Buttonhole, k to end of row.
All other sizes, next row [RS]: K2, work one-row buttonhole 3 times, k to end of row.
Continue in pattern as set for an additional .5 inch/1.5 cm ending with a WS row.
BO.

FINISHING
Blocking wires are recommended. When dry, weave in ends.
Try on the waist band, overlap the two ends and pin the position the buttons should go for a good tight fit. Sew buttons with needle and thread, positioning them 0.5 inch/ 1.5 cm from the cast on edge

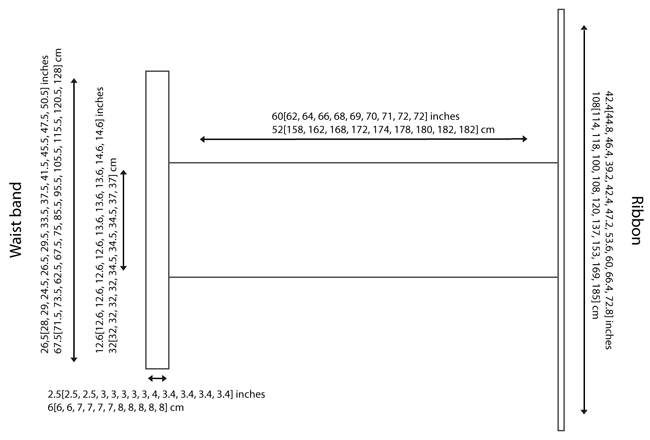
Consult the schematic for placement of the ribbon and waistbands.
Center one short edge of the main panel on the ribbon, pin and sew together with sewing thread and needle.
Center the other short edge of the main panel on the waistband, pin and sew together using a CC yarn tail.

How to wrap:
1. Tie the ribbon around the waist and drape the main panel over one shoulder.
2. Pass the main panel under and then over the ribbon at the back.
3. Drape the main panel from back to front over the other shoulder and button up the waistband.
4. Make adjustments. You may find that the ribbon 'rides up' the back when moving around. You may need to tie the ribbon tighter, tack it under the button waistband or secure it by connecting it to the waistband's upper edge with safety pin(s).
ABOUT THE DESIGNER
 Asimina Saranti is a Computer Engineer and a Web Developer. She likes to travel, immerse in other cultures, and of course, knit!
You can follow her knitting and life adventures on her blog.
Pattern & images © 2017 Asimina Saranti. Contact Asimina