Ambition and Cunning, a free knitting pattern from Knitty.com. Free knitting pattern for a DETAILS HERE.
INTRODUCTION
Ambition and Cunning
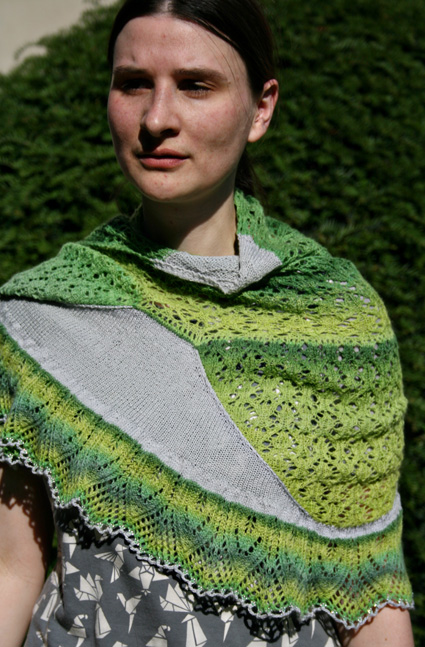 by Lotta Groeger
![]()
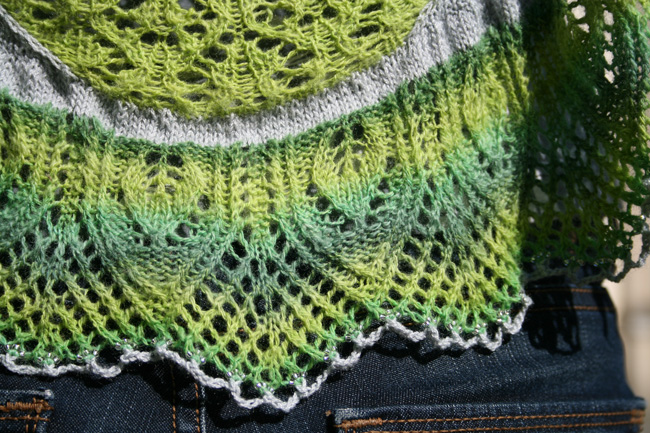
This shawl in green and silver colors was named for the motto of Slytherins. You need some ambition to knit this shawl. The construction is not for the light hearted.
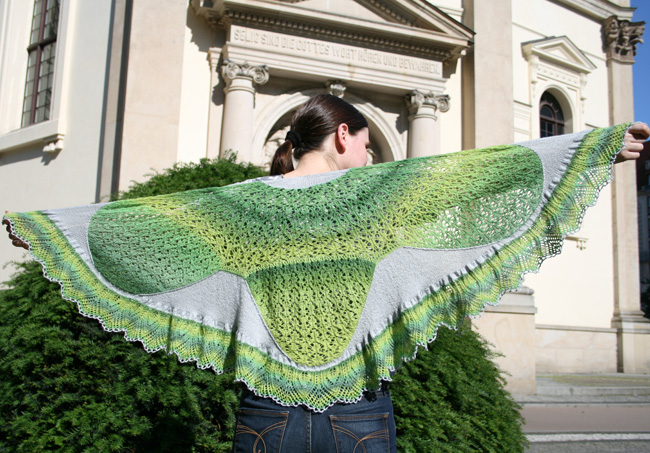
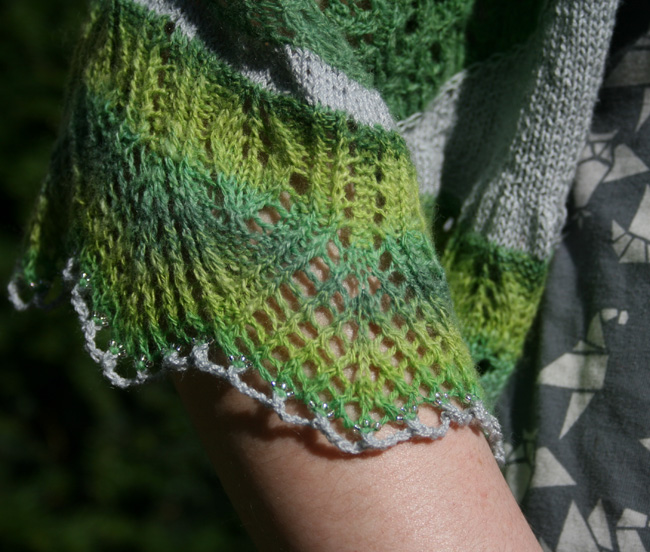
The shawl is worked top down in a half-pi increase method. The waves are created using short rows to get the maximum out of precious handspun and luxurious yarns. The lace on the top part has a short repeat to keep the short rows simpler. The lace on the border gives the shawl a nice complex ending. The beads in the bind off add their own sparkle to match your personality.
This gorgeous fibre, 70% merino, 30% silk and 100% gorgeous green, was gifted to me by the lovely friend who also took the pictures of the shawl. The singles were spun on my Turkish spindle and plyed on my wheel. I managed to line up the color changes quite well while plying both singles together. The resulting yarn was a 25 WPI heavy lace yarn that I paired with a slightly thicker commercial yarn, but then you'll never find a commercial that perfectly matches your handspun.
(Other Hogwarts Houses can follow the same design; just choose the right colors.)
 model: Lotta Groeger
 photos: Nina Fleischer
SIZE
One
FINISHED MEASUREMENTS
Width along top: 25.5 inches/ 65cm
Depth: 51 inches/130 cm
MATERIALS
Fiber
![]() [MC] Lana Gatto Silky [100% silk; 234yd/214m per 50g skein]; color: 8176 (silver); 2 skeins
[MC] Lana Gatto Silky [100% silk; 234yd/214m per 50g skein]; color: 8176 (silver); 2 skeins
![]() [CC] FeltStudio UK [70% merino, 30% silk; roving]; color: green; 3.5 ounces
[CC] FeltStudio UK [70% merino, 30% silk; roving]; color: green; 3.5 ounces
Finished Yarn:
![]() Wraps per inch: 23
Wraps per inch: 23
![]() Ply: 2
Ply: 2
![]() Yardage used: 710 yd/650 m
Yardage used: 710 yd/650 m
![]() Drafting method: semi worsted
Drafting method: semi worsted
Commercial yarn alternative
![]() [MC] Lana Gatto Silky [100% silk; 234yd/214m per 50g skein]; color: 8176 (silver); 2 skeins
[MC] Lana Gatto Silky [100% silk; 234yd/214m per 50g skein]; color: 8176 (silver); 2 skeins
![]() [CC] SweetGeorgia Yarns Merino Silk Lace [50% merino wool; 50% silk; 765yd/100m per 100g skein]; color: Basil; 1 skein
[CC] SweetGeorgia Yarns Merino Silk Lace [50% merino wool; 50% silk; 765yd/100m per 100g skein]; color: Basil; 1 skein
Recommended needle size
[always use a needle size that gives you the gauge listed below - every knitter's gauge is unique]
![]() US #2.5/3mm circular needle, 24 inch/60 cm or longer
US #2.5/3mm circular needle, 24 inch/60 cm or longer
Notions
![]() US C-2/2.75mm crochet hook
US C-2/2.75mm crochet hook
![]() 729 9/0 seed beads (optional, see Pattern Notes)
729 9/0 seed beads (optional, see Pattern Notes)
![]() small crochet hook, beadle needle or similar for adding beads (optional, see Pattern Notes)
small crochet hook, beadle needle or similar for adding beads (optional, see Pattern Notes)
![]() yarn needle
yarn needle
GAUGE
31 sts/40 rows = 4 inches/10cm in stockinette stitch in Lana Gatto Silky
PATTERN NOTES
[Knitty's list of standard abbreviations and techniques can be found here.]
The beads are used for the bind off row only. If you prefer, you can omit them.
p2togtbl: purl two sts together through back loop. 1 st decreased.
CHARTS
DIRECTIONS
Garter Tab:
CO 3 sts in MC.
Work 12 rows in garter stitch.
Knit one more row, then turn work 90 degrees clockwise and pick up and knit 6 sts from the garter bumps at the side and then pick up and knit 3 sts from the cast on edge.12 sts
Section 1:
Row 1 [WS]: K3, p6, k3.
Increase row [RS]: K3, *k1, M1R, repeat from * to last 3 sts, k3. 18 sts
Row 3 [WS]: K3, p to last 3 sts, k3.
Row 4 [RS]: Knit.
Row 5 [WS]: K3, p to last 3 sts, k3.
Work Increase row. 30 sts
Work Rows 3–4 2 times, and work Row 3 once more.
Work Increase row. 54 sts
Work Rows 3–4 5 times, and work Row 3 once more.
Increase row [RS]: K3, M1R, *k1, M1R, repeat from * to last 3 sts, k3. 103 sts
Break MC.
Section 2:
Join CC.
Row 1 [WS]: K3, purl to last 3 sts, k3.
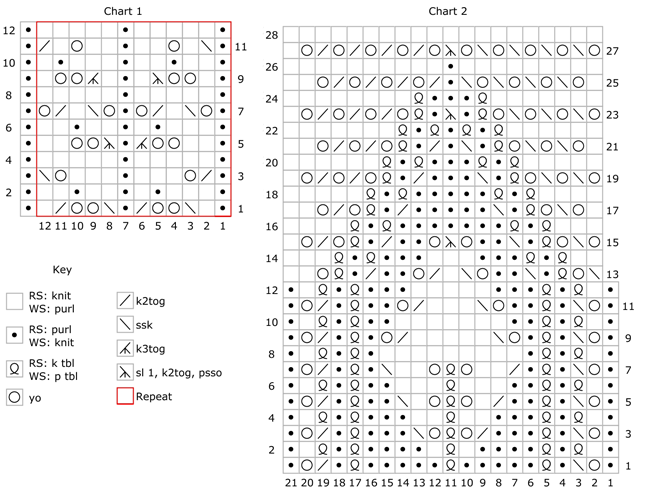
Row 2 [RS]: K3, work Chart 1, working repeat as required, to last 3 sts, k3.
Row 3 [WS]: K3, work Chart 1, working repeat as required, to last 3 sts, k3.
Work as set until Chart 1 is complete, then work Chart Rows 1-10 once more.
Next row, increase [RS]: K3, *k1, yo, repeat from * to last 4 sts, k4. 199 sts
Next row [WS]: K3, purl to last 3 sts, k3.
Row 1 [RS]: K3, work Chart 1, working repeat as required, to last 3 sts, k3.
Row 2 [WS]: K3, work Chart 1, working repeat as required, to last 3 sts, k3.
Work as set until you have worked Chart 1 4 times in total.
Next row, increase [RS]: K3, *k1, yo, repeat from * to last 4 sts, k4. 391 sts
Next row [WS]: K3, purl to last 3 sts, k3.
Section 3:
Note: This section is built by working short rows. For the lace sections, you'll need to keep the lace pattern aligned. Use the purl columns to help you navigate.
Row 1 [RS]: K3, work chart 1 for 113 sts, w&t.
Row 2 [WS]: Work in chart 1 to last 4 sts, w&t.
Row 3 [RS]: Work as per chart to 1 stitch before wrap, w&t.
Row 4 [WS]: Work in chart 1 to 1 stitch before wrap, w&t.
Repeat Rows 3–4 44 times more. 22 sts left unwrapped in the center of the lace section.
Next row [RS]: K across 22 unwrapped sts, work across all wrapped sts, working wraps together with the stitch, k23.
Starting at this point, repeat from Row 1 of this section twice more – after second repeat after wrapped sts have been worked, 3 sts will remain at end of row, knit to end of row.
Break CC. Join MC.
Row 1 [WS]: K3, p1, turn.
Row 2 [RS]: Return 1 from right needle to left needle, k2tog, m1, k to end.
Row 3 [WS]: K3, k to last st in MC, m1p, p2tog, turn.
Repeat Rows 2–3 20 times more, and work Row 2 again.
Row 4 [WS]: K3, p66, pick up wrap and purl together with its stitch, pm, p22, m1p, p2tog, turn.
Row 5 [RS]: Sl1 from right needle to left needle, k2tog, m1, k to 1 before marker, m1, remove marker, ssk, turn.
Row 6 [WS]: Sl1 from right needle to left needle, p2togtbl, m1p, p to stitch made at beginning of row, m1p, p2tog, turn.
Row 7 [RS]: Sl1 from right needle to left needle, k2tog, m1, k to stitch made at beginning of row, m1, ssk, turn.
Repeat Rows 6–7 21 times more.
Row 8 [WS]: P to next wrapped stitch, pick up wrap and purl together with its stitch, pm, p22, m1p, p2tog, turn.
Repeat Row 5.
Repeat Rows 6–7 21 times.
Row 9 [WS]: P to next wrapped stitch, pick up wrap and purl together with its stitch, k3.
Row 10 [RS]: K4, turn.
Row 11 [WS]: Sl1 from right needle to left needle, p2togtbl, m1p, p to last 3 sts, k3.
Row 12 [RS]: K3 to stitch made, m1, ssk, turn.
Repeat Rows 11–12 20 times then work Row 11 again.
Section 4:
Continue with MC.
Increase row [RS]: K3, *k1, M1, repeat from * to last 3 sts, k3. 776 sts
Row 1 [WS]: K3, p to last 3 sts, k3.
Row 2 [RS]: Knit.
Repeat the last 2 rows once more.
Break MC; join CC.
Row 1 [WS]: K3, purl to last 3 sts, k3.
Row 2 [RS]: K3, starting with st 15 and ending with st 7, work Chart 2 to last to last 3 sts, k3.
Row 3 [WS]: K3, starting with st 7 and ending with st 15, work chart 2 to last 3 sts, k3.
Work as set until Chart 2 is complete. 729 sts
Bind off:
Work with MC.
Note: You can work the edge without the beads if you prefer. Note that you need the larger crochet hook for working, and a smaller one (or beadle needle or tool of your choice) for placing beads on the stitches as you go.
Place a bead on each of the next 4 sts, using a small crochet hook or similar, then slip these 4 sts to the crochet hook, wrap the yarn around the hook and pull it through the 4 sts, [ch 6, place beads on next 3 sts, slip these 3 sts to the crochet hook, wrap the yarn around the hook and pull it through the four sts on the hook] to last 4 sts, ch 6, place beads on the last 4 sts, slip these sts to the crochet hook, wrap the yarn around the hook and pull it through the five sts. Cut yarn and pull through final st to secure.
FINISHING
Weave in ends.
Block to a half circle, pin out every loop from crochet bind off.
ABOUT THE DESIGNER
 30-something knitter, geek. Addicted to lace, comics, DnD, Critical Role and Doctor Who.
Pattern & images © 2019 Lotta Groeger.