Phiolet, a free knitting pattern from Knitty.com. Free knitting pattern for a vibrant colorwork sock.
INTRODUCTION
Phiolet
 by Andrea Pfuhl

I am both in love with fair isle knitting, and Kaffe Fasset's bold and colorful designs. And I love knitting socks, too. Since most of Kaffe's designs are based on intarsia knitting, and I am not particularly fond of doing intarsias, I decided to create a colorful homage to Kaffe in simple fair isle technique: only two colors a row and an easy to memorize geometric pattern with a little twist to make it less monotonous.
Remembering his famous pattern "Persian Poppies" I designed an all-over pattern with alternating rows of phiols but then quickly discovered that the result also resembles a field of croci or violets in spring, hence its name "Phiolet". Try it also for scarves, hats and even pullovers!
 photos: Jürgen Pfuhl
SIZE
Adult S[M, L]
FINISHED MEASUREMENTS
Foot Circumference: 7.5[8.25, 9] inches/ 19[21, 23] cm
Leg Length: From upper edge to top of heel 6 inches/ 15 cm, adjustable to length if desired
Note: These socks are designed to be worn with zero ease. Choose the size closest to your actual foot measurement.
MATERIALS
Yarn
Supergarne Aktiv 4-fach uni [75% Superwash Wool, 25% Nylon; 459yd/420m per 100g skein];
Sock A – Violet Flowers
Sock B – Yellow and Violet Flowers
Recommended needle size
[always use a needle size that gives you the gauge listed below - every knitter's gauge is unique]
![]() US #1/2.25mm needles for small circumference in the round: traditional or flexible DPNs, 1 long circular or 2 short circulars as you prefer
US #1/2.25mm needles for small circumference in the round: traditional or flexible DPNs, 1 long circular or 2 short circulars as you prefer
Notions
![]() 2 stitch markers
2 stitch markers
![]() tapestry needle
tapestry needle
GAUGE
38 sts/40 rounds = 4 inches/10 cm in pattern stitch
PATTERN NOTES
[Knitty's list of standard abbreviations and techniques can be found here.]
In order to avoid the jog being visible on the outside of the leg, work a left and a right sock. So every jog will be placed on the inside of the leg.
There is no need to break MC and CC yarns when alternating colors in pattern after every chart repeat. But you can do so if you find it helpful or if you are afraid of tangling the yarns.
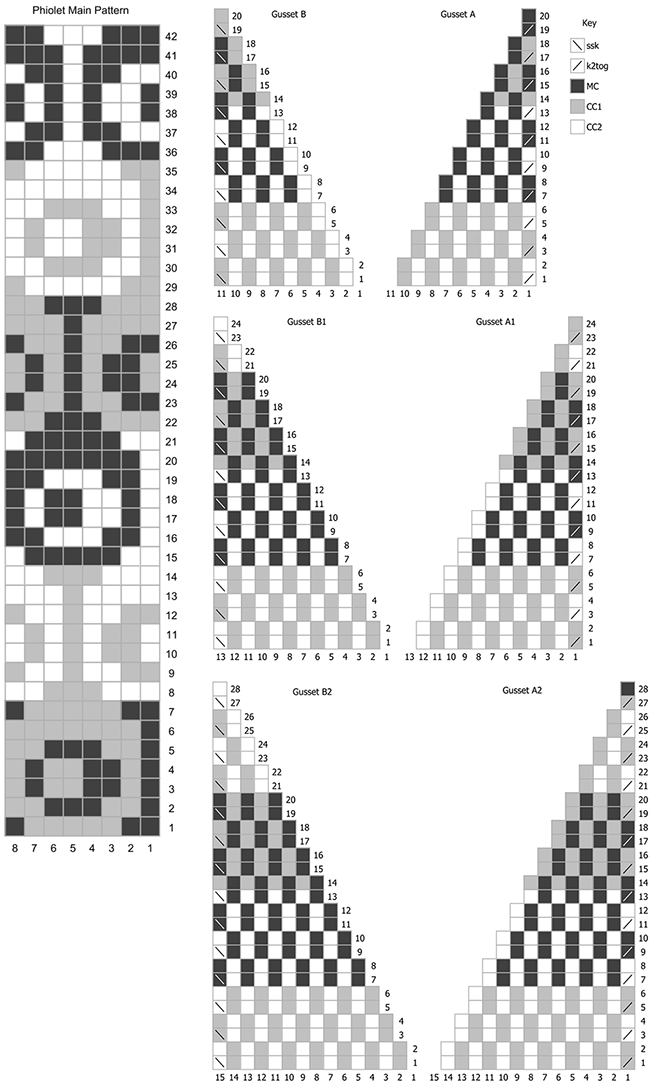
CHARTS
DIRECTIONS
Cuff
With CC2, CO 64[72, 80] sts. Join to work in the round, being careful not to twist sts.
Knit 5 rounds. Join MC and knit 1 round.
Ribbing: With MC, [k1, p1] around.
Work Ribbing as set until cuff measures 0.75 inches/2 cm from CO edge.
Knit 1 round. Do not break yarn.
Increase Round: With CC2, (k8, M1L) 8[8, 8] times, k to end. 72[80, 88] sts.
Leg
Knit 1 Round in MC.
Join CC1. Work Main Pattern Chart around.
Work as set until Sock Chart is complete, and repeat Rows 1-7 once more
Heel Flap
Right sock only: Heel is worked on the first half of the round. Arrange the first 36[40, 44] sts so they are all on one needle. Use MC throughout heel flap and turn. Break CC.
Row 1 [RS]: K1, [Sl1 wyib, k1] to last st, k1 tbl.
Row 2 [WS]: K1, p to last st, k1 tbl.
Repeat Rows 1-2 16[18, 20] more times. There will be 17[19, 21] selvedge sts along each side of the heel flap.
Left sock only: Heel is worked on the second half of the round. Arrange the last 36[40, 44] sts so they are all on one needle. Use MC throughout heel flap and turn. Turn work. Break CC.
Row 1 [WS]: K1, p to last st, kl tbl.
Row 2 [RS]: K1, [sl1 wyib, k1] to last st, k1 tbl.
Repeat Rows 1-2 16[18, 20] more times, and work Row 1 once more. There will be 17[19, 21] selvedge sts along each side of the heel flap.
Turn Heel
Row 1 [RS]: Sl1 wyib, k 20[24, 28] , ssk, k1; turn work.
Row 2 [WS]: Sl1 wyif, p 7[11, 15] , p2tog, p1; turn work.
Row 3: Sl1 wyib, k 8[12, 16] , ssk, k1; turn work.
Row 4: Sl1 wyif, p 9[13, 17] , p2tog, p1; turn work.
Row 5: Sl1 wyib, k 10[14, 18] , ssk, k1; turn work.
Row 6: Sl1 wyif, p 11[15, 19] , p2tog, p1; turn work.
Row 7: Sl1 wyib, k 12[16, 20] , ssk, k1; turn work.
Row 8: Sl1 wyif, p 13[17, 21] , p2tog, p1; turn work.
Row 9: Sl1 wyib, k 14[18, 22] ,ssk, k1; turn work.
Row 10: Sl1 wyif, p 15[19, 23] , p2tog, p1; turn work.
Row 11: Sl1 wyib, k 16[20, 24] , ssk, k1; turn work.
Row 12: Sl1 wyif, p 17[21, 25] , p2tog, p1; turn work.
Row 13: Sl1 wyib, k 18[22, 26] , ssk, k1; turn work.
Row 14: Sl1 wyif, p 19[23, 27] , p2tog, p1; turn work. 22[26, 30] sts rem.
Do not break MC.
Gusset
To setup, work to the center of the heel stitches: Sl1 wyib, k 10[12, 14] st. This is the new start of round position.
Next round, establish patterns:
With CC and CC1 work Gusset chart A[A1, A2] across rem heel sts, place marker for Left gusset.
Right Sock: With CC1 and CC2 pick up and knit 17[19, 21] sts along edge of heel flap according to Sock Chart: start with Row 8 and st 3[5, 7] continuing in pattern, M1L between the heel flap and the instep of the sock. K across 36[40, 44] held instep sts according to Sock Chart, as set. M1L between the heel flap and the instep of the sock in pattern, and pick up with CC1 and CC2 according to Sock Chart 17[19, 21] sts along heel flap, place marker for Right gusset and work Gusset chart B[B1, B2] . 94[106, 118] sts.
Left Sock: With CC1 and CC2, pick up and knit 17[19, 21] sts along edge of heel flap according to Sock Chart, starting with Row 8 and st 7[5, 3] , continuing in pattern, M1L between the heel flap and the instep of the sock. K across 36[40, 44] held instep sts according to Sock Chart, as set. M1L between the heel flap and the instep of the sock in pattern and pick up with CC1 and CC2 according to Sock Chart 17[19, 21] sts along heel flap, place marker for Right Gusset and work Gusset chart B[B1, B2] . 94[106, 118] sts
Continue in pattern, working Gusset Chart A[A1, A2] and B[B1, B2] as set between the two placed markers until it has been completed. 2 sts rem, 1 each between start of round and the gusset markers.
Next Round: Work in pattern as set to Right gusset marker and remove it. Work a k3tog in pattern on the last 2 gusset sts, and the first pattern stitch on the left ndl, removing marker as you go. This is the new start of the round. Continue in pattern to end of Round. 72[80, 88] sts.
Foot
Continue in pattern until foot measures approx 2[2.25, 2.5] inches/ 5[5.5, 6] cm less than desired foot length. Note: the repeat looks best if you end after a pattern block, e.g. after rows 7, 14, 21 etc.
Toe
Round 1: With MC, (k 7[8, 9] , k2tog) 8 times. 64[72, 80] sts.
Round 2: With CC2 Knit. Break all but MC yarn, and continue in MC only.
Round 3, decrease: k to 3 sts before instep, k2tog, k1; k1, ssk, k to 3 sts before end of instep, k2tog, k1; k1, ssk, knit to the center of the round. 4 sts decreased.
Round 4: Knit.
Repeat Rounds 3-4 until you have 40[48, 56] sts on your needles.
Work Round 3 only until you have 8 sts left. Break yarn, leaving a 6 inch/15 cm tail and pull these stitches up together firmly with the yarn held double.
FINISHING
Weave in all ends.
Stranded colorwork benefits from blocking: wash or soak the socks in lukewarm water, roll it in a wet towel to remove excess moisture, and lightly stretch – on sock blockers, or on your feet. (If you’re putting them on your feet, only leave them a minute or two – take them off and hang them to dry!) Once dry, you may wish to steam them to smooth out any remaining bumps.
ABOUT THE DESIGNER
 Andrea is a biologist and journalist who lives with her husband in Northern Germany near the Elbe River. She has always been intrigued by Nordic knits and colorful designs, and was taught knitting by her grandma as a child.
She can be found on Ravelry as Suruvaippa.
Pattern & images © 2020 Andrea Pfuhl.