The Ombis, a free knitting pattern from Knitty.com. Free knitting pattern for a mesh-stitch beach coverup. This pattern was named by a neural net .
INTRODUCTION
The Ombis
 by Amy Singer

What is The Ombis? No one really knows.
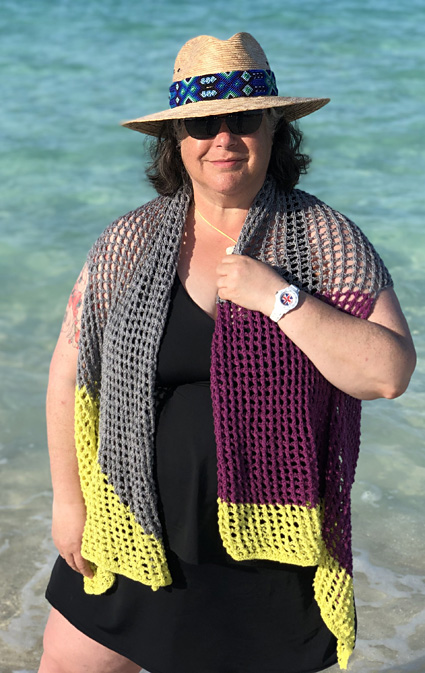
Is it a swoopy beach cover up that doesn’t really cover anything? Does it have a short back or a long one? Is the front gathered and lush or simply drapy? Does it really matter? It’s just fun.
Really, what The Ombis is… is zen knitting. A lacy rectangle with holes for your arms, and a knitted honeycomb grid stitch that looks crocheted, courtesy of the exceptionally clever Melissa Leapman and her book The Knit Stitch Pattern Handbook. The colorblocking is optional, but makes it look different depending on how you wear it. Wear it with the holes nearer the top of the long side, and it’s more drapy (see 3rd picture below). Wear it with the holes nearer the bottom, and it turns into a thing with a squooshy front that is even more fun to wear (shown at left). Don’t even bother blocking it. It’s just gonna get wet, and as the yarn is made from three of the most durable fibers, it’ll just get softer with time.
It’s a silly thing. Silly things seem like a good idea lately.
 model: Amy Singer
photos: Mark Sadler
SIZE
Women's XS[S, M, L, 1X, 2X, 3X, 4X 5X]
shown in size 3X, worn with 12 inches/30.5 cm of ease around full bust
FINISHED MEASUREMENTS
Full Width: 52[52.75, 55.75, 57.25, 60.25, 61, 64, 62.75, 63.75] inches/132[134, 141.5, 145.5, 153, 155, 162.5, 159.5, 162] cm
Length: 19.25[20.5, 20.5, 21, 21, 21.5, 22, 22.25, 22.25] inches/49[52, 52, 53.5, 53.5, 54.5, 56, 56.5, 56.5]
Note: See Pattern Notes regarding Full Width measurement
MATERIALS
Yarn
Knit One Crochet Two Daisy [38% Linen, 32% Silk, 30% Hemp; 272 yd/248m per 3.5oz/100g skein];
![]() [CC1] 207 Spring Moss; 2[2, 2, 2, 2, 2, 2, 2, 2] skeins
[CC1] 207 Spring Moss; 2[2, 2, 2, 2, 2, 2, 2, 2] skeins
![]() [CC2] 214 Slate; 2[2, 2, 2, 2, 2, 2, 2, 2] skeins
[CC2] 214 Slate; 2[2, 2, 2, 2, 2, 2, 2, 2] skeins
![]() [CC3] 212 Bougainvillea; 1[1, 1, 1, 1, 1, 1, 2, 2] skein(s)
[CC3] 212 Bougainvillea; 1[1, 1, 1, 1, 1, 1, 2, 2] skein(s)
Note: You can work this all in one color if you prefer. You’ll need 4[4, 4, 4, 5, 5, 5, 5, 5] skeins total.
Recommended needle size
[always use a needle size that gives you the gauge listed below - every knitter's gauge is unique]
![]() US #6/4mm circular needle, 20-inches/50cm length or longer
US #6/4mm circular needle, 20-inches/50cm length or longer
![]() crochet hook in a similar size, for the cast on
crochet hook in a similar size, for the cast on
Notions
![]() sharp-pointed yarn needle
sharp-pointed yarn needle
GAUGE
22 sts/30 rows = 4 inches/10 cm in stockinette stitch
22.5 sts/24 rows = 4 inches/10 cm in pattern stitch
PATTERN NOTES
[Knitty's list of standard abbreviations and techniques can be found here.]
Full width does not mean "body size" in this pattern, since the front pieces fall at a diagonal. Choose a size relative to your largest upper body measurement (bust or torso) plus approximately 12 inches/30.5 cm of ease.
This fabric is exceptionally stretchy in all directions because of the honeycomb structure of the stitch. It can be challenging to get a fixed measurement, as it stretches while it’s being measured. Rather than working to a specific length, you’ll likely find it easier to work to row counts. When you check your gauge in the pattern stitch, make sure your stitch gauge matches precisely – and remember, this is for a washed swatch! – and take note of your row gauge. If it’s off by a little, that’s fine. Make a note of the number of rows you’re getting per inch (or cm, if you are working in metric). When the pattern tell you to work to a certain length, multiply that number by your row gauge – that’s the number of rows you’ll need to have worked. Approximate row counts are given in the pattern – these are only a guide, and even if following them, make sure that you keep track of which pattern row you’ve just worked so that you line up with the instructions.
It is meant to be machine washed, damp dried and laid flat to finish.
The sample photographed was worked as follows: the first front and part of the back worked in a 2-color stepped intarsia pattern using CC1 and CC2; continued as established until all sts were worked in CC2. The back was completed and the second armhole worked in CC2; switched to CC3 for the second front, to end of the skein of CC3, switched to CC1 for remainder of work. All switches were made at the start of a RS row. Cut yarn and knot loosely with next color; you’ll tidy up the knots and weave in ends after the garment is finished. If you’re working a smaller size, change back to CC1 when you’re a few inches from the end of the second front.
Use any color combination or pattern you wish – work in all one color, all-over vertical stripes, colorblocking. For ease of weaving in ends, change colors at the end of a row.
For the intarsia section, switch colors before making the double yarn over: Twist CC1 around CC2 twice to secure it, then continue in CC2, beginning with the double yarn over.
Techniques:
- Crochet cast on – watch the top video, starting at 3:00.
- Russian bind off, purl variation: P2tog, *slip resulting st back to left needle, p2tog; repeat to end.
- CDD: Slip 2 st tog as if to k2tog, k1, and pass 2 slipped sts over st just knit. 2 sts decreased.
CHARTS
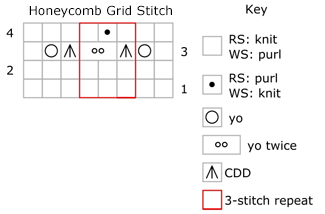
Honeycomb Grid Stitch
Work from chart or written instructions as you prefer.
Worked over a multiple of 3 stitches plus 5.
Row 1 [RS]: Knit
Row 2: Purl.
Row 3: K1, yo, [CDD, yo twice] to last 4 sts, CDD, yo, k1.
Row 4: P2, [p2, k1] to last 3 sts, p3. Note: This is simply purling across, working (p1, k1) into the double yarnover.
DIRECTIONS
Front A (as garment is reversible, left and right don’t apply)
Using the crochet method and CC1, cast on 110[116, 116, 119, 119, 122, 125, 125, 125] sts.
Knit 2 rows.
Row 3 [RS]: Work Honeycomb Grid Stitch across.
Work 1 WS row.
Row 5: Attach CC2, leaving CC1 attached. Work the first stitch of the pattern with CC2, twist CC2 around CC1, and complete the row in CC1.
Row 6: Work in patt in CC1 to last st, twist yarns around each other and work last st in CC2.
Row 7: Work 2 sts with CC2, twist CC2 around CC1, and complete the row in CC1.
Row 8: Work in patt in CC1 to last 2 sts, twist yarns around each other and work last 2 sts in CC2.
Row 9: Work 3 sts with CC2, twist CC2 around CC1, and complete the row in CC1.
Row 10: Work in patt in CC1 to last 3 sts, twist yarns around each other and work last 3 st in CC2.
Note: Read ahead before you proceed.
From here, continue in pattern as set, working 1 more stitch in CC2 each RS row, until all sts are worked in CC2. At that point, cut CC1 and continue with CC2 only until after second armhole is complete.
AT THE SAME TIME, when piece measures approximately 16[16, 16.5, 16.5, 17, 17, 17, 17.5, 18] inches/40.5[40.5, 42, 42, 43, 43, 43, 44.5, 45.5] cm from CO edge – approximately 120[120, 124, 124, 128, 128, 128, 132, 136] rows – ending with row 4 of the pattern, make first armhole as follows:
Armhole row 1 [RS]: K59[70, 66, 68, 65, 65, 65, 65, 60], using Russian Bind Off described in Pattern Notes, loosely bind off 32[28, 31, 32, 35, 37, 39, 41, 44] sts, k to end of row.
Armhole row 2 [WS]: P to 1 st before armhole bind-off gap, using crochet method, CO 32[28, 31, 32, 35, 37, 39, 41, 44] sts, p to end of row.
Back
Continue working even in pattern (you’re on Honeycomb Grid Stitch row 3), until piece measures approximately 20[20.75, 22.75, 24.25, 26.25, 27, 27, 27.75, 27.75] inches/51[52.5, 58, 61.5, 66.5, 68.5, 68.5, 70.5, 70.5] cm from first armhole – approximately 150[158, 170, 182, 198, 202, 202, 210, 210] rows – ending with row 4 of the pattern.
Work Armhole rows 1-2 once more.
Cut CC2 and join CC3.
Front B
Work even in CC3 until piece measures approximately 12.75[12.5, 13, 12.75, 13.25, 13, 13, 13.25, 13.75] inches/32.5[32, 33, 32.5, 33.5, 33, 33, 33.5, 35] cm – approximately 96[94, 98, 96, 100, 98, 98, 100, 104] rows – or you run out of CC3.
Change to CC1.
Continue working even in pattern (you’re on Honeycomb Grid Stitch row 3), until piece measures 16[16, 16.5, 16.5, 17, 17, 17, 17.5, 18] inches/ 40.5[40.5, 42, 42, 43, 43, 43, 44.5, 45.5] cm from second armhole – or the same number of rows you worked for the first front- ending with Row 2 of the pattern.
Knit 2 rows.
Bind off using Russian bind off variation, being careful to match the tension of the edge to the lace stitches so they aren’t constricted.
FINISHING
Machine wash and dry till damp; lay flat to finish drying, shaping gently.
With a sharp-pointed darning needle, weave in ends. Best hiding place for this work is the solid knit rib on the WS, or the garter edges.
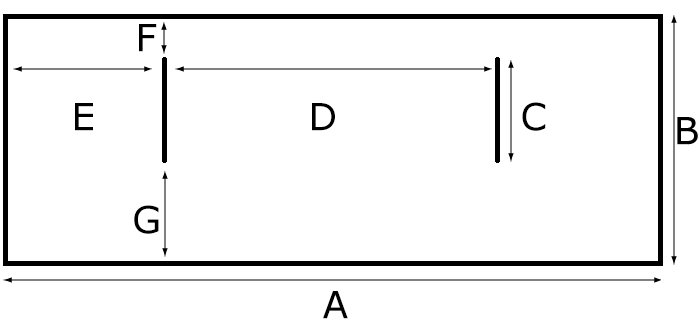
Full Width – A: 52[52.75, 55.75, 57.25, 60.25, 61, 64, 62.75, 63.75] inches/132[134, 141.5, 145.5, 153, 155, 162.5, 159.5, 162] cm
Length – B: 19.25[20.5, 20.5, 21, 21, 21.5, 22, 22.25, 22.25] inches/49[52, 52, 53.5, 53.5, 54.5, 56, 56.5, 56.5] cm
Armhole depth – C: 5.75[5, 5.5, 5.75, 6.25, 6.5, 7, 7.25, 7.75] inches/14.5[12.5, 14, 14.5, 16, 16.5, 18, 18.5, 19.5] cm
Back width – D: 20[20.75, 22.75, 24.25, 26.25, 27, 27, 27.75, 27.75] inches/51[52.5, 58, 61.5, 66.5, 68.5, 68.5, 70.5, 70.5] cm
Front width – E: 16[16, 16.5, 16.5, 17, 17, 17, 17.5, 18] inches/40.5[40.5, 42, 42, 43, 43, 43, 44.5, 45.5] cm
Top edge to top of armhole – F: 3[3, 3.25, 3.25, 3.25, 3.5, 3.5, 3.5, 3.75] inches/7.5[7.5, 8.5, 8.5, 8.5, 9, 9, 9, 9.5] cm
Bottom edge to bottom of armhole – G: 10.5[12.5, 11.75, 12, 11.5, 11.5, 11.5, 11.5, 10.75] inches/26.5[32, 30, 30.5, 29, 29, 29, 29, 27.5] cm
ABOUT THE DESIGNER
 Amy never imagined she would ever pose for magazine pictures in her bathing suit. Body acceptance is a powerful thing.