Cascading Cables Socks, a free knitting pattern from Knitty.com. Free knitting pattern for a delicately cabled top-down sock.
INTRODUCTION
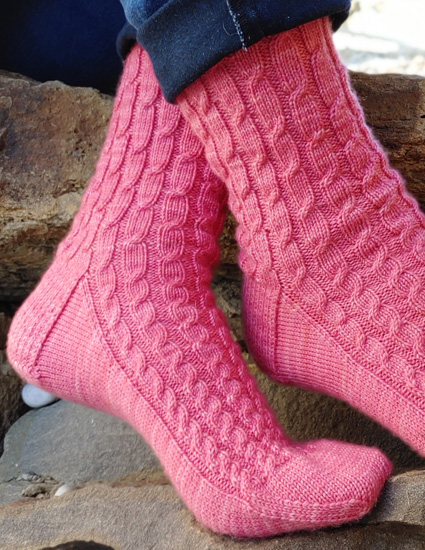
Cascading Cables
 by Lisa Park Tomaszewski

Years ago, I spent the summer driving a tandem-axle dump truck. The pay was good, but I was bored out of my mind! We were hauling loads of clay from one job site to another site that was just a few miles down the road. After dumping a load, I would drive back to the first site and line up for my turn to have my truck filled by the large excavator. There were quite a few trucks on this project, and we would inch forward in line as each loaded truck drove off.
Like many knitters, I'm in the habit of always bringing my knitting anywhere I go because one never knows when a knitting opportunity will arise. I spent my lunch breaks happily knitting away. On one particularly boring day, while I was waiting in line to have my truck loaded, I glanced over at my knitting lying on the seat next to me. It was a simple pair of socks that were near completion. I picked it up and knit half of a round. I inched my truck forward and knit some more. I had completed several rounds by the time my truck was loaded and I was on the road again. I finished that pair of socks that day. I had a new appreciation for my job!
The next day, it was time to start a new pair. I usually design my socks on the fly according to whatever strikes my fancy at the time. I decided to do elongated 4-stitch cables with staggered crossings. This seemed like a perfect design for my new knitting environment. And wouldn't you know it, I goofed! I had crossed my cables two rounds too soon, and by the time I noticed it, I had already worked several more rounds. I couldn't fathom ripping it back while in my truck, so I modified my plans. I decided to make the cable crossing progressively more frequent as I knit my way to the toes. And that is how the Cascading Cable Socks came to be! The original pair was accidently fulled, but are still worn frequently. You can't see the cascading cables anymore, as they just look like fuzzy ribbed socks. It was time to knit them again and share the pattern with others! I hope that you enjoy knitting them and wearing them as much as I have.
 photos: Amy Tomaszewski
SIZE
Adult S[M, L]
FINISHED MEASUREMENTS
Foot Circumference: 6[7, 8] inches/ 15[18, 20.5] cm
Foot Length: adjustable to preference
Leg Length [all sizes]: 6 inches/15cm, as shown
Note: Leg length can be shortened to 3.5 inches/9cm by omitting rnds 25-62.
Note: Choose a size with approximately 2 inches/5 cm negative ease in foot circumference. These socks have a significant amount of negative ease, as they are essentially 4x2 ribbed socks. For example, the leg of the medium size measures only 5.5 inches/14cm in circumference but will comfortably stretch to 11 inches/28cm when worn.
MATERIALS
Yarn
![]() Smiling Sheep Happy Sock [85% SW Merino, 15% Nylon; 437yd/400m per 3.53 oz/100 g skein]; Lollipop; 1[1, 2] skeins
Smiling Sheep Happy Sock [85% SW Merino, 15% Nylon; 437yd/400m per 3.53 oz/100 g skein]; Lollipop; 1[1, 2] skeins
Short version: 1[1, 1] skein
Recommended needle size
[always use a needle size that gives you the gauge listed below - every knitter's gauge is unique]
![]() US #1/2.25mm needles for working small circumference in the round
US #1/2.25mm needles for working small circumference in the round
Yarn Characteristics: Choose a hardwearing sock yarn. A 4-ply yarn is preferable as it will enhance the definition of the cables. The yarn used in the sample has merino for softness, but because of its relatively low nylon content, I've worked it densely for longevity. The pattern looks best in a solid or nearly-solid color.
Notions
![]() cable needle
cable needle
![]() stitch marker
stitch marker
![]() yarn needle
yarn needle
GAUGE
38 sts/54 rounds= 4 inches/10 cm in stockinette stitch
PATTERN NOTES
[Knitty's list of standard abbreviations and techniques can be found here.]
Techniques:
C4B: Slip 2 sts onto cable needle and hold at back of work; k2, then k2 from cable needle.
Leg Patterns
Cable Turn A: [P1, C4B, p2, k4, p1] around.
Cable Turn B: [P1, k4, p2, C4B, p1] around.
DIRECTIONS
Cuff
Using long-tail method, cast on 72[84, 96] sts. Distribute sts across needles as you prefer and join for working in the round.
Cuff Rnds 1-7: [K1, p1] to end of rnd.
Leg
Ribbing round: [P1, k4, p1] around.
Work 6 more rnds as set.
Next round, Cable Turn A: [P1, C4B, p2, k4, p1] around.
Work 7 rnds even.
Next round, Cable Turn B: [P1, k4, p2, C4B, p1] around.
Work 7 rnds even.
Work Cable Turn A.
Note: Leg length can be shortened here by skipping the next 2 even rnds and working the following sequence just once.
Work 2 rnds even.
[Work 5 rnds even. Work Cable Turn B. Work 5 rnds even. Work Cable Turn A.] 4 times.
Heel Flap
Turn work.
Row 1 [WS]: P 36[42, 48] . (Heel flap is worked back and forth over these sts only. Rearrange sts as you prefer.) Turn.
Row 2 [RS]: [Sl1, k1] to end. Turn.
Row 3 [WS]: Sl1, p to end. Turn.
Repeat Rows 2-3 17[20, 23] more times. 37[43, 49] rows total.
Turn Heel:
Row 1 [RS]: K 21[24, 27] , ssk, k1. Turn.
Row 2 [WS]: Sl1, p7, p2tog, p1. Turn.
Row 3: Sl 1, knit to 1 st before gap, ssk, k1. Turn.
Row 4: Sl 1, purl to 1 st before gap, p2tog, p1. Turn.
Small and Large only:
Repeat Rows 3-4 until all sts of heel flap have been worked. 22[-, 28] sts.
Medium only:
Repeat Rows 3-4 until 1 stitch remains on either side of the gaps.
Next row [RS]: Sl1, knit to 1 st before gap, ssk. Turn.
Next row [WS]: Sl1, purl to 1 stitch before gap, p2tog. Turn. 24 sts.
Gusset and Foot
Set-up rnd 1 [RS]: Knit across 22[24, 28] sts of heel. Pick up and knit 19[22, 25] sts along first edge of heel flap. Work across 36[42, 48] sts of instep in ribbing pattern. Pick up and knit 19[22, 25] sts along second edge of heel flap. This is the new start of round. 96[110, 126] sts.
Set-up rnd 2: K to 4 sts before instep, k2tog; this position is the new start of instep, slip the next 2 sts to the start of the next needle; k1, p1, work across instep in rib pattern as set; work p1, k1 on first two gusset sts; this position is the new end of instep; ssk, k to start of instep. This is the new start of round. 2 sts decreased.
Rnd 1: Work across instep in rib pattern as set; k to end of rnd.
Rnd 2: Work across instep in rib pattern as set; ssk, k to last 2 sts, k2tog. 2 sts decreased.
Repeat Rnd 1 once more.
Please read ahead before you continue: Gusset decreases are worked every other Round, as set by Rnd 2. Continue working Gusset decreases until 72[84, 96] sts rem. Once gusset decreases are complete, work even on sole sts.
AT THE SAME TIME, work patterning on instep as follows:
Cable Turn B, Small and Large only: K1, p1, [p1, k4, p2, C4B, p1] 3[-, 4] times, p1, k1; work to end of round.
Cable Turn B, Medium only: K1, p1, [p1, k4, p2, C4B, p1] 3 times, p1, k4, p2, k1; work to end of round.
Work 3 rnds in ribbing as set.
Cable Turn A, Small and Large only: K1, p1, [p1, C4B, p2, k4, p1] 3[-, 4] times, p1, k1; work to end of round.
Cable Turn A, Medium only: K1, p1, [p1, C4B, p2, k4, p1] 3 times, p1, C4B, p2, k1; work to end of round.
Work 3 rnds in ribbing as set.
Repeat the last 8 rnds 3 more times, working gusset decreases on sole as required, then work Cable Turn Round B, 3 rnds even, and Cable Turn Round A one more time.
[Work 2 rnds even, work Cable Turn Round B, work 2 rnds even, work Cable Turn Round A across instep.]
Repeat these last 6 rnds until foot measures 1.5[1.75, 2] inches/ 4[4.5, 5] cm short of desired length – you can end anywhere in the pattern.
Toe
Set-up: K1, p1 – this is the new start of round. Divide the sts evenly, so that you have 36[42, 48] each on the sole and the instep, and place a marker or arrange so that you can identify the midpoint of the round.
Decrease rnd: K1, ssk, k to 3 sts before midpoint of rnd, k2tog, k1; k1, ssk, k to 3 sts before end of rnd, k2tog, k1. 4 sts decreased.
Following rnd: Knit.
Repeat the last 2 rnds 6 more times. 44[56, 68] sts rem.
Work Decrease rnd 5[8, 11] times. 24 sts rem.
FINISHING
Graft toe close. Wash to block, and weave in ends.
ABOUT THE DESIGNER
 Lisa is a firm believer in knitting anywhere and everywhere. Whether on a mountain side or in a fire truck, there are no "knit-free" zones in her world. When she's not knitting, she can often be found dyeing yarn in her Smiling Sheep Fine Yarns studio with her adult daughters.
Lisa's favorite person to knit for is herself, and her favorite thing to knit is socks. Currently, her sock drawer capacity has reached a critical point. She is considering purchasing a new dresser just for socks!
Lisa can be found on Ravelry and her website.
Pattern & images © 2021 Lisa Park Tomaszewski