Ripple Rib Socks, a free knitting pattern from Knitty.com. Free knitting pattern for an eyelet rib top-down sock with a naturally occuring ripply cuff.
INTRODUCTION
Ripple Rib
 by Christie WN

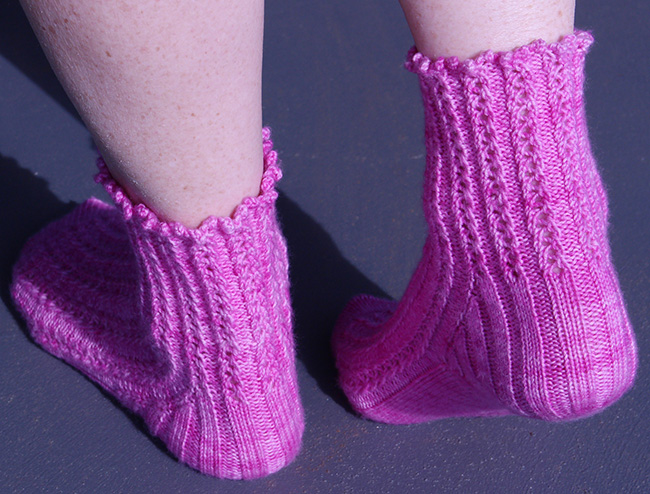
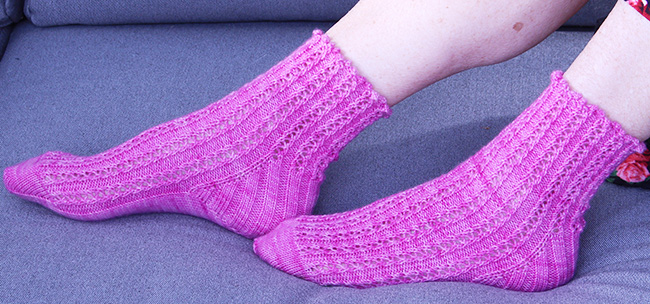
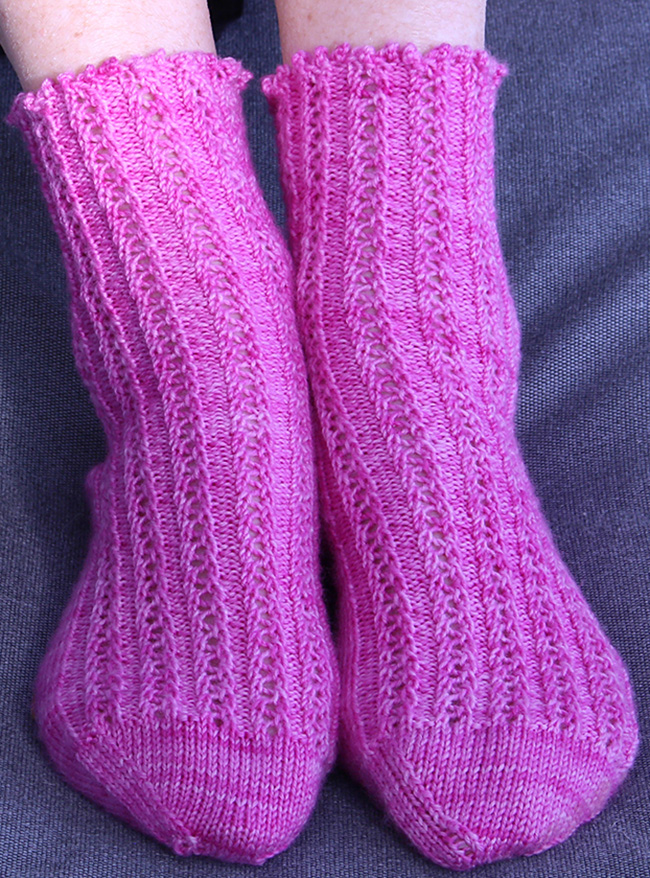
Sometimes the yarn itself causes inspiration to strike and that was the case with the colour of this Raspberry Cordial yarn. Thoughts of lazy summer days with ice cream sundaes and ripply biscuit wafers popped into my head and the Ripple Rib socks came into being.
The pattern starts with a gentle ripply cast on at the cuff and goes straight into a summery eyelet rib, perfectly comfortable and stylish for wearing in tennis shoes or with Mary Janes. The eyelet rib flows into a ribbed heel that hugs the back of the foot.
Pick a color reminiscent of your favourite ripple ice cream and enjoy knitting this easily memorisable lace pattern.
 model: Christie WN
photos: Kit WN
SIZE
Adult S[M, L]
FINISHED MEASUREMENTS
Foot circumference: 7[8, 9] inches/ 17.5[20, 22] cm
Leg length: 4.5 inches/11.5 cm as shown, adjustable to preference
Foot length: adjustable to preference
Note: Choose a size with approximately 0.5-1 inch/1.5-2.5 cm negative ease in the foot circumference.
MATERIALS
Yarn
![]() Sally Ridgway Designs 4 ply Supreme Sock [85% merino/15% nylon; 435yd/400m per 100g skein]; color: Raspberry Cordial; 1 skein.
Sally Ridgway Designs 4 ply Supreme Sock [85% merino/15% nylon; 435yd/400m per 100g skein]; color: Raspberry Cordial; 1 skein.
Yarn Characteristics:
The sample shown uses a 4-ply superwash sock yarn. For substitution, a hard-wearing sock yarn with a nylon component is recommended.
Recommended needle size
[always use a needle size that gives you the gauge listed below - every knitter's gauge is unique]
![]() US #1/2.25mm needles for small circumference in the round
US #1/2.25mm needles for small circumference in the round
Notions
![]() stitch markers
stitch markers
![]() yarn needle
yarn needle
GAUGE
34 sts/48 rounds = 4 inches/10 cm in stockinette stitch
PATTERN NOTES
[Knitty's list of standard abbreviations and techniques can be found here.]
The leg length is easily adjustable by working fewer or more sets of the 4 round Eyelet Rib pattern.
Eyelet rib:
Round 1: [P2, k1, yo, ssk] to end.
Round 2: [P2, k3] to end.
Round 3: [P2, k2tog, yo, k1] to end.
Round 4: [P2, k3] to end.
The Eyelet Rib pattern is stretchy so fewer stitches are worked for the leg, increasing the number of stitches after the heel turn for the foot.
DIRECTIONS
Cuff
Using a Cable CO, CO 5. BO2. Put stitch back on left needle. *CO4. BO2. Return st to left needle. Repeat from * until you have 51[61, 71] sts total.
Distribute sts across needles as you prefer, place last CO st onto first needle, at the start of the round.
Set up round 1: P2tog, p1, k3, [p2, k3] to end. 50[60, 70] sts.
Set up round 2: [p2, k3] to end
Leg
Work 12 repeats in total of the eyelet rib pattern, or desired length to start of gusset increases.
Heel/Gusset
The first 27[32, 37] sts form the instep, the remaining sts are the heel. Place markers or rearrange sts on needles as desired.
Round 1: Work 27[32, 37] instep sts in Eyelet Rib pattern as established, beginning and ending with p2; k1, m1r, k2, [p2, k3] to last 5 sts, p2, k2, m1l, k1. 2 sts inc.
Round 2: Work across instep sts in Eyelet Rib pattern; k4, (p2, k3) to last st, k1.
Round 3: Work across instep sts in Eyelet Rib pattern; k1, m1pr, (k3, p2) to last 4 sts, k3, m1pl, k1. 2 sts inc.
Round 4: Work across instep sts in Eyelet Rib pattern; k1, p1, (k3, p2) to last 5 sts, k3, p1, k1.
Round 5: Work across instep sts in Eyelet Rib pattern; k1, m1pr, p1, (k3, p2) to last 5 sts, k3, p1, m1pl, k1.
Round 6: Work across instep sts in Eyelet Rib pattern; k1, p2, (k3, p2) to last st, k1.
Round 7: Work across instep sts in Eyelet Rib pattern; k1, m1r, p2, (k3, p2) to last st, m1l, k1.
Round 8: Work across instep sts in Eyelet Rib pattern; k2, p2, (k3, p2) to last 2 sts, k2.
Round 9: Work across instep sts in Eyelet Rib pattern; k1, m1r, k1, p2, (k3, p2) to last 2 sts, k1, m1l, k1.
Round 10: Work across instep sts in Eyelet Rib pattern; (k3, p2) to last 3 sts, k3.
Repeat Rounds 1-10 2[2, 2] more times.
For sizes M and L only, work Rounds –[1-2, 1-6] again.
Sizes S and L only:
Work across instep sts in Eyelet Rib pattern; (k3, p2) to last 3 sts, k2, m1l, k1.
27[32, 37] sts for the instep; 54[62, 70] sts for the heel.
All sizes continue:
Turn Heel:
Turn work so that WS is facing.
Row 1 [WS]: Sl 1 pwise wyif, p 28[32, 36] , p2tog, p1, turn.
Row 2 [RS]: Sl 1 pwise wyib, k5, ssk, k1, turn.
Row 3: Sl 1 pwise wyif, p to 1 st before gap, p2tog, p1, turn.
Row 4: Sl 1 pwise wyib, k to 1 st before gap, ssk, k1, turn.
Repeat Rows 3-4 until you have 32[36, 40] ] heel sts, total, including 2 unworked sts each side of the heel. Do not turn at the end of the last RS row.
Setup for next step: K2, to start of round.
Round 1: Work across instep in pattern; k1, k2tog, k to last 3 sts, ssk, k1. 59[66, 75] sts
Round 2: Work across instep in pattern; k to end.
Round 3: Work across instep in pattern; k2tog, k to last 2 sts, ssk. 57[64, 73] sts
Round 4: Work across instep in pattern; k to end.
Foot
Work the instep sts in pattern and knit the sole sts even until foot measures 1.75[2, 2.25] inches/ 4.5[5, 5.5] cm short of desired foot length.
Toe
Round 1: K1, ssk, k to 3 sts before end of instep, k2tog, k1; k1, ssk, k to last 3 sts, k2tog, k1. 4 sts decreased.
Round 2: Knit.
Repeat Rounds 1-2 5[6, 7] more times, until 33[36, 41] sts remain.
Work Round 1 5 times. 13[16, 21] sts remain.
Sizes S and L only:
K to 3 sts before end, k2tog, k1. 1 st dec.
Arrange sts so there are 6[8, 10] sts on each of 2 needles and graft toe closed.
FINISHING
Weave in all ends. Wash to block and even out the sitches.
ABOUT THE DESIGNER
 Christie recently moved from tropical North West Western Australia to Tasmania where she is enjoying the opportunity to wear her hand knits in the cooler climate.
Trained as a Chartered Management Accountant, Christie took up knitting as a productive outlet due to chronic illnesses that resulted in spending a lot of time sitting or lying down. She also crochets, weaves, makes bobbin lace, does dressmaking, cross stitch and kumihimo braiding and has been known to dive into any textile-based rabbit hole that crosses her path. Christie describes her patterns as classic with a quirky twist.
Find Christie at her Ravelry store, on her Ravelry profile, or Instagram.
Pattern & images © 2021 Christie WN