Vortex, a free knitting pattern from Knitty.com.
INTRODUCTION
Vortex
 by Pamela Baker

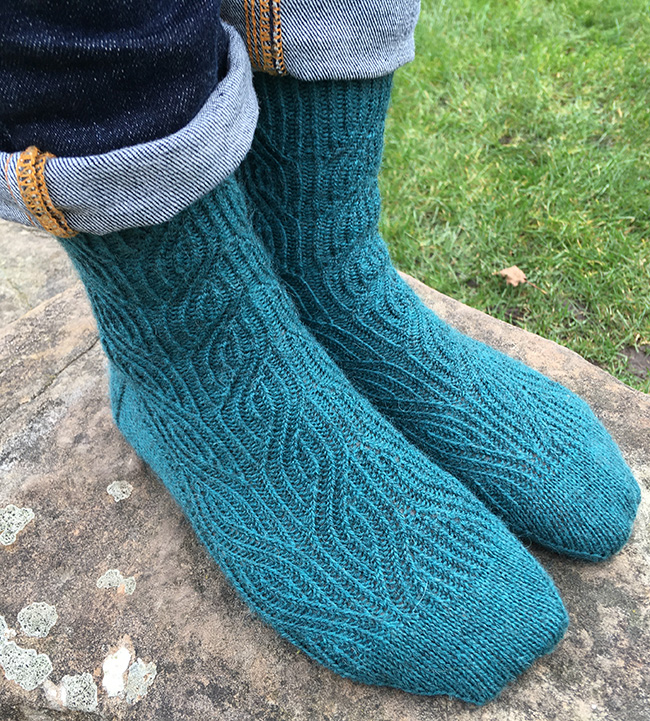
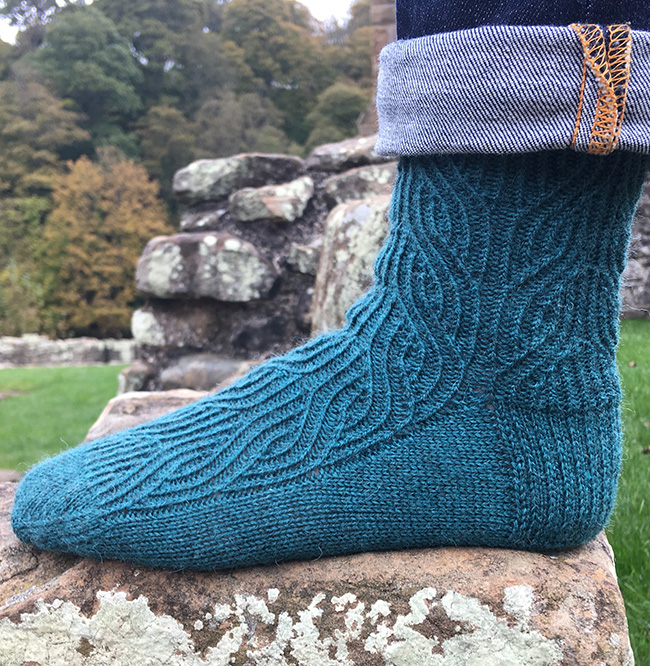
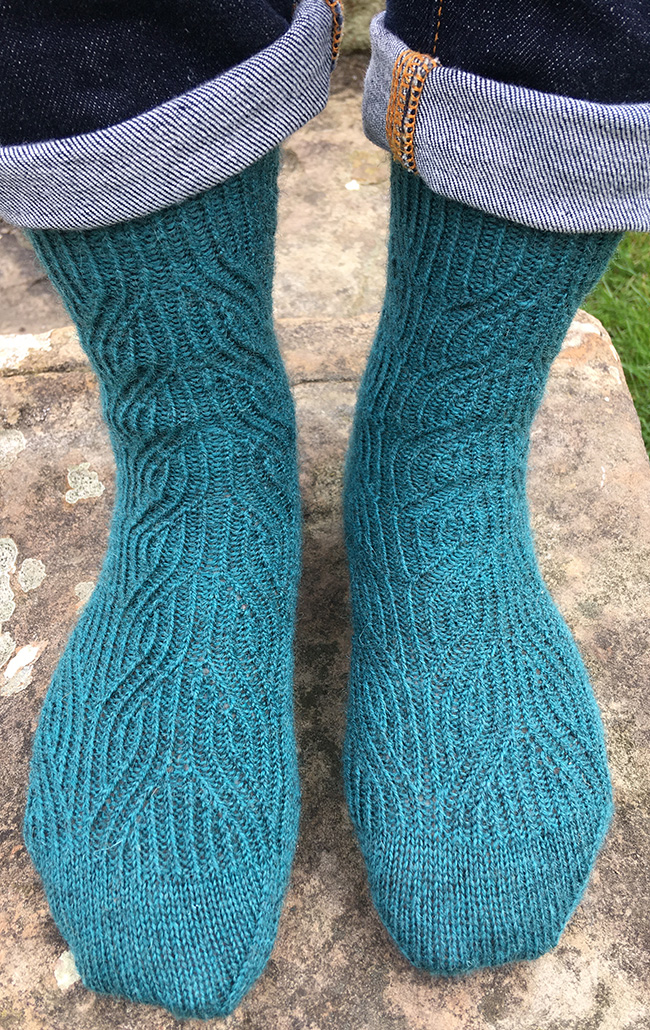
The whirlpool like design of this sock inspired the name, once you get going it's really hard not to be sucked into this pattern. Much like the way that I was sucked into knitting socks. I firmly stated for years that I was never going to knit socks but then found myself addicted. Now I find that I am designing my own patterns for myself and friends.
There are a lot of twisted stitches, but don't be put off, they help with the definition of the design. Once you have the pattern established it's really quite simple to read off your work for the next round. Knitting these is most pleasant with a wool that doesn't split or you will be cursing every twisted stitch. While I normally knit socks on 9" circulars, I did find these easier on DPNs with nice sharp tips.
The design really opens up once the sock is blocked or when you're wearing it. When you're knitting, make sure to stretch the work to see the design and to check the fit. I knit my pair really tight because I can't stand a loose sock, but knit your pair your way. That's the whole point of knitting!
 photos: Peter Baker
SIZE
Adult S[M, L]
FINISHED MEASUREMENTS
Foot Circumference: 7[8, 9] inches/ 17.5[20, 22.5] cm
Foot Length: Adjust as needed.
Leg Length: 5 inches/ 12.5cm, adjustable to preference
Choose a size about 1 inch/2.5cm smaller than your actual foot circumference.
MATERIALS
Yarn
![]() Exmoor Sock by John Arbon Textiles [60% Exmoor Blueface, 20% Corriedale, 10% Zwartbles, 10% Nylon; 218yds/200m per 50g skein] in Dimity; 2[2, 3] Skeins
Exmoor Sock by John Arbon Textiles [60% Exmoor Blueface, 20% Corriedale, 10% Zwartbles, 10% Nylon; 218yds/200m per 50g skein] in Dimity; 2[2, 3] Skeins
Yarn Characteristics
![]() This is a hardwearing sock yarn in a solid colour allowing the design to be clearly seen.
This is a hardwearing sock yarn in a solid colour allowing the design to be clearly seen.
Recommended needle size
[always use a needle size that gives you the gauge listed below - every knitter's gauge is unique]
![]() 2.25mm needles for small circumference in the round: traditional or flexible DPNs, 1 long circular for magic loop, or 2 shorter circulars
2.25mm needles for small circumference in the round: traditional or flexible DPNs, 1 long circular for magic loop, or 2 shorter circulars
Notions
![]() cable needle if desired
cable needle if desired
![]() stitch markers
stitch markers
![]() yarn needle
yarn needle
GAUGE
42 sts/48 rounds = 4 inches/10 cm in pattern
34 sts/48 rounds = 4 inches/10 cm in stockinette stitch
Note: gauge is always taken after blocking.
PATTERN NOTES
[Knitty's list of standard abbreviations and techniques can be found here.]
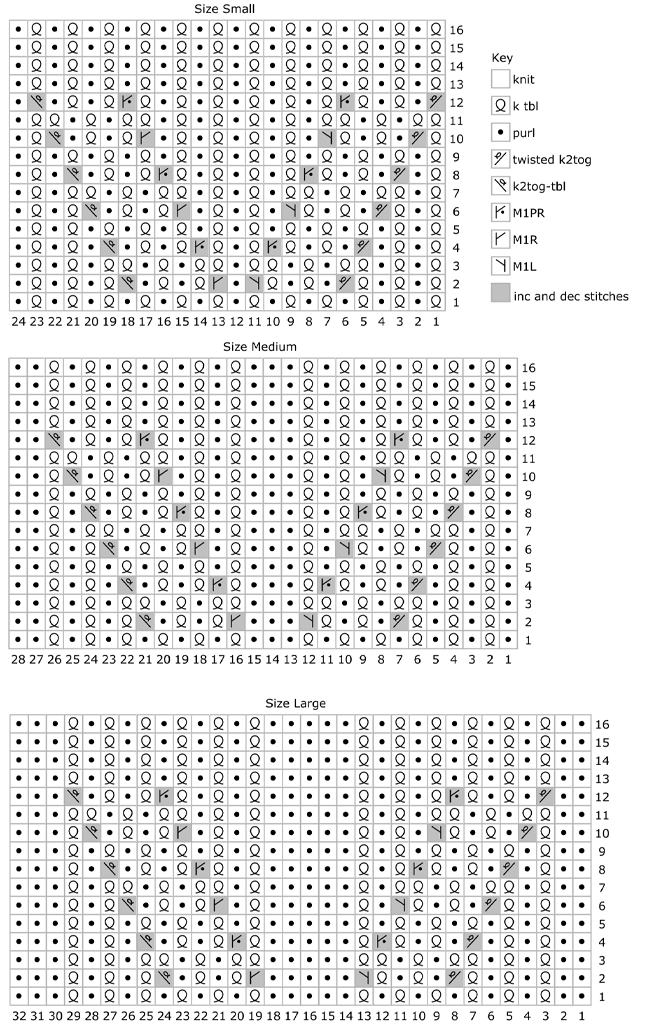
K2tog-tbl: Knit 2 sts together through back loop; 1 stitch decreased. This is a left-leaning decrease, with the top stitch twisted.
Twisted-k2tog: Slip the next 2 stitches, individually, purlwise. Put the tip of the left needle into the second of those stitches, from right to left (that is, pointing the same direction as the right needle), and return it to the left needle, to twist it. Return the other slipped stitch to the left needle without twisting, and then knit them together. 1 stitch decreased. This is a right-leaning decrease, with the top stitch twisted.
Grafting
Instructions for grafting can be found here (photo tutorial) and here (video tutorial).
CHARTS
Editor's note: Charts updated Mar 19/22. M1PL has been removed.
Note: To make the charts a little easier to read, we have used grey to highlight the key stitches, the increases and decreases. The rest of the patterned area is worked in twisted ribbing – the only stitches that require attention are those that are shaded.
DIRECTIONS

Cuff
Using the long tail method, CO 72[84, 96] stitches. Distribute stitches across the needles as you prefer and join for working in the round. It's helpful if each needle has a multiple of 12[14, 16] stitches.
Ribbing round, sizes S and L only: [K1tbl, p1] around.
Ribbing round, size M only: [P1, k1tbl] around.
Work ribbing as set for 1 inch/2.5 cm.
Leg
Leg round: Work chart for your size 3 times around.
Work as set until leg measures 5 inches/12.5cm from cast on edge, or desired length. Make note of last chart round worked.
Heel Flap
The heel will be worked across the first 35[41, 47] sts; the rem 37[43, 49] are held for the instep.
Row 1 [RS]: (Slip 1 purlwise with yarn in back, k1) 17[20, 23] times, k1. Turn.
Row 2 [WS]: Slip 1 purlwise with yarn in front, p 34[40, 46] . Turn.
Repeat Rows 1–2 until heel flap measures 2.25[2.5, 2.75] inches/ 6[6.5, 7] cm in length ending after Row 2.
Heel Turn
Row 1 [RS]: Slip 1 purlwise with yarn in back, k 19[21, 25] , ssk, k1, turn.
Row 2 [WS]: Slip 1 purlwise with yarn in front, p 6[4, 4] , p2tog, p1, turn.
Row 3 [RS]: Slip 1 purlwise with yarn in back, knit to 1 stitch before the gap, ssk (1 stitch from each side of gap), k1, turn.
Row 4 [WS]: Slip 1 purlwise with yarn in back, purl to 1 stitch before the gap, p2tog (1 stitch from either side of gap), p1, turn.
Repeat Rows 3–4 until all stitches have been worked, 21[23, 27] stitches remain.
Shape Gusset
Setup round: Slip 1 purlwise with yarn in back, k 9[11, 13] , to centre of heel. This is the new start of round – place marker or rearrange stitches as desired. K to end of heel flap; then pick up and knit 1 stitch in each slipped stitch along edge of heel flap, plus 1 stitch between heel flap and top of foot, and p1 on the first of the previously held instep sts. This is the new start of instep; place marker or rearrange stitches as desired. Work across remainder of foot in pattern from the main chart, starting at stitch 13;15, 17], stopping when 1 st remains. This is the new end of instep position; place marker or rearrange stitches as desired. Work p1 on the final stitch, and then pickup and knit 1 stitch between foot and heel flap and 1 stitch in each slipped stitch on edge of heel flap. Knit to end of round.
Round 1: Knit to 2 stitches before instep, p2tog, work across instep in pattern as set; p2tog, knit to end of round. 2 stitches decreased.
Round 2: Knit to 1 stitch before instep, p1, work across instep in pattern as set; p1, k to end of round.
Repeat Rounds 1–2 until 72[84, 96] stitches remain. There will be 35[41, 47] stitches on the instep and 37[43, 49] stitches on the sole.
Foot
Work even in pattern as set until the foot measures 1.75[2, 2.25] inches/ 4.5[5, 5.5] cm shorter than desired. Remove end of round marker and knit to the start of the instep. This is the new beginning of round.
Toe
Set up round: K across instep, and k1 from the sole. This position is the new end of instep. Knit to the end of the round. You will now have 36[42, 48] stitches on the top and bottom of the foot.
Round 1: K1, ssk, knit to 3 stitches before end of instep, k2tog, k1; k1, ssk, knit to 3 stitches before end of round, k2tog, k1. 4 stitches decreased.
Round 2: Knit
Repeat Rounds 1–2 10[11, 13] more times, 28[36, 40] sts rem.
FINISHING
Divide top and bottom of foot so that stitches are evenly distributed over two needles. Cut yarn, leaving long tail.
Using tail, graft top and bottom together.
Wash, and weave in ends. (It's not necessary to stretch them or use blockers, as they'll stretch in wearing, but if you're making them as a gift, use can sock blockers to make them look pretty.)
ABOUT THE DESIGNER
 It took Pamela about 4 years to finish her first garment. Fortunately, she's gotten a bit faster since then. Most recently addicted to sock knitting, mainly because she has returned to Sydney, Australia, where it's a bit warm for most hand knits.
You can find her on Ravlery under pamelabakerknits.
Pattern & images © 2022 Pamela Baker