Asterism, a free knitting pattern from Knitty.com.
INTRODUCTION
Asterism
 by Cecily Burrill

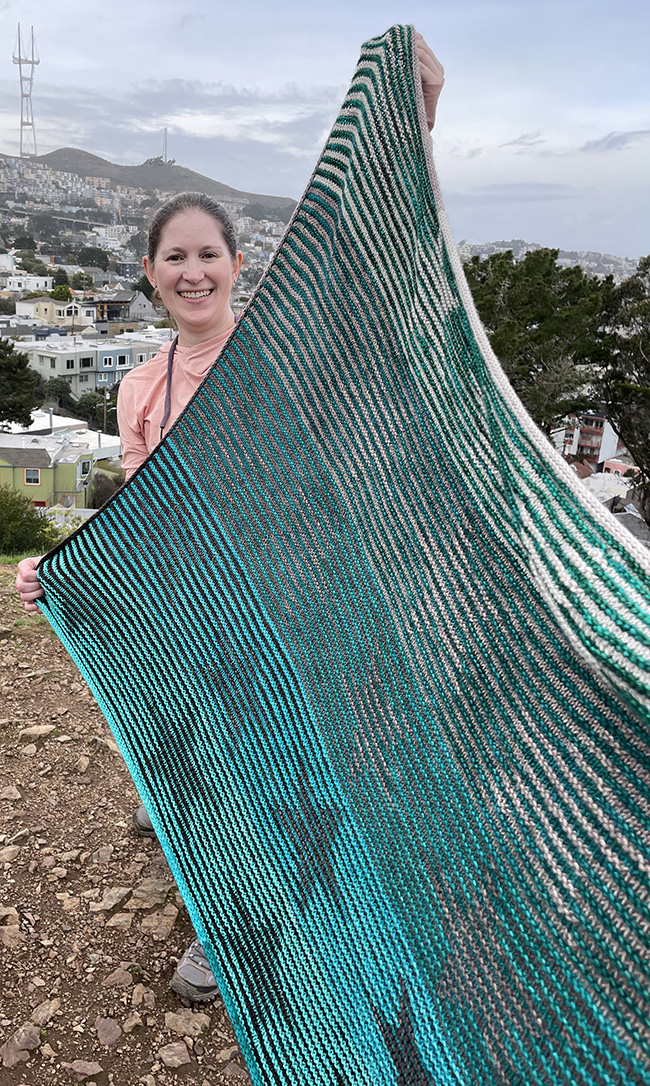
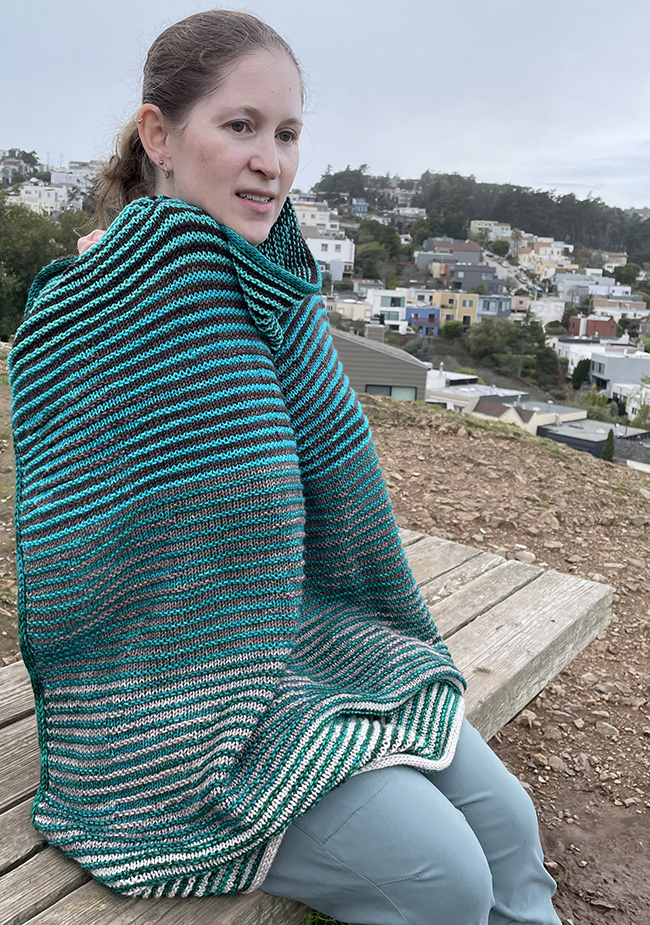
I was inspired to create the rotating star pattern after trying some of the patterns in Shadow Knitting by Vivian Høxbro. Shadow knitting alternates two rows of stockinette in one color with two rows of garter stitch in a contrasting color. The garter stitch ridges create a pattern that appears and disappears, depending on the angle of the viewer. An asterism is a pattern of stars that is not a constellation.
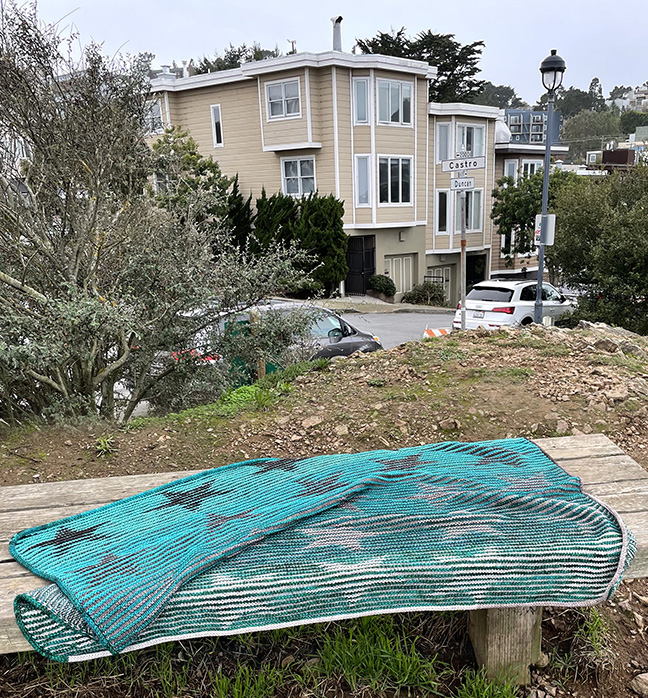
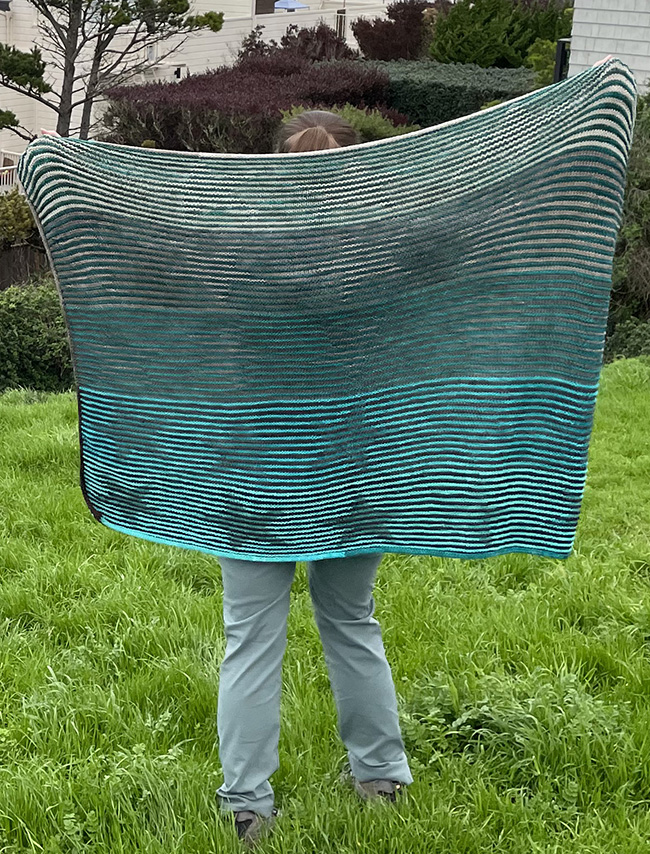
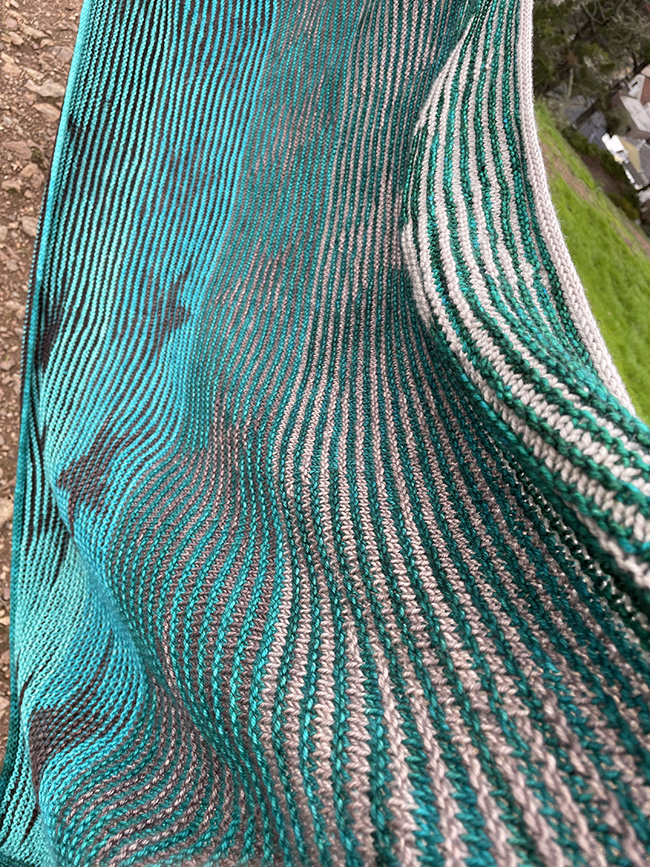
When I attended Stitches West 2019, I was struck by the variety of gradient sets available in different yarns and colorways. I became intrigued by the idea of creating a project with two gradients in complementary colors, one running light to dark and the other dark to light. When I came up with the idea to combine the gradients with shadow knitting, this throw was born. I love it because it mostly just looks like a simple stripe pattern, until you happen to catch it from the correct angle and suddenly the stars jump out at you, revealing a whole hidden design.
The sample shown uses five-shade gradients, and creates an array of 25 rotating five-pointed stars, but could be easily modified to use more or fewer shades and create a larger or smaller throw.
model: Cecily Burrill,
photos: Christina Rutter
SIZE
One
FINISHED MEASUREMENTS
Width: 50 inches/127 cm
Length: 40 inches/102 cm
MATERIALS
Yarn
Neighborhood Fiber Co. Studio DK [100% Superwash Merino; 720 yd/658 m per 10.7 oz/303 g set of five skeins];
![]() [MC] Shades of Emerald set; 5 skeins (1 skein each shade: MC1, MC2, MC3, MC4, and MC5)
[MC] Shades of Emerald set; 5 skeins (1 skein each shade: MC1, MC2, MC3, MC4, and MC5)
![]() [CC] Shades of Umber set; 5 skeins (1 skein each shade: CC1, CC2, CC3, CC4, and CC5)
[CC] Shades of Umber set; 5 skeins (1 skein each shade: CC1, CC2, CC3, CC4, and CC5)
Yarn Characteristics
![]() The sample shown uses a DK weight 3-ply wool, but anything that gives a good stitch definition for the shadow technique would work well.
The sample shown uses a DK weight 3-ply wool, but anything that gives a good stitch definition for the shadow technique would work well.
Recommended needle size
[always use a needle size that gives you the gauge listed below - every knitter's gauge is unique]
![]() 1 US #6/4mm circular needle, a 47-inch/120cm or longer is recommended to handle the large stitch count
1 US #6/4mm circular needle, a 47-inch/120cm or longer is recommended to handle the large stitch count
![]() 1 or 2 US #6/4mm double-pointed needles (used for I-cord edge)
1 or 2 US #6/4mm double-pointed needles (used for I-cord edge)
Notions
![]() stitch markers – standard and removable; see the Pattern Notes
stitch markers – standard and removable; see the Pattern Notes
![]() 1 yarn needle
1 yarn needle
GAUGE
15.5 sts/20 rows = 4 inches/10 cm in stockinette stitch
15.5 sts/26 rows = 4 inches/10 cm in pattern stitch
39 sts / 52 rows of Rotating Star Chart measures 10 inches / 25 cm wide and 8 inches / 20 cm tall
Note: Matching pattern gauge is not critical for this project; working at a different gauge will affect the yardage used and the finished size. The ridged fabric needs to be somewhat dense for the shadow pattern to be most effective. If in doubt, err on the side of smaller needles
PATTERN NOTES
[Knitty's list of standard abbreviations and techniques can be found here.]
In shadow knitting, the pattern is worked on the WS only (the even rows in this pattern). You will always work two rows of MC followed by two rows of CC. All RS rows are knit. WS rows alternate knitting and purling to create the pattern.
For the shadow technique to be most effective, start with the darkest shade of MC and lightest shade of CC. The pattern uses regular stitch markers to separate the different Rotating Star Charts. You may also wish to use locking stitch markers to mark the edges of the star itself so you know where to change from knitting to purling and vice versa on the WS, but you will have to move them for every other row so you may prefer to just follow the chart closely.
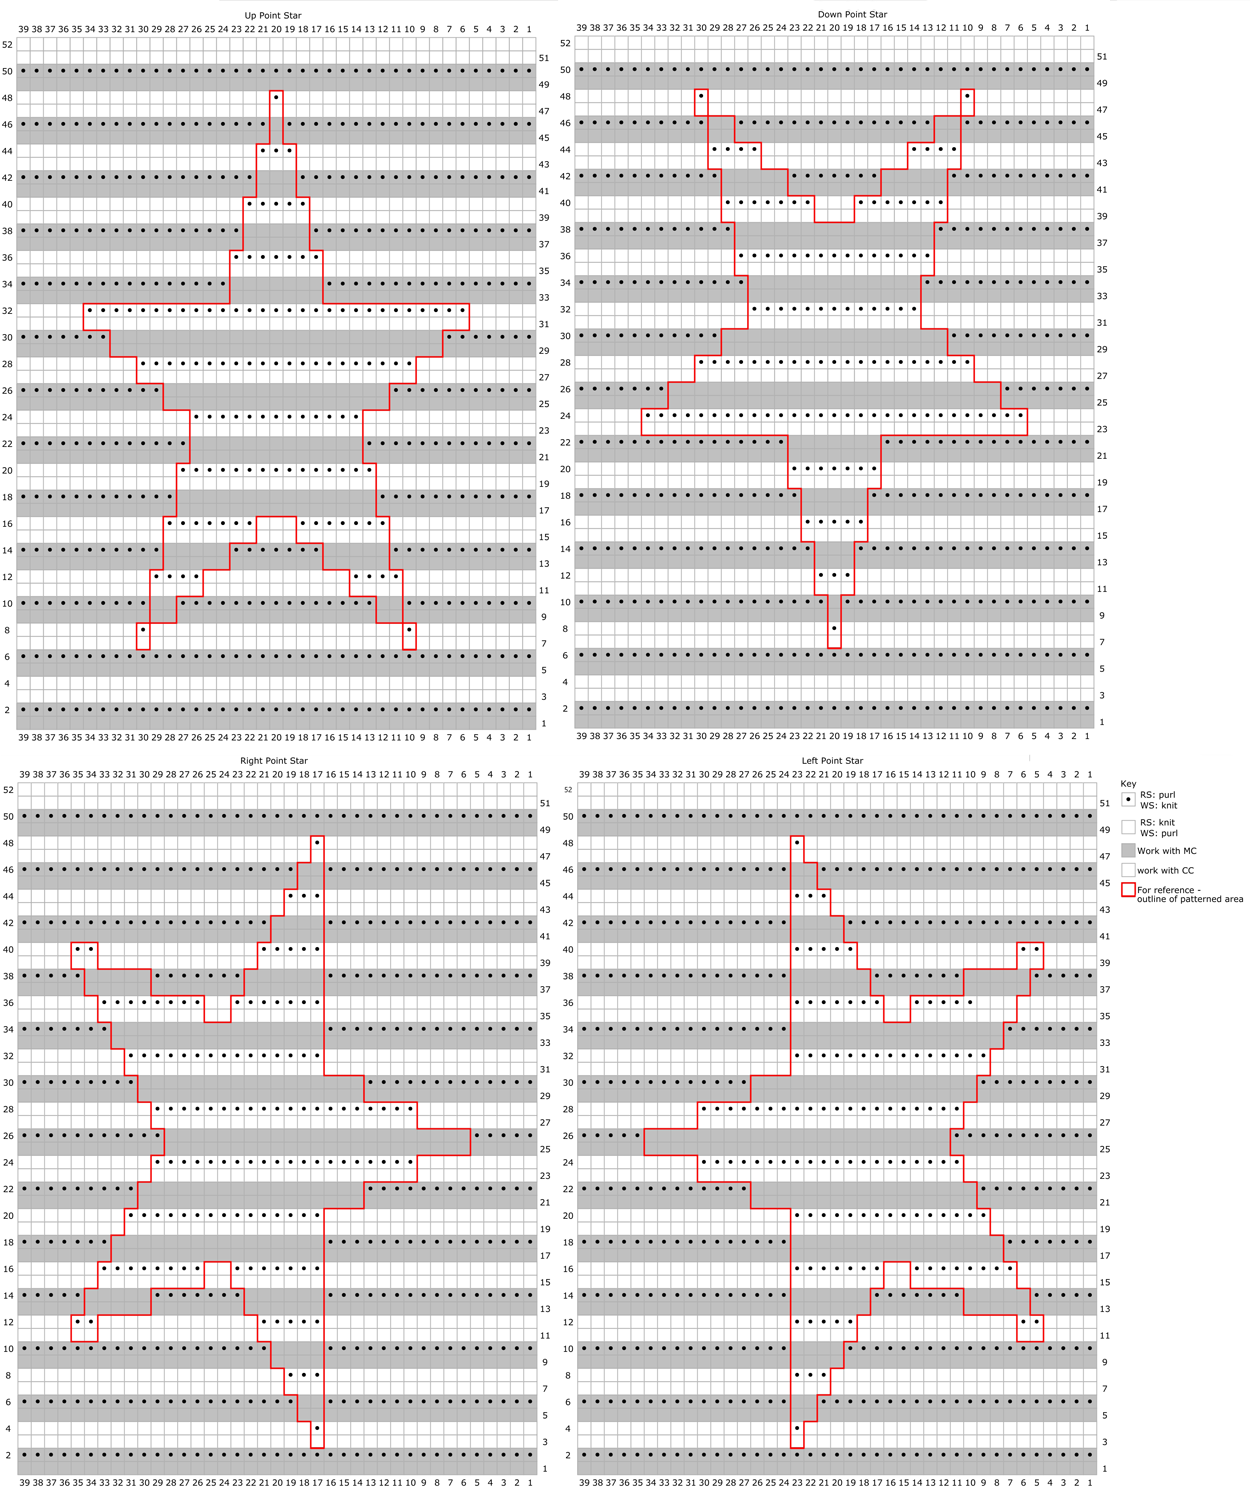
CHARTS
View and download all charts here (down point star chart updated Mar 29/23)
The thick red lines are to enable easier visualization of the stars and indicate where you may wish to place locking stitch markers to remind you to switch between k and p in WS rows.
Pattern Placement
U = Up Point Star; R = Right Point Star; D = Down Point Star; L = Left Point Star
In the finished blanket, the charts are placed as follows:
| U | R | D | L | U |
| R | D | L | U | R |
| D | L | U | R | D |
| L | U | R | D | L |
| U | R | D | L | U |
Note: Section 1 begins at the bottom.
DIRECTIONS
Section 1
Using MC1, CO 195 sts.
Row 1 [RS]: Work Chart U row 1 over 39 sts, pm, work Chart L row 1 over 39 sts, pm, work Chart D row 1 over 39 sts, pm, work Chart R row 1 over 39 sts, pm, work Chart U row 1.
Row 2 [WS]: Work Chart U row 2 to marker, work Chart R row 2 to marker, work Chart D row 2 to marker, work Chart L row 2 to marker, work Chart U row 2.
Join CC5, and work 2 rows in pattern as set.
Continue the section as established, alternating two rows of MC1 and two rows of CC5 and following Rotating Star Charts as set, until you have worked 52 rows of the charts.
Section 2
Change to MC2.
Row 1 [RS]: Work Chart L row 1 over 39 sts, work Chart D row 1 over 39 sts, pm, work Chart R row 1 over 39 sts, pm, work Chart U row 1 over 39 sts, pm, work Chart L row 1.
Row 2 [WS]: Work Chart L row 2 to marker, work Chart U row 2 to marker, work Chart R row 2 to marker, work Chart D row 2 to marker, work Chart L row 2.
Join CC4, and work 2 rows in pattern as set.
Continue the section as established, alternating two rows of MC2 and two rows of CC4 and following Rotating Star Charts as set, until you have worked 52 rows of the charts.
Section 3
Change to MC3.
Row 1 [RS]: Work Chart D row 1 over 39 sts, work Chart R row 1 over 39 sts, pm, work Chart U row 1 over 39 sts, pm, work Chart L row 1 over 39 sts, pm, work Chart D row 1.
Row 2 [WS]: Work Chart D row 2 to marker, work Chart L row 2 to marker, work Chart U row 2 to marker, work Chart R row 2 to marker, work Chart D row 2.
Join CC3, and work 2 rows in pattern as set.
Continue the section as established, alternating two rows of MC3 and two rows of CC3 and following Rotating Star Charts as set, until you have worked 52 rows of the charts.
Section 4
Change to MC4.
Row 1 [RS]: Work Chart R row 1 over 39 sts, work Chart U row 1 over 39 sts, pm, work Chart L row 1 over 39 sts, pm, work Chart D row 1 over 39 sts, pm, work Chart R row 1.
Row 2 [WS]: Work Chart R row 2 to marker, work Chart D row 2 to marker, work Chart L row 2 to marker, work Chart U row 2 to marker, work Chart R row 2.
Join CC2, and work 2 rows in pattern as set.
Continue the section as established, alternating two rows of MC4 and two rows of CC2 and following Rotating Star Charts as set, until you have worked 52 rows of the charts.
Section 5
Change to MC5.
Row 1 [RS]: Work Chart U row 1 over 39 sts, pm, work Chart L row 1 over 39 sts, pm, work Chart D row 1 over 39 sts, pm, work Chart R row 1 over 39 sts, pm, work Chart U row 1.
Row 2 [WS]: Work Chart U row 2 to marker, work Chart R row 2 to marker, work Chart D row 2 to marker, work Chart L row 2 to marker, work Chart U row 2.
Join CC1, and work 2 rows in pattern as set.
Continue the section as established, alternating two rows of MC5 and two rows of CC1 and following Rotating Star Charts as set, until you have worked 52 rows of the charts.
BO all sts using CC1.

FINISHING
Starting at bottom left corner, with RS facing, rejoin MC1 yarn, and pick up and knit 195 sts evenly spaced along bottom edge, one stitch for every cast on stitch; pick up and knit 155 along the first side edge at the rate of 3 sts for every 5 rows. Change to CC1 and pick up and knit another 195 sts along the top edge, and another 155 sts along the other side edge. 700 sts total. Clip removeable stitch markers every 70 stitches – this will mark color-change points.
Continuing with CC1 at the start of the picked up sts CO 4 sts using backwards loop method and work i-cord as follows to the first marker:
With DPN or short circular, *K3, SSK (knitting your fourth CO st together with the first picked up edge stitch). Slip 4 sts back onto long circular; repeat from * to the first marker. Change to CC2, and work i-cord as set to the next marker. Change to CC3, and work i-cord as set to 1 st before the corner. Turn the corner as follows:
(K3, work the first slip of the ssk, then use the tip of the left needle to pick up a horizontal strand in the edge and slip that to the right needle; complete the ssk decrease on the slipped stitch and the newly-picked up strand, slip 4 sts back to left needle; k3, ssk, slip 4 sts back to left needle; k3, work the first slip of the ssk, pick up a strand with left needle and slip that to right needle, complete the ssk, and slip 4 sts back to left needle)
Then continue, working i-cord as before to next marker. Change to CC4 and work i-cord as set to next marker. Change to CC5 and work i-cord as set to next marker, working corner as before. Change to MC1 and work i-cord as set to next marker. Change to MC2 and work i-cord as set to next marker. Change to MC3 and work i-cord as set to the next marker, working corner as before. Change to MC4 and work i-cord as set to the next marker. Change to MC5 and work i-cord as set to the last marker; work k4 on these sts once more, and then use yarn needle to fasten off. Join the two ends of the i-cord together.
Weave in ends. To block, rinse in cold water then dry flat.
ABOUT THE DESIGNER
 Cecily is a high-school science teacher and administrator living in San Francisco who enjoys knitting, playing bridge, and game or movie nights with friends. She has been knitting and playing with designs for more than 25 years, but this is her first attempt to publish something formally.
You can find her on Ravelry.
Pattern & images © 2023 Cecily Burrill