Leptira, a free knitting pattern from Knitty.com.
INTRODUCTION
Leptira
 by Rosemary (Romi) Hill

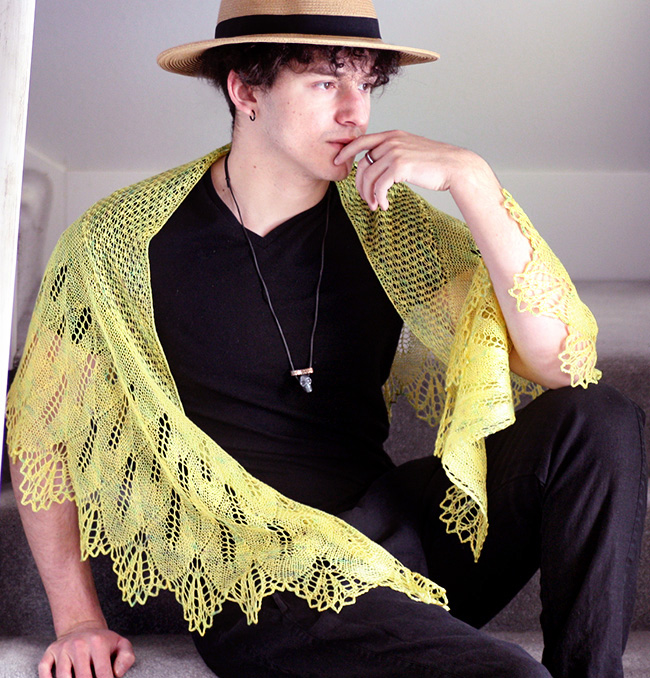
My first ever published pattern appeared in Knitty, so I thought it would be fun to design a mashup of some of my favorite shawls along the way since then! The tencel lace-weight from Trailhead reminded me of butterflies every time I looked at it, and that gave me the name (leptira means "butterfly" in Croatian) and the stitch motifs. The inner mesh portion is shaped using short rows to build a crescent from the top, and then the leaf motif grows organically, with all of the increases written into the motif so that they flow outward. The edging is flowery and lovely, and even though it may look like a difficult motif, it's actually created rather simply by drastically increasing the number of stitches and then stretching and pinning during blocking.
If you've never knit lace before, I have a couple of tips! First, knit a little on the loose side to be able to manipulate your stitches more easily. Second, lace never realizes its complete beauty until it's been wet blocked and pinned. Before that, it can look like a shriveled-up shower cap! If you want to remind yourself of the blocking magic that will happen, definitely swatch, wet the swatch, and then stretch and pin it out. Then you can remind yourself that the blocking magic will indeed happen for you.
 model: Rosemary (Romi) Hill, Remy Xavier
photos: Rosemary (Romi) Hill
SIZE
One
FINISHED MEASUREMENTS
Width, tip to tip: 70 inches/178 cm
Depth at center: 20 inches/51 cm
MATERIALS
Yarn
![]() Trailhead Yarns Cabot Trail [100% tencel; 800 yds/732 m per 3.5 oz/100 g skein]; color: Knitty; 1 skein
Trailhead Yarns Cabot Trail [100% tencel; 800 yds/732 m per 3.5 oz/100 g skein]; color: Knitty; 1 skein
Editor's note: This beautiful colorway, shown below in the skein, was dyed especially by Trailhead Yarns to celebrate our 20th Anniversary! You can get it by ordering from Yarns Untangled, the exclusive LYS retailer for this colorway. Located in Toronto, Canada, they will ship worldwide.
Yarn Characteristics
![]() The sample shown uses a laceweight tencel yarn that drapes beautifully and holds a block well. Choose a yarn with no stretch for similar results.
The sample shown uses a laceweight tencel yarn that drapes beautifully and holds a block well. Choose a yarn with no stretch for similar results.
Recommended needle size
[always use a needle size that gives you the gauge listed below - every knitter's gauge is unique]
![]() 1 US #4/3.5mm circular needle, 24-inch/60 cm or longer
1 US #4/3.5mm circular needle, 24-inch/60 cm or longer
Notions
![]() optional stitch markers
optional stitch markers
![]() blocking mat
blocking mat
![]() lots of t-pins
lots of t-pins
![]() optional flexible blocking wires
optional flexible blocking wires
![]() sharp needle
sharp needle
GAUGE
22 sts/24 rows = 4 inches/10 cm in stockinette stitch, fully blocked by stretching and pinning out
27 sts/22 rows = 4 inches/10 cm in Chart D stitch pattern, fully blocked by stretching and pinning out
Note: gauge is taken after wet blocking and pinning.
It's not crucial to work to the gauge specified for this project, but a difference in gauge can change the look of the fabric, will result in a different finished size, and may affect yardage required.
PATTERN NOTES
[Knitty's list of standard abbreviations and techniques can be found here.]
The pattern uses short rows to shape the upper crescent. Each row is lessened by 3 sts at the end. You may find it helpful to mark your place with a clip-on marker that can be removed and replaced at each turn, or with a marker at each turn to keep your place in the chart.
Construction method: This crescent shaped shawl starts with a cast-on across the top mesh inner crescent. Wrap-and-turn short rows are used to shape the top, and the wraps are left and disguised in purl bumps. (I do not suggest substituting a different method of short rows). The remainder of the shawl is knit down from the inner crescent and all increases are integrated into the charted patterning.
Techniques:
- t2l: reaching behind first stitch on left needle with right needle, knit second stitch tbl, then knit through front of first stitch; slip both stitches off left needle
- t2r: knit second stitch on left needle, then knit first stitch; slip both stitches off left needle
- kfbf (double increase): into one stitch, k1, k1 tbl, k1. 2 sts increased.
- cdi (double increase): into one stitch, k1 tbl, YO, k1. 2 sts increased.
- stretchy BO: Work 2 sts in pattern, [replace both sts on left needle, k2tog tbl, work 1 st in pattern] to end. Fasten off.
The techniques above are demonstrated in short videos by Romi.
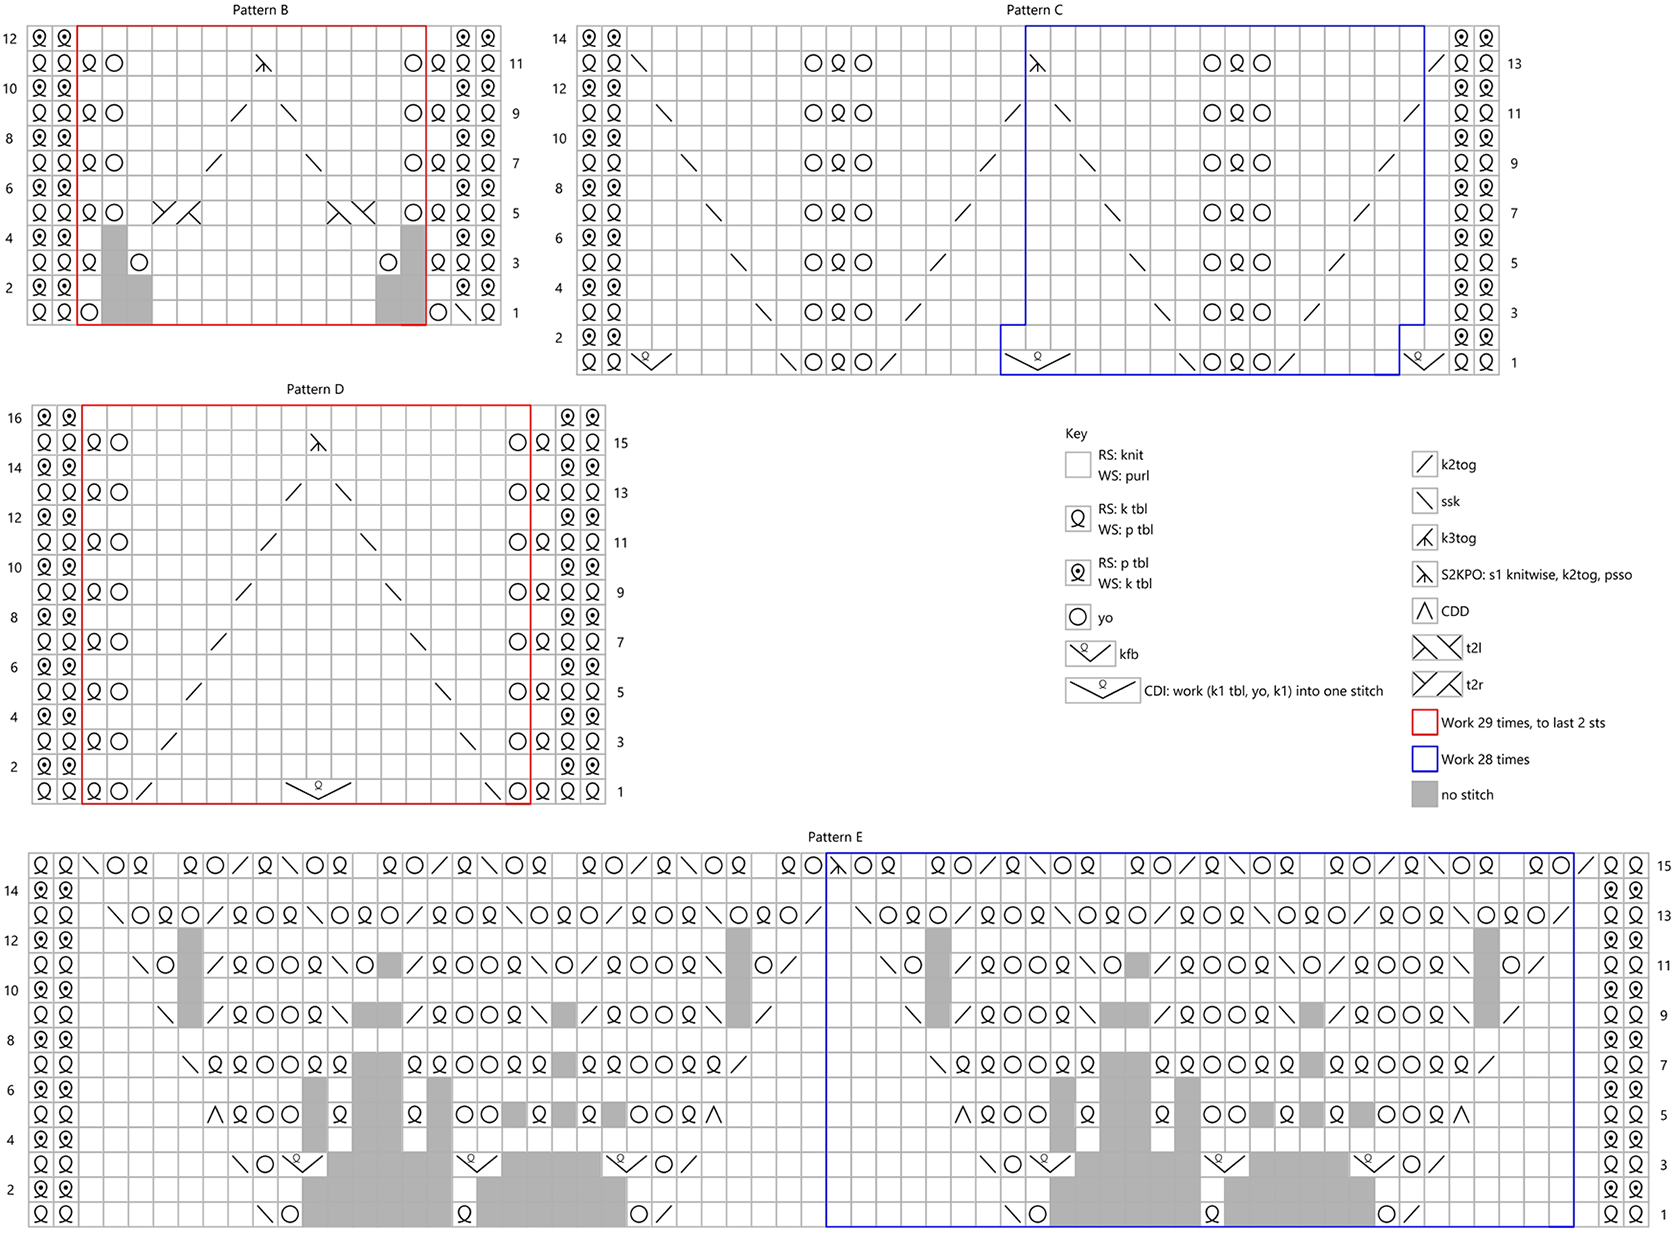
CHARTS
View and download all CHARTS here.
Pattern B written instructions:
Row 1 [RS]: K1 tbl, SSK, YO, [k9, YO] 29 times to last 2 sts, k2 tbl.
Row 2 [WS] and all other even numbered rows: K2 tbl, purl to 2 sts before end, k2 tbl.
Row 3 [RS]: K3 tbl, [YO, k9, YO, k1 tbl] 29 times to last 2 sts, k2 tbl.
Row 5 [RS]: K3 tbl, [YO, k1, t2l, k5, t2r, k1, YO, k1 tbl] 29 times to last 2 sts, k2 tbl.
Row 7 [RS]: K3 tbl, [YO, k3, SSK, k3, k2tog, k3, YO, k1 tbl] 29 times to last 2 sts, k2 tbl.
Row 9 [RS]: K3 tbl, [YO, k4, SSK, k1, k2tog, k4, YO, k1 tbl] 29 times to last 2 sts, k2 tbl.
Row 11 [RS]: k1 tbl 3 times, [YO, k5, SK2PO, k5, YO, k1 tbl] 29 times to last 2 sts, k2 tbl.
Row 12: K2 tbl, purl to 2 sts before end, k2 tbl.
Pattern C written instructions:
Row 1 [RS]: K2 tbl, kfb, [k4, k2tog, YO, k1 tbl, YO, SSK, k4, cdi] 28 times, k4, k2tog, YO, k1 tbl, YO, SSK, k4, kfb, k2 tbl.
Row 2 [WS] and all other even numbered rows: K2 tbl, purl to 2 sts before end, k2 tbl.
Row 3 [RS]: K2 tbl, k1, [k4, k2tog, k1, YO, k1 tbl, YO, k1, SSK, k5] 29 times, k2 tbl.
Row 5 [RS]: K2 tbl, k1, [k3, k2tog, k2, YO, k1 tbl, YO, k2, SSK, k4] 29 times, k2 tbl.
Row 7 [RS]: K2 tbl, k1, [k2, k2tog, k3, YO, k1 tbl, YO, k3, SSK, k3] 29 times, k2 tbl.
Row 9 [RS]: K2 tbl, k1, [k1, k2tog, k4, YO, k1 tbl, YO, k4, SSK, k2] 29 times, k2 tbl.
Row 11 [RS]: K2 tbl, k1, [k2tog, k5, YO, k1 tbl, YO, k5, SSK, k1] 29 times, k2 tbl.
Row 13 [RS]: K2 tbl, k2tog, [k6, YO, k1 tbl, YO, k6, SK2P] 28 times, k6, YO, k1 tbl, YO, k6, SSK, k2 tbl.
Row 14: K2 tbl, purl to 2 sts before end, k2 tbl.
Pattern D written instructions:
Row 1 [RS]: K3 tbl, [YO, SSK, k5, cdi, k5, k2tog, YO, k1 tbl] 29 times, k2 tbl.
Row 2 [WS] and all other even numbered rows: K2 tbl, purl to 2 sts before end, k2 tbl.
Row 3 [RS]: K3 tbl, [YO, k1, SSK, k11, k2tog, k1, YO, k1 tbl] 29 times, k2 tbl.
Row 5 [RS]: K3 tbl, [YO, k2, SSK, k9, k2tog, k2, YO, k1 tbl] 29 times, k2 tbl.
Row 7 [RS]: K3 tbl, [YO, k3, SSK, k7, k2tog, k3, YO, k1 tbl] 29 times, k2 tbl.
Row 9 [RS]: K3 tbl, [YO, k4, SSK, k5, k2tog, k4, YO, k1 tbl] 29 times, k2 tbl.
Row 11 [RS]: K3 tbl, [YO, k5, SSK, k3, k2tog, k5, YO, k1 tbl] 29 times, k2 tbl.
Row 13 [RS]: K3 tbl, [YO, k6, SSK, k1, k2tog, k6, YO, k1 tbl] 29 times, k2 tbl.
Row 15 [RS]: K3 tbl, [YO, k7, SK2P, k7, YO, k1 tbl] 29 times, k2 tbl.
Row 16: K2 tbl, purl to 2 sts before end, k2 tbl.
Pattern E written instructions:
Row 1 [RS]: K2 tbl, k1, [k6, k2tog, YO, k1 tbl, YO, SSK, k7] 29 times, k2 tbl.
Row 2 [WS] and all other even numbered rows: K2, purl to 2 sts before end, working (p1, k1) into each double YO where applicable, k2 tbl.
Row 3 [RS]: K2 tbl, k1, [k5, k2tog, YO, kfb 3 times, YO, SSK, k6] 29 times, k2 tbl.
Row 5 [RS]: K2 tbl, k1, [k4, cdd, k1 tbl, (YO 2 times, k2 tbl) 2 times, YO 2 times, k1 tbl, cdd, k5] 29 times, k2 tbl.
Row 7 [RS]: K2 tbl, k1, [k3, k2tog, k2 tbl, (YO 2 times, k1 tbl 4 times) 2 times, YO 2 times, k2 tbl, SSK, k4] 29 times, k2 tbl.
Row 9 [RS]: K2 tbl, k1, [k2, k2tog, (SSK, k1 tbl, YO 2 times, k1 tbl, k2tog) 3 times, SSK, k3] 29 times, k2 tbl.
Row 11 [RS]: K2 tbl, k1, [k1, (k2tog, YO, SSK, k1 tbl, YO 2 times, k1 tbl) 3 times, k2tog, YO, SSK, k2] 29 times, k2 tbl.
Row 13 [RS]: K2 tbl, k1, [k2tog, (YO, k1 tbl, YO, SSK, k1 tbl, YO, k1 tbl, k2tog) 3 times, YO, k1 tbl, YO, SSK, k1] 29 times, k2 tbl.
Row 15 [RS]: K2 tbl, k2tog, [YO, k1 tbl, (k1, k1 tbl, YO, SSK, k1 tbl, k2tog, YO, k1 tbl) 3 times, k1, k1 tbl, YO, SK2P] 28 times, YO, k1 tbl, (k1, k1 tbl, YO, SSK, k1 tbl, k2tog, YO, k1 tbl) 3 times, k1, k1 tbl, YO, SSK, k2 tbl: 875 sts.
DIRECTIONS
Inner crescent:
Set-up:
Using the knitted-on method, CO 187 sts.
Row 1 [RS]: Kfbf, knit to 2 sts from end, w&t. 2 sts increased.
Row 2 [WS]: Knit to 4 sts from end, w&t.
Row 3: Knit to 3 sts before last wrapped st, w&t.
Row 4: Knit to 3 sts before last wrapped st, w&t.
Pattern A
Row 1 [RS]: [Kfb, k2tog] to 3 before last wrapped st, w&t.
Row 2 [WS]: Purl to 3 sts before last wrapped st, w&t.
Row 3: [K2tog, kfb] to 3 before last wrapped st, w&t.
Row 4: Purl to 3 sts before last wrapped st, w&t.
Repeat the last 4 rows 13 more times. Note: Each RS row, the number of repeats of the 3-stitch pattern you work will be reduced by 2. Row 1 has 58 repeats, Row 3 has 56, Row 5 has 54, and so on. On the final RS row, there will be 4 repeats of the pattern; after the final WS row, there will be 9 sts between the two last wraps, but total number of stitches on needles will not have changed.
Transition from center to lace edging:
Note: leave all wraps in place on Rows 1-2; there is no need to hide or work them.
Row 1 [RS] (partial row worked from center): [Kfb, k2tog] 32 times, to last 2 sts, k1 tbl, kfbf. 191 sts.
Row 2 [WS]: K2 tbl, knit to 2 sts from end, k2 tbl.
Row 3: Kfb, k1 tbl, pfb, p1, [pfb, p2] 61 times, to last 4 sts, pfb, p1, kfb, k1 tbl. 256 sts.
Row 4: K2 tbl, purl to last 2 sts, k2 tbl.
Row 5: Kfb, k1 tbl, knit to last 2 sts, kfb, k1 tbl. 2 sts increased.
Row 6: K2 tbl, purl to last 2 sts, k2 tbl.
Repeat Rows 5-6 an additional 4 times. 266 sts.
Lace edging:
Work Pattern B. 411 sts.
Work Pattern C. 469 sts.
Work Pattern D. 527 sts.
Work Pattern E, noting that you end after a RS row, Row 15. 875 sts before binding off.
Bind off as follows: Work stretchy BO while working following sts. (Note that while binding off, it is possible to knit multiple stitches into a YO. Bind off each stitch as it is knitted): K3tog tbl, [k5 into YO, k3tog tbl] 7 times, k5 into YO, [k1 tbl, (k5 into YO, k3tog tbl) 7 times, k5 into YO] 28 times, k3tog tbl. Bind off.
FINISHING
Wash using wool wash, making sure to rinse wool wash out thoroughly. Remove excess water from shawl and block by weaving blocking wires through top edging of shawl, and then through middle edging point of each edging motif. Pull tight and pin out blocking wires, evening out shawl. Stretch, stretch, stretch the lace into shape. Wet material is stronger than dry, so don't worry! Pin out each edging loop separately to create scallop, then remove flexible blocking wires from edging, leaving wires woven through top edge. When thoroughly dry, unpin, sew in ends.
ABOUT THE DESIGNER
 Romi Hill lives on the eastern slope of the Sierra Nevada mountains in Northern Nevada, where the high-desert nights are cool and the air is clear and crisp. A lifelong crafter and knitter, she is inspired by the natural surroundings in her corner of the world, and her designs have an organic flow. She specializes in lace of all weights, and her patterns are known for their knitterly details.
Romi's lace book from Interweave Press, New Lace Knitting, features timeless patterns for garments and accessories. Her work has been featured in numerous magazines and books, and knit by thousands of knitters. Check out her eBook collections and subscriptions on Ravelry where you can see her full pattern collection.
Follow her on Instagram and YouTube, and find her work on Ravelry, or in her Ravelry forum @ Romi's Studio.
Pattern & images © 2023 Rosemary (Romi) Hill