


We Will Sock You, a free knitting pattern from Knitty.com.
INTRODUCTION
We Will Sock You
 by Allison Sarnoff

I'll be honest. I went through what I've been calling a Designer Drought for the last couple of years. Covid-related? Probably, but still, hardly any decent ideas for a long time. Until Fall 2022, when I ran into a question online from someone (can't remember who or where) asking questions about something they called the Crocodile Sock. I scrolled past the question a couple of times, each time confused about why someone was asking about an Elton John song in a knitting forum. Because I was reading it as Crocodile Rock.
It hit me. I could totally replace the word ROCK with SOCK for any song I wanted. That could be my inspiration for a whole line of sock patterns. I was back.
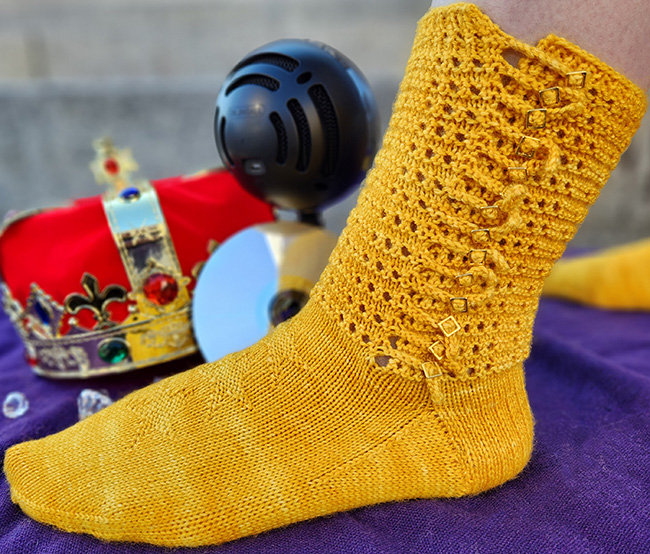
This sock pattern grew out of that idea because it doesn't get more rock and roll than Queen's We Will Rock You. The specific color and look of the sock is inspired by Freddie Mercury's yellow military jacket that he wore during the 1986 "Magic" Tour of Europe. The stars on the top of the foot come from the star shaped sunglasses Freddie wore for the We Will Rock You music video. There's also a version with decorative buttons, if you don't want to mess with the buckles.
And there you have it. We will, we will SOCK YOU.
 photos: Allison Sarnoff, Rebecca Foster-Damour, Sage Ruckterstuhl


SIZE
Women's XS[S, M, L, XL]
FINISHED MEASUREMENTS
Foot circumference: 7[7.5, 8, 8.5, 9] inches/ 18[19, 20.5, 21.5, 23] cm
Leg length: 6.5/16.5 cm leg from cuff to top of heel
Foot length: adjustable to fit
Choose a size approximately 1 inch/2.5 cm smaller around than the circumference of your foot taken at the ball of the foot.
MATERIALS
Yarn
![]() Fiber Optics Yarns Footnotes [80% superwash merino 20% nylon, 420 yd/381 m per 4 oz/114 g skein]; color: Bumblebee, 1 skein
Fiber Optics Yarns Footnotes [80% superwash merino 20% nylon, 420 yd/381 m per 4 oz/114 g skein]; color: Bumblebee, 1 skein
Yarn Characteristics
![]() The sample yarn is a smooth, semi-solid sock yarn with multiple plies. A fuzzy yarn may make the straps hard to manage.
The sample yarn is a smooth, semi-solid sock yarn with multiple plies. A fuzzy yarn may make the straps hard to manage.
Recommended needle size
[always use a needle size that gives you the gauge listed below - every knitter's gauge is unique]
![]() US #1.5/2.5mm needles for small circumference in the round: traditional or flexible DPNs, 1 long circular for magic loop, or 2 shorter circulars as you prefer
US #1.5/2.5mm needles for small circumference in the round: traditional or flexible DPNs, 1 long circular for magic loop, or 2 shorter circulars as you prefer
![]() US #1.5/2.5mm needles for working flat: a 16-inch/40 cm or longer circular needle, or a set of straight needles
US #1.5/2.5mm needles for working flat: a 16-inch/40 cm or longer circular needle, or a set of straight needles
Notions
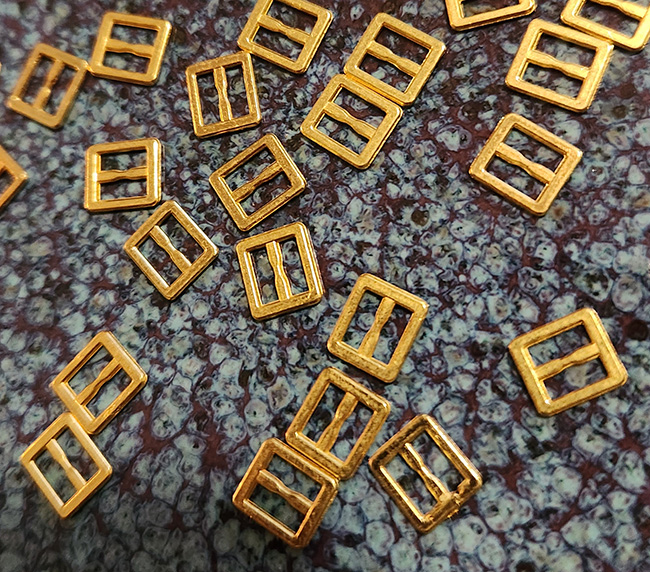
![]() 28 size 6 mm gold buckles (available on Amazon, etsy or other craft sites, search for 6 mm doll buckles; see photo below)
28 size 6 mm gold buckles (available on Amazon, etsy or other craft sites, search for 6 mm doll buckles; see photo below)
or
![]() 28 size 10 mm round gold buttons
28 size 10 mm round gold buttons
![]() sewing thread in a matching color
sewing thread in a matching color
![]() a sewing needle for attaching buckles or buttons, 2 stitch markers, tiny crochet hook to help get the straps through the buckles (optional, I used a size 7/1.55mm hook)
a sewing needle for attaching buckles or buttons, 2 stitch markers, tiny crochet hook to help get the straps through the buckles (optional, I used a size 7/1.55mm hook)
![]() yarn needle
yarn needle
GAUGE
32 sts/48 rounds = 4 inches/10 cm in stockinette stitch
PATTERN NOTES
[Knitty's list of standard abbreviations and techniques can be found here.]
These socks are not identical; they are mirror images so that the straps and buckles or buttons are on the outside of each sock.
The straps are done by casting on extra stitches at the end of noted rows, then turning the work and immediately binding off the stitches just cast on. In order to make the socks mirror image, the straps are done for the left sock at the end of the eyelet row and for the right sock at the end of the row before the eyelet row. Yes, the straps are not added on the same row. At such a small gauge, the difference is almost unnoticeable.
The button version of the sock is worked in the round, so when you add the buttons, make sure you sew the buttons on opposite sides of your finished socks, so you have a right and left sock with buttons along the outside of the legs.
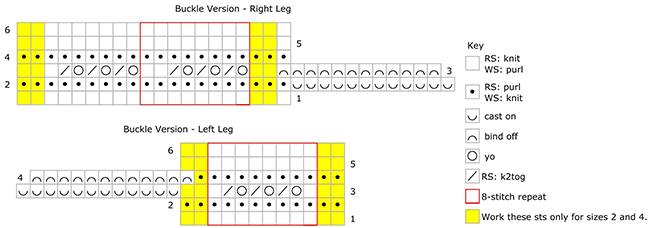
CHARTS
Work from written or charted instructions as you prefer.
Buckle Version - Left Leg Pattern
Row 1 [RS]: Knit
Row 2 [WS]: Purl.
Row 3: K 0[2, 0, 2, 0] , *k1, (yo, k2tog) 3 times, k1; repeat from * to last 0[2, 0, 2, 0] sts, k 0[2, 0, 2, 0] . Using the backward loop cast on, CO 12 more stitches.
Row 4: BO 12 stitches, then purl to end of row.
Row 5: Knit.
Row 6: Knit.
Buckle Version -Right Leg Pattern
Row 1 [RS]: Knit
Row 2 [WS]: Purl. Using the backward loop cast on, CO 12 more stitches.
Row 3: BO 12 sts, k 0[2, 0, 2, 0] [(yo, k2tog) 3 times, k2] to last 7[9, 7, 9, 7] sts, (yo, k2tog) 3 times, k 1[3, 1, 3, 1] .
Row 4: Purl.
Row 5: Knit.
Row 6: Knit.
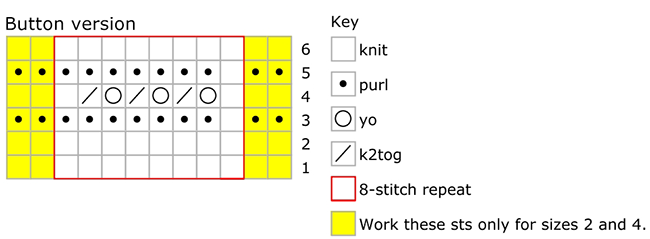
Button Version – Leg Pattern
Round 1: Knit.
Round 2: Purl
Round 3: K 0[2, 0, 2, 0] , *k1, (yo, k2tog) 3 times, k1; repeat from * to last 0[2, 0, 2, 0] sts, k 0[2, 0, 2, 0] .
Round 4: Purl.
Rounds 5-6: Knit.
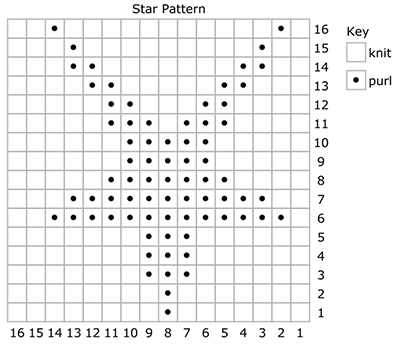
Star Pattern
DIRECTIONS

Using the Long Tail method and needles for working flat, CO 64[68, 72, 76, 80] sts. Do not join. The leg will be worked flat.
Leg Patterning Setup - Left Leg ONLY
Row 1 [WS]: Purl
Rows 2-4: [K1, p1] across.
Row 5: Knit.
Row 6: K 0[2, 0, 2, 0] , *k1, (yo, k2tog) 3 times, k1; repeat from * to last 0[2, 0, 2, 0] sts, k 0[2, 0, 2, 0] . Using the backward loop cast on, CO 12 more stitches.
Row 7: BO 12 stitches, then knit to end of row.
Rows 8-10: [K1, p1] across.
Row 11 [WS]: Knit.
Leg Patterning Setup - Right Leg ONLY
Row 1 [WS]: Purl
Rows 2-4: [K1, p1] across.
Row 5: Knit. Using the backward loop cast on, CO 12 more stitches.
Row 6: BO 12 sts, k 0[1, 0, 1, 0] [(yo, k2tog) 3 times, k2] to last 7[9, 7, 9, 7] sts, (yo, k2tog) 3 times, k 1[3, 1, 3, 1]
Row 7: Knit.
Rows 8-10: [K1, p1] across.
Row 11 [WS]: Knit.
Both Legs, Continue
Next row [RS]: Work appropriate Leg pattern across starting with row 3.
Continue as set, working cast-ons and bind-offs as per pattern until you have worked the pattern 13 times total, ending with Row 6 of the pattern – there will be 14 straps.
Distribute your sts across needles for working in the round, and then join to work in the round, noting or marking start of round as required.
Next rnd, decrease, sizes XS, M, XL only: (K2tog, k 6[-, 7, -, 8] ) 8 times. 56[-, 64, -, 72] sts.
Next rnd, decrease, sizes S and L only: (K2tog, k6[7], k2tog, k7[8]) 4 times. –[60, -, 68, ] sts.
Work in stockinette for another .25 inches/.5 cm.
Heel Flap Setup
Heel flap row 1, Left Leg ONLY [RS]: K 2[4, 6, 8, 10] ; slip these sts to the end of the round. K 28[30, 32, 34, 36] stitches – this will be the heel flap. Slip the remaining 26 stitches to one needle or a holder, for the instep.
Heel flap row 1, Right Leg ONLY [RS]: K26. This will be the start of the heel flap – start a new needle or place a marker at this point, as required. K 28[30, 32, 34, 36] stitches – this will be the heel flap. Slip the remaining 28[30, 32, 34, 36] stitches to one needle or a holder – the 26 you worked and the remaining 2[4, 6, 8, 10] sts of the round.
Proceed to "All Versions, Continue", below.
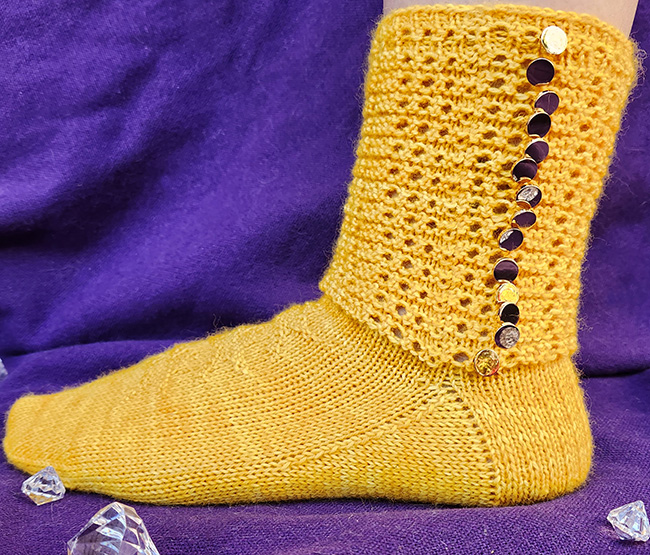
Button Version (shown above)
Using the Long Tail method and needles for working in the round, CO 56[60, 64, 68, 72] sts. Distribute sts across needles as you prefer and join for working in the round.
Rnd 1: Knit.
Rnds 2-4: [K1, p1] around.
Rnd 5: Purl.
Rnd 6: K 0[2, 0, 2, 0] , *k1, (yo, k2tog) 3 times, k1; repeat from * to last 0[2, 0, 2, 0] sts, k 0[2, 0, 2, 0] .
Rnd 7: Purl.
Rnds 8-10: [K1, p1] around.
Rnd 11: Purl.
Next rnd [RS]: Work Button pattern around starting with round 4 of the chart.
Work as set until you have completed the pattern 13 times, and you have 14 eyelet rounds, ending with Rnd 6.
Knit for .25 inches/.5 cm.
Heel Flap Setup
Knit across the first 28[30, 32, 34, 36] , then turn work. The heel flap will be worked over the stitches just knitted. Rearrange sts as you prefer.
All Versions, Continue:
Heel Flap Row 2 [WS]: Sl 1, p to end, turn.
Heel Flap Row 3 [RS]: [Sl 1, k1] across, turn.
Repeat Heel Flap Rows 2-3 15[16, 17, 18, 19] more times, and work row 2 one more time. 33[35, 37, 39, 41] rows total, after the setup row.
Turn Heel
Row 1 [RS]: K 16[17, 18, 19, 20] sts, SKP, k1. Turn.
Row 2: Sl 1, p5, p2tog. Turn.
Row 3: Sl 1, knit to 1 stitch before the gap, sl 1, k1, psso, k1. Turn.
Row 4: Sl 1, purl to 1 stitch before the gap, p2tog, p1. Turn.
Repeat Rows 3-4 until 18[18, 20, 20, 22] sts rem.
Sizes XS, M, XL ONLY:
Row 5: Sl 1, knit to 1 stitch before the gap, SKP. Turn.
Row 6: Sl 1, purl to 1 stitch before the gap, p2tog. Turn.
16[18, 18, 20, 22] sts rem.
Gusset setup round: Knit across the rem heel sts; pick up and knit 16[17, 18, 19, 20] sts along the first side of the heel flap; knit across instep sts; pick up and knit 16[17, 18, 19, 20] sts along the second side of the heel flap, k 8[9, 9, 10, 10] stitches to center of heel. This is the new start of the round. 76[82, 86, 92 96, ] sts.
Gusset round 2: Knit.
Gusset round 3: K to 3 sts before instep, k2tog, k1; k 8[9, 10, 11, 12] , pm and work 16 sts as per Star chart, k 8[9, 10, 11, 12] to end of instep; k1, ssk, k to end of round. 2 sts decreased.
Gusset round 4: K to Star chart marker, work Star chart across next 16 sts, k to end of round.
Repeat Gusset rounds 3-4 9[10, 10, 11, 11] times more until a total of 56[60, 64, 68, 72] sts rem.
Work even in pattern as set until sock foot measures 1.5[1.5, 2, 2, 2.25] inches/ 4[4, 5, 5, 6] cm short of the finished length of the sock, repeating the Star chart rows 1-16 as many times as will fit, switching to stockinette for the remainder of the foot. The chart measures a little less than 1.5 inches/4 cm vertically; once you've worked two repeats, check your foot length to see if you have room for a third before the toe decreases start.
To work the toe:
Rearrange your stitches to have the same number of stitches for the instep as for the sole. 28[30, 32, 34, 36] stitches for each half of the foot.
Round 1, decrease: K to 3 sts before instep, k2tog, k1; k1, ssk, k to last 3 sts of instep, k2tog, k1; k1, ssk, k to end of round. 4 sts decreased.
Round 2: Knit.
Repeat Rounds 1-2 6[6, 7, 7, 8] more times, until 28[32, 32, 36, 36] stitches total remain, then work round 1 only until 8[8, 12, 12, 12] stitches total remain.
Knit to end of instep. Set up the remaining stitches on 2 needles with the bottom of the foot on one and the top of the foot on the other, making sure that the working yarn is at one end of the live stitches. Cut yarn, leaving a long enough tail to graft the remaining stitches together.
FINISHING
Weave in all ends. Wash the socks and lay flat to dry; if you're using buckles, it can be helpful to pin out the straps from the leg flat and untwisted, so they dry straighter.
After the socks are dry, I strongly recommend putting them on and placing a pin in the row where you want to attach the buckles, starting with the buckle closest to the foot and working up the leg until all 28 pins have been placed. Then sew on the buckles, trim the ends of the thread close and thread the straps through the buckles. I found a crochet hook helped with threading the straps through the buckles.
For the button version, do as above sewing on the buttons at every eyelet row on one side or the other making a right and left sock.
ABOUT THE DESIGNER
 Allison Sarnoff was the author and creator of the long running web comic series Knit Princess and is the co-author of Unobtainables: Fake Elements, Real Knits with Heatherly Walker. She lives in a yarn stuffed townhouse in the Capital District of New York State. Her cats remain unimpressed by her knitting projects.
Pattern & images © 2023 Allison Sarnoff