Ruut, a free knitting pattern from Knitty.com.
INTRODUCTION
Ruut
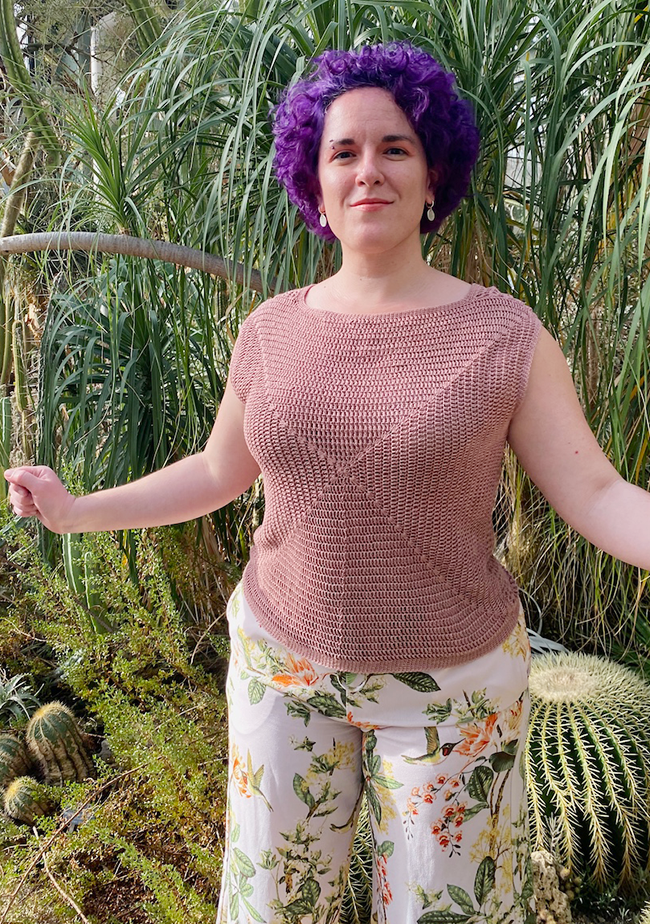 by Asimina Saranti
![]()
Have you discovered the wonders of hemp and linen yarn? The glorious shine, the great stitch definition and the strength of such fibers make for excellent summer garments.
These plant fibers are breathable and absorb humidity very well, providing a very comfortable feeling even on the hottest summer days. They are also strong, so regular washing and drying not only does not damage them, but in fact makes the fabric softer.
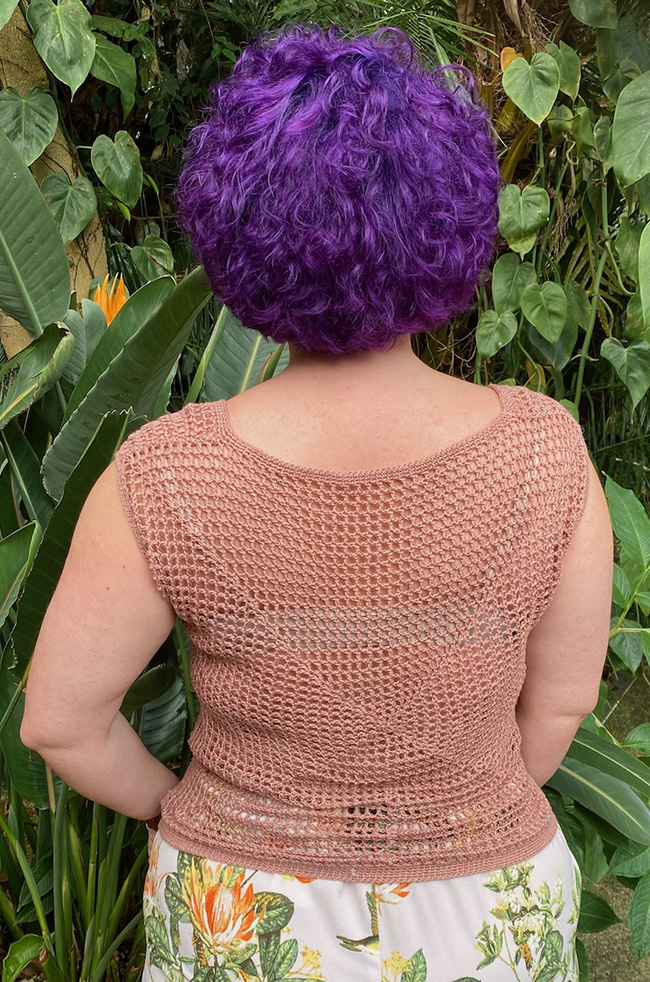
In the quest to create more hemp pieces for the summer to come, I came up with a modern crochet top that is fast to make and easy to wear. Ruut is worked with simple crochet stitches and very basic techniques; but offers a sleek, modern look that is hard to miss.
Join me this season for more hemp making, it will be fun!
*Ruut means 'square' in Estonian.
 model + photos: Asimina Saranti
SIZE
Women's XS[S, M, L, 1X, 2X, 3X, 4X, 5X
]
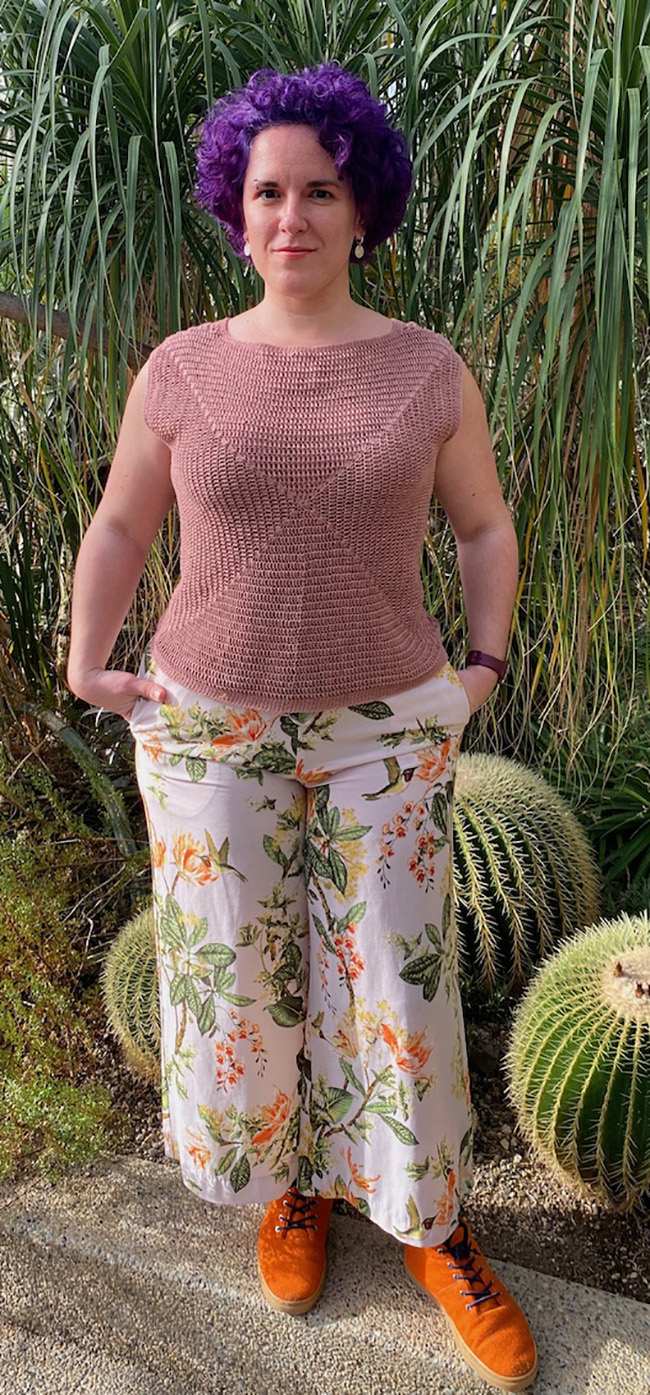
shown in size M with 2 inches/5 cm of ease at largest part of chest and 2.5 inches/6 cm of ease at chest measurement
FINISHED MEASUREMENTS
Body Circumference at Underarm: 31.5[35.5, 39.5, 43.5, 47, 51, 55, 59, 63] inches/ 80[90, 100, 110, 120, 130, 140, 150, 160] cm
Length (from top of shoulder to bottom edge): 18[20, 22, 24, 26, 28, 30, 32.5, 34.5] inches/ 45.5[50.5, 55.5, 60.5, 66.5, 71.5, 76.5, 82.5, 87.5] cm
Note: Choose a size at least 2-2.5 inches/5-6 cm larger than chest circumference at underarm; go larger if you need more ease to accommodate a large bust.
MATERIALS
Yarn
![]() Lang Yarns Canapa [100% Hemp; 88 yd/ 80 m per 0.88 oz/25 g skein]; color: 48; 7[8, 9, 11, 13, 15, 18, 21, 24] skeins
Lang Yarns Canapa [100% Hemp; 88 yd/ 80 m per 0.88 oz/25 g skein]; color: 48; 7[8, 9, 11, 13, 15, 18, 21, 24] skeins
Note: This yarn is discontinued. Lanaknits allhemp 3 is a perfect substitute in a larger put-up; check total yardage for your size to calculate number of skeins required.
Yarn Characteristics
![]() The sample shown uses a sport-weight plied hemp yarn. The yarn is smooth and shiny. It holds its shape well and provides great stitch definition. Choose a yarn with a tight twist to avoid splitting when crocheting.
The sample shown uses a sport-weight plied hemp yarn. The yarn is smooth and shiny. It holds its shape well and provides great stitch definition. Choose a yarn with a tight twist to avoid splitting when crocheting.
Recommended needle size
[always use a needle size that gives you the gauge listed below - every knitter's gauge is unique]
![]() US #2.5/3mm hook
US #2.5/3mm hook
Notions
![]() 5-10 removable stitch markers
5-10 removable stitch markers
![]() sharp-pointed yarn needle
sharp-pointed yarn needle
GAUGE
19 sts/10 rounds = 4 inches/10 cm in double crochet
PATTERN NOTES
[Knitty's list of standard abbreviations and techniques can be found here.]
Construction method:
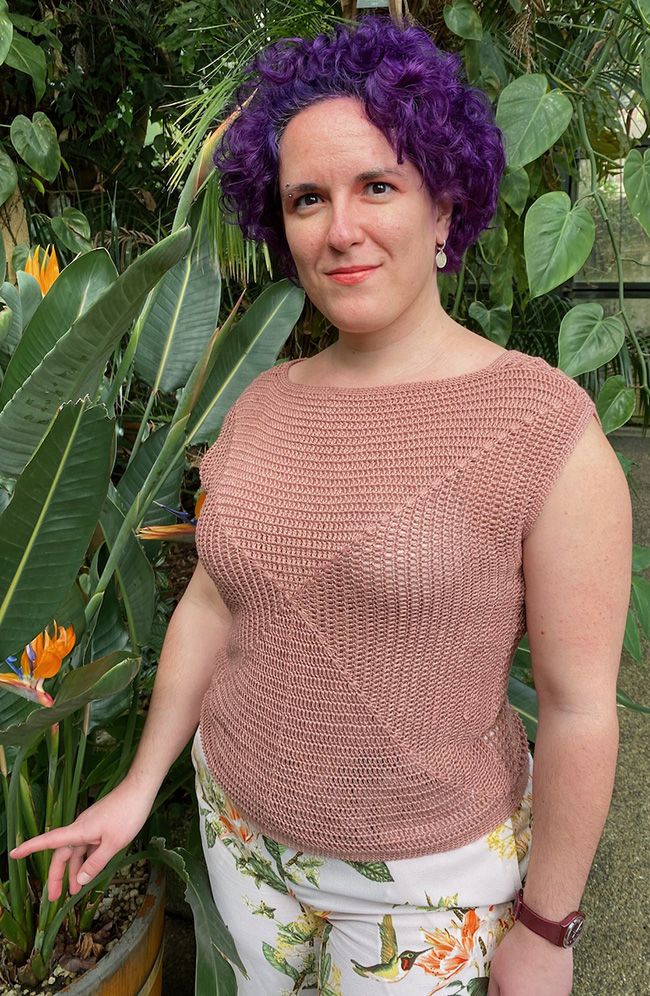
The body of this top consists of two same-size squares that make up the front and back pieces. Each front/back piece is worked in the round, center-out. The front piece is worked in a solid fabric with double crochet stitches. The back piece is worked in a filet crochet fabric. Two additional shoulder pieces are worked flat in the same mesh pattern as the back piece. All pieces are then sewn together. Each opening is then finished with single crochet in the round.
Techniques:
- Sliding Loop/Magic Ring: (video tutorial)
- Single Crochet Seaming: (video tutorial)
DIRECTIONS
FRONT
Note: The ch3 sts at the beginning of each round do not count as a stitch. This means that the first dc should be worked on the base st of the ch3 sts.
Being with magic ring/sliding loop.
Round 1: Ch 3, dc 12 in loop, join with sl st. Place m for BOR. (3 ch + 12 dc)
Round 2: Ch 3, dc, dc 5 in next st, pm in the middle of the five dc sts for corner, *dc 2, dc 5 in next st, pm in the middle of the five dc sts, repeat from * twice more, dc, join with sl st. (3 ch + 28 dc) (16 sts increased)
Round 3: Ch 3, *dc to 1 st before corner m, rm, dc 5 in next st, pm in the middle of the five dc sts for corner, repeat from * three more times, dc to EOR, join with sl st. (16 sts increased)
Repeat Round 3 17[20, 22, 25, 27, 30, 32, 35, 37] more times or until work measures 15.5[17.5, 19.5, 21.5, 23.5, 25.5, 27.5, 29.5, 31.5] inches/ 40[45, 50, 55, 60, 65, 70, 75, 80] cm in width.
Fasten off, leaving a 10 cm / 4 inch tail.
BACK
Note: The ch3 sts at the beginning of each round do count as a dc stitch.
Begin with magic ring/sliding loop.
Round 1: Ch 3, [ch 1, dc in loop] 7 times, ch 1, join with sl st. Place m for BOR. (3 ch as 1 dc + 8 ch + 7 dc)
Round 2: Ch 4, (skip ch st, [dc, ch 1, dc, ch 1, dc] in next st, pm in the middle of the three dc sts for corner, skip ch st, ch 1, dc in next st, ch 1) three times,
skip ch st, [dc, ch 1, dc, ch 1, dc] in next st, pm in the middle of the three dc sts for corner, skip ch st, ch 1, join with sl st. 16 sts increased.
Round 3: Ch 3, *(ch 1, skip ch st, dc in next st) to 1 dc st before corner m, rm, ch 1, [dc, ch 1, dc, ch 1, dc] in next st, pm in the middle of the three dc sts for corner, repeat from * three more times, then [ch 1, skip ch st, dc in next st] to EOR, ch1, join with sl st.
Repeat Round 3 17[20, 22, 25, 27, 30, 32, 35, 37] more times or until work measures until work measures 15.5[17.5, 19.5, 21.5, 23.5, 25.5, 27.5, 29.5, 31.5] inches/ 40[45, 50, 55, 60, 65, 70, 75, 80] cm in width.
Fasten off, leaving a 4 inch/10 cm tail.
Shoulders
Make two.
Row 1 [RS]: Ch 5, turn.
Row 2 [WS]: Ch 1, sc 5, turn. 5 sts
Row 3 [RS]: Ch 2 (does not count as a dc), dc in same st, *ch 1, sk 1 st, dc in next st, repeat from * to EOR, turn.
Row 4: Ch 2 (does not count as a dc), dc 2 in same st, *ch 1, sk ch st, dc in next st, repeat from * to EOR, dc 1 more in the last st, turn. 2 sts increased.
Row 5: Ch 2 (does not count as a dc), dc in same st, ch1, dc in next st, *ch 1, sk ch st, dc in next st, repeat from * to 1 st before EOR, ch1, dc 1 in the last st, turn. 2 sts increased.
Repeat Rows 4-5 3[3, 3, 3, 4, 4, 4, 5, 5] more times. 21[21, 21, 21, 25, 25, 25, 29, 29] sts
Repeat Row 3 once more.
Row 6: Ch 1, sc in every st to EOR, turn.
Fasten off, leaving a 4 inch/10 cm tail.
Assembly
Place the shoulder pieces between the front and the backs, positioned so that the starting row is aligned with the outside shoulder edges of the front and backs, leaving an opening for the neck in the center.
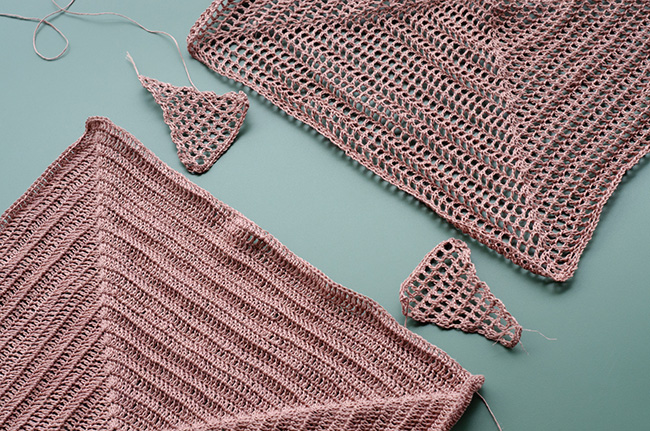
Sew into place either with a yarn needle or with single crochet stitches (right sides together).
Use removable stitch markers to mark the armhole depth for each of the front and back pieces, placing a marker at the lower edge on both left and right sides of front and back pieces as shown below.
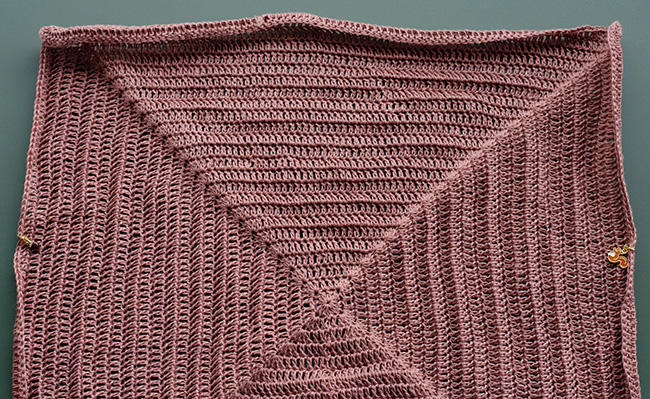
We recommend trying the garment on to determine your preferred depth; suggested depths are 7.5[7.75, 8.75, 9, 9.75, 10.25, 10.75, 11, 11.5] inches / 19[20, 22, 23, 25, 26, 27, 28, 29] cm away from each top corner.
Starting from the bottom and going up, sew the front and back sides together either with a yarn needle or with single crochet stitches (right sides together).
FINISHING
Attach yarn to neck opening and work sc in each st across, join with sl st. Place markers in the four corners, where the shoulder pieces meet the front/back. In the next round, work sc in each st and sc2tog in each of the four neckline corners, join with sl st. Repeat last round once more. Fasten off, leaving a 4 inch/10 cm tail.
Attach yarn to sleeve opening at center of underarm and work sc in each st across, join with sl st. Repeat for a total of 3 rounds. Fasten off, leaving a 4 inch/10 cm tail.
Attach yarn to bottom opening at side seam and work sc in each st across, join with sl st. Repeat for a total of 6 rounds. Fasten off, leaving a 4 inch/10 cm tail.
To block, wash. Dry flat and weave in ends.
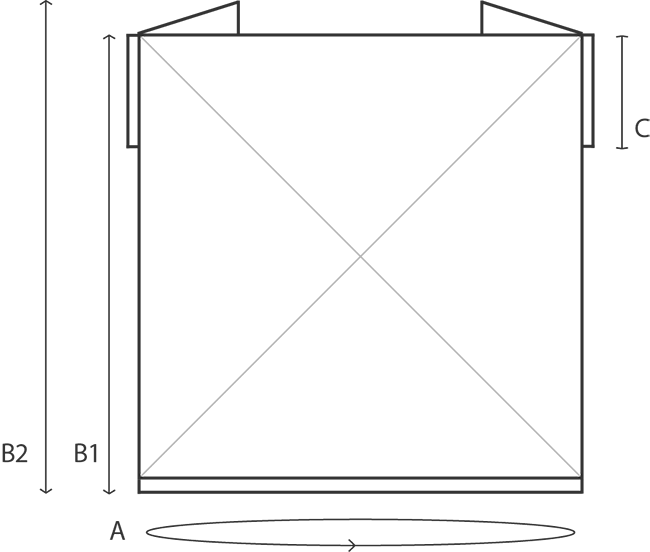
A – Body circumference at underarm: 31.5[35.5, 39.5, 43.5, 47, 51, 55, 59, 63] inches/ 80[90, 100, 110, 120, 130, 140, 150, 160] cm
B1 – Length (from neck to bottom edge): 15.5[17.5, 19.5, 21.5, 23.5, 25.5, 27.5, 29.5, 31.5] inches/ 40[45, 50, 55, 60, 65, 70, 75, 80] cm
B2 – Length (from top of shoulder to bottom edge): 18[20, 22, 24, 26, 28, 30, 32.5, 34.5] inches/ 45.5[50.5, 55.5, 60.5, 66.5, 71.5, 76.5, 82.5, 87.5] cm
C – Armhole depth: 7.5[7.75, 8.75, 9, 9.75, 10.25, 10.75, 11, 11.5] inches / 19[20, 22, 23, 25, 26, 27, 28, 29] cm – adjustable to preference, see finishing notes
ABOUT THE DESIGNER
 Asimina works as a Computer Engineer and freelance Knitwear Designer. She works part-time at her local yarn store, fraukuhn, where she handles sales, photography and the technical infrastructure. She also gives knitting and crochet courses (online and in person). In her free time she likes to read, knit, crochet and spin a little.
She lives in Bern, Switzerland with her partner, Philipp, and an enormous collection of stashed yarns. Find her on Ravelry.
Pattern & images © 2024 Asimina Saranti