Stars over the Rainbow, a free knitting pattern from Knitty.com.
INTRODUCTION
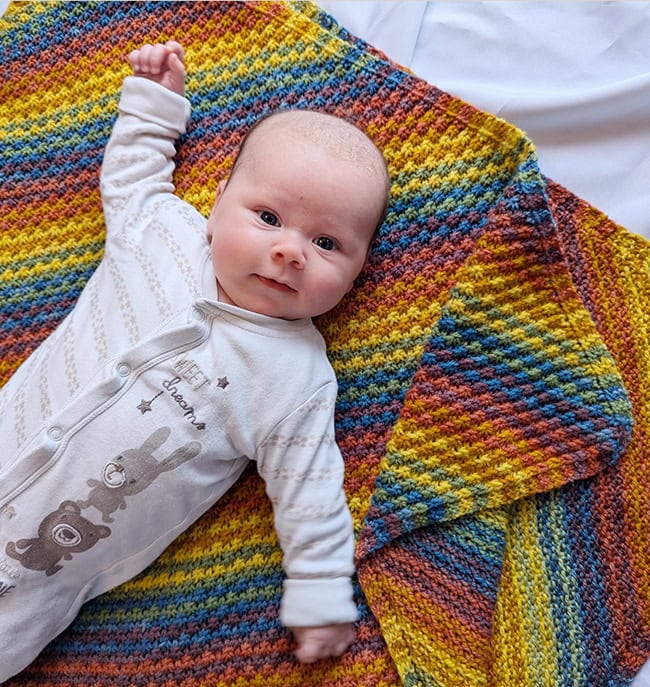
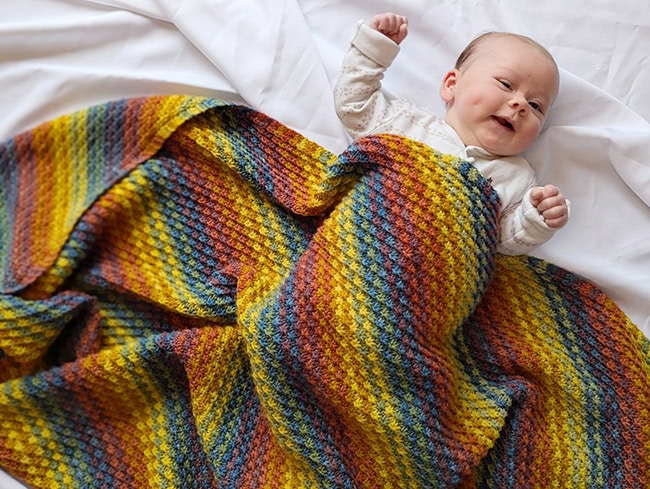
Stars over the Rainbow
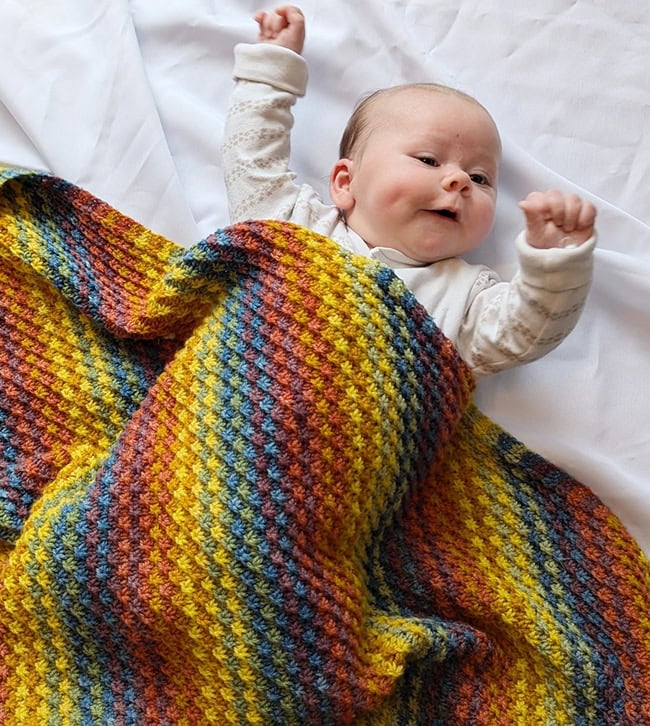
by Kate Harvie

I have reached the exciting stage of life where my children and their friends are having babies. It falls to me as the knitting "expert" of the family to come up with something fabulous for the imminent arrival of said children. No pressure, but a beautiful blanket has been requested.
I'm not keen on pastels of pink and blue, and especially not lemon, and anyway, there is good evidence out there to suggest that human infants respond best to bright colors with high contrast.
Also I have recently been learning natural dyeing with plants, and I wanted to prove to myself and anyone else who doesn't run away quickly enough, that it is possible to get colors from all parts of the spectrum. Not just beige.
So I set to work and dyed six skeins, and although I haven't yet mastered crimson red, I am pretty happy with my results.
Next question is to decide what to do with my six skeins of yarn. How big should a baby blanket be? An internet search made me more confused than ever – I found at least 12 different definitions of baby blankets with different sizes and proportions.
In the end I decided that I would knit the biggest size I could with the yarn I had available. I went for a rectangular shape based approximately on the Golden Ratio. This means that the long edge is about 1.6 times the length of the short edge. It's a ratio that appears often in nature, and is considered by some to be the most aesthetically-pleasing rectangle.
I decided to work the blanket diagonally, which meant that I could calculate as I went (fortunately I like math) to make sure I did not run out of yarn and could complete a full number of repeats of the sequence of my six colors.
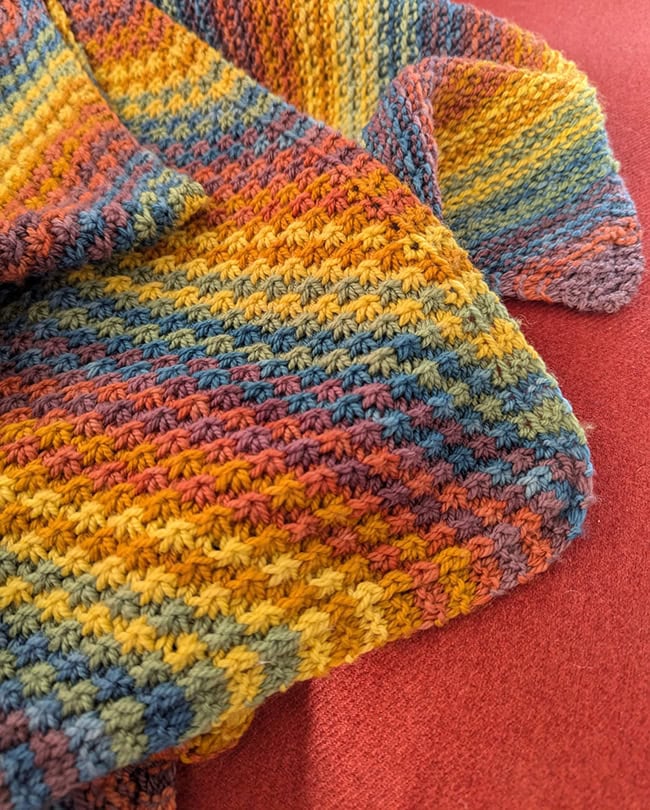
The pattern is made in a series of stripes each of two rows, making a thick, light fabric with plenty of air pockets for warmth. Each stripe forms a line of little stars. Changing colours for each row of stars makes them show up beautifully. Unfortunately it also generates a lot of ends to sew in. If you like, you can console yourself by paying yourself 10 cents/10p/a krone - or whatever currency you are using - for each end you sew in, then at the end you might have enough for a gorgeous hand-dyed skein from your favorite indie dyer.
If you don't want to sew so many ends in, you can use just two colors and carry the yarn up the side of the work, or work in blocks of color or a single color, but then your stars will not shine so brightly.
If you wish to make a larger or smaller blanket, or a scarf, this is no problem. Work the increase rows until the edges of your work measure the width you want, then work the straight rows until the long edge measures the length you want, then work the decreases. Just make sure that you keep enough yarn to work the decreases.
 model: Tony Ferguson and baby F
photos: Kristina Craven
SIZE
One
Note: This pattern is infinitely customizable to make any size or shape of rectangle you like.
If you are going to make a different sized rectangle, it is vital that you leave enough yarn for the decrease section. I recommend weighing your work just before starting the straight section so that you know exactly how much yarn you will need for the decrease section. And round up a little, for safety's sake.
FINISHED MEASUREMENTS
Width: 32.5 inches/82.5cm
Length: 51.25 inches/130cm
MATERIALS
Yarn
Version photographed: World of Wool Santorini DK 100 superwash merino wool, 252 yds/230m per 100g skein, hand dyed by myself using sustainably collected or purchased plant materials;
![]() Color A: red, dyed with Madder, 1 skein
Color A: red, dyed with Madder, 1 skein
![]() Color B: orange, dyed with Madder and Onion skins, 1 skein
Color B: orange, dyed with Madder and Onion skins, 1 skein
![]() Color C: yellow, dyed with Birch leaves, 1 skein
Color C: yellow, dyed with Birch leaves, 1 skein
![]() Color D: green, dyed with Common Reed flowers, 1 skein
Color D: green, dyed with Common Reed flowers, 1 skein
![]() Color E: blue, dyed with Indigo, 1 skein
Color E: blue, dyed with Indigo, 1 skein
![]() Color F: purple, dyed with Oakmoss lichen, 1 skein
Color F: purple, dyed with Oakmoss lichen, 1 skein
Suggested widely available alternative yarns:
Stylecraft Special DK, 100% premium acrylic, 323 yds/295m per 100g ball;
![]() Color A: 1010 Matador, 1 ball
Color A: 1010 Matador, 1 ball
![]() Color B: 1711 Spice, 1 ball
Color B: 1711 Spice, 1 ball
![]() Color C: 1081 Saffron, 1 ball
Color C: 1081 Saffron, 1 ball
![]() Color D: 1826 Kelly Green, 1 ball
Color D: 1826 Kelly Green, 1 ball
![]() Color E: 1003 Aster, 1 ball
Color E: 1003 Aster, 1 ball
![]() Color F: 1061 Plum, 1 ball
Color F: 1061 Plum, 1 ball
OR
Drops Karisma 100% superwash merino wool; 55 yds/50m per 50g ball;
![]() Color A: 18 Red, 3 balls
Color A: 18 Red, 3 balls
![]() Color B: 11 Orange, 3 balls
Color B: 11 Orange, 3 balls
![]() Color C: 52 Dark Mustard, 3 balls
Color C: 52 Dark Mustard, 3 balls
![]() Color D: 45 Light Olive, 3 balls
Color D: 45 Light Olive, 3 balls
![]() Color E: 30 Light Denim Blue, 3 balls
Color E: 30 Light Denim Blue, 3 balls
![]() Color F: 39 Dark Old Rose, 3 balls
Color F: 39 Dark Old Rose, 3 balls
OR
West Yorkshire Spinners Colour Lab DK, 100% wool, 246 yds/225m per 100g ball;
![]() Color A: 0556 Crimson Red, 1 ball
Color A: 0556 Crimson Red, 1 ball
![]() Color B: 0476 Zesty Orange, 1 ball
Color B: 0476 Zesty Orange, 1 ball
![]() Color C: 0229 Citrus Yellow, 1 ball
Color C: 0229 Citrus Yellow, 1 ball
![]() Color D: 0363 Bottle Green, 1 ball
Color D: 0363 Bottle Green, 1 ball
![]() Color E: 0364 Harbour Blue, 1 ball
Color E: 0364 Harbour Blue, 1 ball
![]() Color F: 0717 Thistle Purple, 1 ball
Color F: 0717 Thistle Purple, 1 ball
Yarn Characteristics
![]() The sample is made using a 3-ply DK weight yarn with a round profile and smooth surface. This pattern will work best in solid colors with 3 or more plies which will give good stitch definition and show the stars at their best.
The sample is made using a 3-ply DK weight yarn with a round profile and smooth surface. This pattern will work best in solid colors with 3 or more plies which will give good stitch definition and show the stars at their best.
Recommended needle size
[always use a needle size that gives you the gauge listed below - every knitter's gauge is unique]
![]() US #8/5mm circular needle, 32 inches/80 cm or longer
US #8/5mm circular needle, 32 inches/80 cm or longer
Notions
![]() Yarn needle for sewing in ends
Yarn needle for sewing in ends
GAUGE
24 sts/28 rows = 4 inches/10 cm in pattern stitch.
Note: The recommended needle size for the suggested yarns is US6/4mm giving a suggested gauge of 21-22 stitches and 28-30 rows to 4 inches/10cm. This pattern is worked on larger needles than recommended on the ball band.
Gauge is not critical in this project, but working at a different gauge will result in a different finished item and will change yardage requirements. If your gauge is looser, you will need extra yarn. The pattern instructions include advice for making sure you have enough yarn as you work the blanket.
PATTERN NOTES
[Knitty's list of standard abbreviations and techniques can be found here.]
Construction method: This blanket is worked diagonally from one corner to the opposite corner. Starting with a small cast-on, and working flat in rows, increases are worked until the desired width is reached, then decreases are worked at one edge along with increases at the other edge until the desired length is reached, then decreases are worked at both edges until only a few stitches remain. The pattern is written for 6 colors, forming a rainbow. These are worked in a sequence of 18 stripes, which are repeated 10 times in all over the entire blanket, so that you use an equal quantity of each color.
Pattern stitches are worked on WS rows only.
Colors change on every RS row so that the stars show up well.
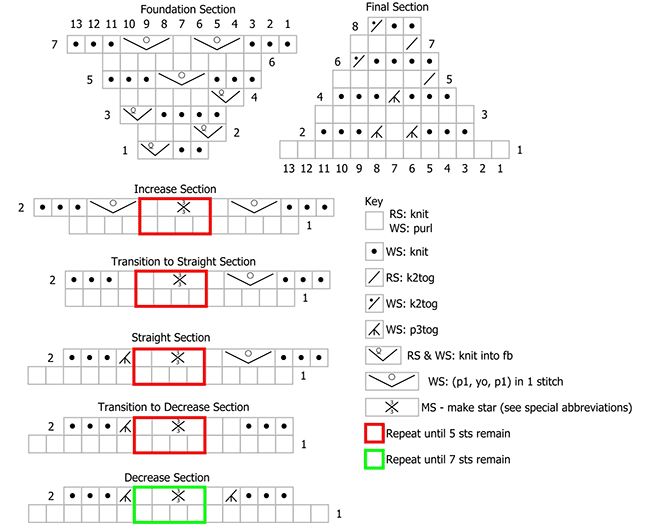
MS (make star): Purl next 3 sts together, but do not remove loops from your left-hand needle. Make a yarnover – by taking yarn over top of needle from front to back, then forward under the needle tip – then purl the same 3 sts again.
CHARTS
DIRECTIONS
Using Color A, CO 3 sts using long tail or your preferred method.
Foundation Section
Work from chart or written instructions as you prefer.
Rows 1-4: Kfb, k to end. 1 st increased.
Row 5 [WS]: K3, (p1, yo, p1) in next stitch, k3. 9 sts.
Row 6 [RS]: Knit.
Row 7: K3, (p1, yo, p1) in next stitch, p1, (p1, yo, p1) in next stitch, k3. 13 sts.
Increase section
When working this section, you add 4 sts (one pattern repeat) on each WS row. Start with color A and change color on every RS row. I advise carrying the unused color up the edge of the work for no more than two rows. Take care not to pull yarn too tightly at the start of rows when doing this.
Work in the following color sequence of 18 stripes (2 rows of each color):
A B A, B C B, C D C, D E D, E F E, F A F. Then start again at the beginning of the sequence. Work the color sequence throughout.
Work from chart or written instructions as you prefer.
Row 1 [RS]: Knit.
Row 2 [WS]: K3, (p1, yo, p1) in next stitch, [p1, MS] to last 5 sts, p1, (p1, yo, p1) in next stitch, k3. 4 sts increased.
Work these two rows 68 times in total. 285 sts. You will be partway through the color sequence.
Transition to straight section:
Work from chart or written instructions as you prefer.
Row 1 [RS]: Knit.
Row 2 [WS]: K3, p1, [p1, MS] to last 5 sts, p1, (p1, yo, p1) in next stitch, k3. 287 sts.

Straight Section
Note: If you are not working the blanket exactly as described, weigh your work at this point so that you can ensure you leave plenty of yarn for working the decrease section.
In this section you work decreases at the start of WS rows and continue with increases at the end of the rows. The stitch count remains the same. Continue stripe sequence as established.
Work from chart or written instructions as you prefer.
Row 1 [RS]: Knit.Row 2 [WS]: K3, p3tog, [p1, MS] to last 5 sts, p1, (p1, yo, p1) in next stitch, k3.
Work these two rows 21 times in total. You are now halfway through your blanket if working as described. You will have worked 5 full repeats of the color sequence of 18 stripes.
Weigh your work. If you have used less than half of your yarn, work the two rows of the straight section another 21 times.
If you have used more than half of your yarn, and you are following the 18-stripe sequence, you will need to shorten the straight section by one full sequence of 18 stripes; work the two rows of the straight section another 3 times. Do not be tempted to work extra stripes here, as you may run out of some colors before you finish the blanket. Your blanket will be a little shorter than planned, but it will still be a nicely balanced rectangle.
Transition to Decrease Section:
Work from chart or written instructions as you prefer.
Row 1 [RS]: Knit.
Row 2 [WS]: K3, p3tog, [p1, MS] to last 5 sts, p2, k3. 285 sts.
Decrease Section
In this section, you remove one pattern repeat in each WS row by working decreases at both ends of the row.
Work from chart or written instructions as you prefer.
Row 1 [RS]: Knit.
Row 2 [WS]: K3, p3tog, [p1, MS] to last 7 sts, p1, p3tog, k3. 4 sts decreased.
Maintaining stripe sequence as before, work these 2 rows 68 times in total, until 13 sts remain. You will work the last 2 of these rows in color F, in the last stripe of the sequence.
Final section
Continuing with color F, work the last few rows as follows:
Work from chart or written instructions as you prefer.
Row 1 [RS]: Knit.
Row 2 [WS]: K3, p3tog, p1, p3tog, k3. 9 sts.
Row 3: Knit.
Row 4: K3, p3tog, k3. 7 sts.
Rows 5-8: K2tog, k to end of row. 1 st decreased.
Break yarn, pass yarn end through remaining 3 sts and fasten off.
FINISHING
Weave in all ends neatly and securely.
Soak in lukewarm water with a drop of washing up liquid or wooly wash for 20-30 minutes, or wash as you would intend to wash the blanket if it were dirty. How you do this will depend on the yarn you are using. Roll in towels, or short spin in a machine to remove excess water. Pull gently into shape on a flat surface and allow to dry completely. Do not pin or stretch.
ABOUT THE DESIGNER
 Kate has been a knitter and lover of anything woolly since childhood. She survived more than 40 years working in healthcare by playing viola, walking outdoors and knitting, hopefully not all at the same time. Since retirement in 2022, Kate has had a lot of fun trying vainly to reduce her stash, designing knitwear and playing with natural dyes in her garden shed. As well as a roomful of fiber and yarn, she has three grown-up children, a husband and a cat, and a brand new grandchild. She lives in North Yorkshire close to the moors and the sea.
Find her on Ravelry and Instagram.
Pattern & images © 2025 Kate Harvie