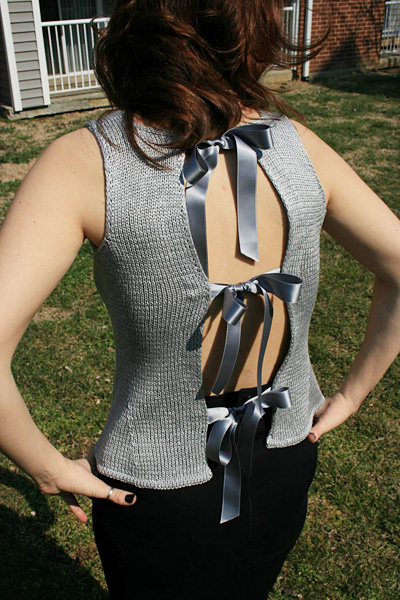
  Note:
This pattern is worked using 2 strands of yarn held
together throughout. Note:
This pattern is worked using 2 strands of yarn held
together throughout.
Lower
Body
Using circular needle and crochet cast-on (or other provisional cast on method), CO 145[165, 185, 205, 225, 245, 265] sts.
Hem
Rows
1-4: Work in stockinette st, beginning with a RS row.
Row 5 [RS]: P all sts.
Rows 6-8: Work in stockinette st, beginning with a WS row.
Remove waste yarn from CO edge and place resulting live sts on spare circular needle. Fold work to WS along ridge formed by Row 5, so that spare needle is directly behind working needle.
Row 9 [RS]: K first st from working needle together with first st from spare needle; continue in this way, working each st from working needle together with corresponding st from spare needle, until all sts have been worked.
Hem is complete. From this point, measure work from Row 5 (turning ridge of hem).
Beginning on the next row, work Tubular Edging (see Pattern Notes) at each edge of work. Maintain Tubular Edging along side edges of work until piece is complete.
Note: Directions for Tubular Edging are not included in line-by-line directions which follow. When the pattern says K10, for example, sts of edging are included in those 10 sts.
Work in stockinette st, maintaining edges in Tubular Edging, until work measures 1 inch, ending with a WS row.
Set-up Row [RS]: K20[22, 25, 27, 30, 32, 34], place marker, k 26 [30, 34, 38, 40, 44, 48], place marker, k 53 [61, 67, 75, 85, 93, 101], place marker, k 26 [30, 34, 38, 40, 44, 48], place marker, k20[22, 25, 27, 30, 32, 34].
Work 1 WS row.
Decrease Row [RS]: [K to marker, ssk, k to 2 sts before next marker, k2tog] twice, k to end. 4 sts decreased.
Work 3[3, 3, 3, 5, 5, 5] rows.
Repeat these 4[4, 4, 4, 6, 6, 6] rows 5 times more, then work Decrease
Row once more. 117[137,157, 177, 197, 217, 237] sts.
Work until piece measures 6.5[6.5, 7, 7, 7.5, 7.5, 8] inches, ending with a WS row.
Note: Read ahead before proceeding. Waist shaping and short-row
bust shaping are worked at the same time.
Increase Row [RS]: [K to marker, slip marker, LLI, k to next marker, RLI, slip marker] twice, work to end. 4 sts increased.
Work 9 rows.
Repeat these 10 rows 3 times more, then work Increase Row once more. 137[157, 177, 197, 217, 237, 257] sts.
AT THE SAME TIME: When work measures 11[11, 11.5, 12, 12, 12,
12.5] inches, ending with a WS row, work short-row bust darts
as follows. The bust darts are worked between the second and
third markers, which delineate the center front panel.
IMPORTANT NOTE: Short-row bust dart directions given below are for cup sizes A[B,
C, D, DD]. They do not correspond to sizes XS-3X. Work bust shaping according to your cup size, not according to size of garment!
Row 1 [RS]: K to 2 sts before third marker,
W&T.
Row
2 [WS]: P to 2 sts before marker, W&T.
Row 3 [RS]: K to 1 st before previous wrapped
st, W&T.
Row
4 [WS]: P to 1 st before previous wrapped st, W&T.
Repeat Rows
3 and 4, 3[3, 5, 7, 9] times more.
Bust darts are complete. When working the 2 rows which follow the short rows, pick up wraps and work them together with the respective wrapped sts.
Continue in stockinette st until work measures 12.5[12.5, 13, 13.5, 13.5, 13.5, 14] inches, ending with a WS row.
 Shape
Front Armholes Shape
Front Armholes
Row 1 [RS]: K to first marker, remove marker, k11[13, 15, 17, 18, 20, 22], place 31[35, 40, 44, 48, 52, 56] sts just worked on waste yarn; k to second marker, remove marker, k to third marker, remove marker, k10[12, 14, 16, 17, 19, 21]; wrap next st and turn work, placing last 31[35, 40, 44, 48, 52, 56] sts of row on waste yarn, removing fourth marker (do not place wrapped st on holder). 75[87, 97, 109, 121, 133, 145] sts on needle.
Row 2 [WS]: P to last st, W&T.
Row 3 [RS]: K to last 4[4, 5, 5, 5, 6, 6] sts,
W&T.
Row 4 [WS]: P to last 4[4, 5, 5, 5, 6, 6] sts,
W&T.
Row 5 [RS]: K to last 8[8, 10, 10, 10, 12, 12]
sts, W&T.
Row 6 [WS]: P to last 8[8, 10, 10, 10, 12, 12]
sts, W&T.
Row 7 [RS]: K to last 12[12, 16, 16, 16, 20, 20]
sts, W&T.
Row 8 [WS]: P to last 12[12, 16, 16, 16, 20, 20]
sts, W&T.
Place 12[12, 16, 16, 16, 20, 20] sts at each edge of work on waste yarn (use new pieces of waste yarn; do not place these sts on same pieces of yarn as held sts of right and left back). 51[63, 65, 77, 89, 93, 105] sts.
Working Tubular Edging at each edge of work, continue in stockinette st until work measures 17[17.5, 18.5, 19, 20, 20.5, 21.5] inches (armhole measures 4.5[5, 5.5, 5.5, 6.5, 7, 7.5] inches), ending with a WS row.
Shape Neckline
Next Row [RS]: K11[13, 13, 15, 17, 17, 20] and place these sts on hold on a double-point needle or spare circular needle for left shoulder; k29[37, 39, 47, 55, 59, 65] and place these sts on waste yarn; working Tubular Edging at each side of remaining 11[13, 13, 15, 17, 17, 20] sts, k to end.
Continue in stockinette st, maintaining Tubular Edging at each edge of work, until work measures 19[19.5, 20.5, 21, 22, 22.5, 23.5] inches, ending with a WS row.
Shape Right Front Shoulder
Row
1 [RS]: K8[9, 9, 10, 11, 11, 13], W&T.
Row
2 [WS]: P to end.
Row 3 [RS]: K4[4, 4, 5, 6, 6, 7], W&T.
Row
4 [WS]: P to end.
Row 5 [RS]: K all sts, picking up wraps and working them together with wrapped sts.
Break yarn, leaving a 12-inch tail. Place sts on hold on double-point
needle.
Replace held sts of left shoulder on needle with WS facing and rejoin yarn.
Continue in stockinette st, maintaining Tubular Edging at each edge of work, until work measures 19[19.5, 20.5, 21, 22, 22.5, 23.5] inches, ending with a RS row.
Shape Left Front Shoulder
Row
1 [WS]: P8[9, 9, 10, 11, 11, 13], W&T.
Row
2 [RS]: K to end.
Row 3 [WS]: P4[4, 4, 5, 6, 6, 7], W&T.
Row
4 [RS]: K to end.
Row 5 [WS]: P all sts, picking up wraps and working them together with wrapped sts.
Break yarn, leaving a 12-inch tail. Place sts on hold on double-point needle.
RIGHT BACK
Replace held sts of right back on needle with RS facing and rejoin yarn (yarn will be joined at armhole edge). Maintaining Tubular Edging at back edge, k to end.
Row 1 [WS]: P to last st, W&T.
Row
2 [RS]: K to end.
Row 3 [WS]: P to last 4[4, 5, 5, 5, 6, 6] sts,
W&T.
Row
4 [RS]: K to end.
Row 5 [WS]: P to last 8[8, 10, 10, 10, 12, 12]
sts, W&T.
Row
6 [RS]: K to end.
Row 7 [WS]: P to last 12[12, 16, 16, 16, 20,
20] sts, W&T.
Place 12[12, 16, 16, 16, 20, 20] underarm sts on waste yarn and
k to end. 19[23, 24, 28, 32, 32, 36] sts.
Working Tubular Edging at each edge of work, continue in stockinette st until work measures 17.5[18, 19, 19.5, 20.5, 21, 22] inches (armhole measures 5[5.5, 6, 6, 7, 7.5, 8] inches), ending with a RS row.
Shape Neckline
Next Row [WS]: P8[10, 11, 13, 15, 15, 16] and place these sts on waste yarn; working Tubular Edging at each side of remaining 11[13, 13, 15, 17, 17, 20] sts, p to end.
Continue in stockinette st, maintaining Tubular Edging at each edge of work, until work measures 19[19.5, 20.5, 21, 22, 22.5, 23.5] inches, ending with a RS row.
Shape shoulder as for Left Front Shoulder.
Graft to held sts of Right Front Shoulder.
  LEFT BACK LEFT BACK
Replace held sts of left back on needle with WS facing and rejoin yarn (yarn will be joined at armhole edge). Maintaining Tubular Edging at back edge, p to end.
Row 1 [RS]:
K to last st, W&T.
Row 2 [WS]: P to end.
Row 3 [RS]: K to last 4[4, 5, 5, 5, 6, 6] sts,
W&T.
Row 4 [WS]: P to end.
Row 5 [RS]: K to last 8[8, 10, 10, 10, 12, 12]
sts, W&T.
Row 6 [WS]: P to end.
Row 7 [RS]: K to last 12[12, 16, 16, 16, 20, 20]
sts, W&T.
Place 12[12, 16, 16, 16, 20, 20] underarm sts on waste yarn and p to end. 19[23, 24, 28, 32, 32, 36] sts.
Working Tubular Edging at each edge of work, continue in stockinette st until work measures 17.5[18, 19, 19.5, 20.5, 21, 22] inches (armhole measures 5[5.5, 6, 6, 7, 7.5, 8] inches), ending with a WS row.
Shape Neckline
Next Row [RS]: K8[10, 11, 13, 15, 15, 16] and place these sts on waste yarn; working Tubular Edging at each side of remaining 11[13, 13, 15, 17, 17, 20] sts, k to end.
Continue in stockinette st, maintaining Tubular Edging at each edge of work, until work measures 19[19.5, 20.5, 21, 22, 22.5, 23.5] inches, ending with a WS row.
Shape shoulder as for Right Front Shoulder.
Graft to held sts of Left Front Shoulder. |

