
|
|
|
||||||
|
||||||
Lace for Short Attention Spans
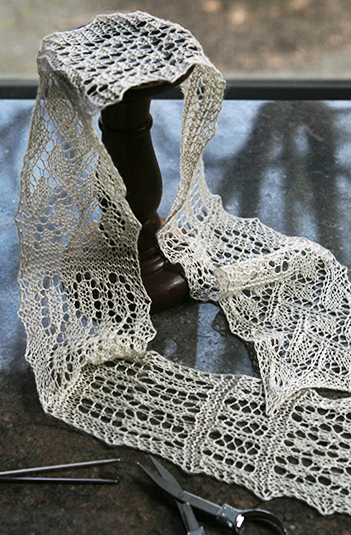
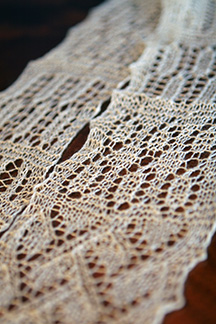
Perhaps you have wondered, in a dreamy moment, whether it might be fun to put down that sock for a while, and try knitting a fine lace shawl. You have imagined conjuring ferns and flowers in yarn so light it floats on the breeze. You have imagined saying quite casually, as admirers fawn over your completed masterpiece, “Of course, the entire shawl slips right through my wedding ring.” Then, perhaps, you have imagined spending two months to a year or more concentrating on a single project, broken a cold sweat, and gone back to your sock. If this sounds familiar, pray allow me to introduce you to the knitted lace sampler. The idea is simplicity itself: a collection of motifs, worked one after another as a continuous strip of fabric. They were a common Victorian undertaking, and many nineteenth-century examples survive. Possibly the best-known, now in the collection of the Brooklyn Museum, was knit in Germany or Austria and includes a whopping 91 different stitch patterns–83 of them lace.* Such pieces probably served both as learning tools and memory aids. Once practiced and perfected in a sampler, each motif was preserved for future reference. Miss Pole and Jessie Brown, characters in Elizabeth Gaskell’s 1853 novel Cranford, are said to have formed “a kind of intimacy on the strength of the Shetland wool and the new knitting stitches.” I like to imagine the ladies** spending many happy hours sharing the lessons recorded in their samplers. If you’re a timid beginner, or easily distracted, a sampler may be your perfect entrée to the art. It requires no large commitment of time or materials. You’re not asking lace to marry you, you’re just meeting it for coffee to see if there’s chemistry. Use what you have at hand, or buy a small quantity of something you like. Pick a motif, work it until you feel you’re finished with it, then choose another motif. That is all. A Quintet of Victorian Laces You may of course put patterns from any source into a sampler, but to get you started I’ve translated five from Frances Lambert’s My Knitting Book (1843), which also gave us the Pence Jug (Winter 2008). They are a potpourri of large and small, plain and fancy. Most are lace knitting,*** with alternate rows worked in purl or knit without patterning. One, “Fish-Bone” [sic], includes yarnovers in every row, but as there are only two rows in the pattern it’s an easy go even for beginners. These patterns are part of a dozen the author recommend as suitable for “d’oyleys [sic], tidies, etc.” “Tidy,” in this context, is probably used as a little-known synonym for antimacassar,**** a term that itself is seldom heard today. “Tidy” is also, of course, quaint English for a receptacle in which keeps small items that would otherwise be untidy. I’m thinking of making one for all my loose diamonds–but not from a pattern that’s full of holes. *The Brooklyn Museum’s sampler was splendidly chronicled in a classic book, Knitting Lace: A Workshop with Patterns and Projects by Susanna E. Lewis. It has been out of print for years–but a knowledgeable little bird who may or may not work at the Brooklyn Museum has tweeted to me reliable rumors of a possible reissue. Cross your fingers. **Because I am a total geek and this is the kind of thing I do in my spare time. ***As opposed to “knitted lace,” which includes patterning on every row. Please make a note of the difference, as it will be included in your final exam. ****A subspecies of doily that lives on the back of an armchair or sofa, to keep macassar oil (the 19th-century precursor of Brylcreem*****) off the upholstery. Aren’t we learning an awful lot today, boys and girls? *****A men’s hair styling gel. And now I’m just being silly.
| ||||||
SIZE FINISHED MEASUREMENTS MATERIALS
|
||||||
| GAUGE | ||||||
| n/a | ||||||
| PATTERN NOTES [Knitty's list of standard abbreviations and techniques can be found here] |
||||||
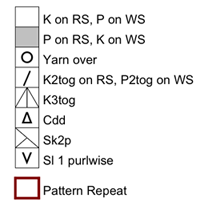
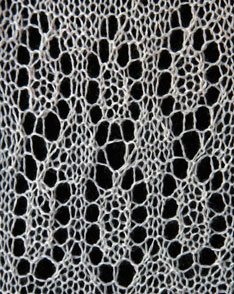
Miss Lambert’s “Lace” motif
includes a clever centered
double decrease (cdd)
indicated by a triangle
(see Symbol Key) and
worked as follows: sk2p: Sl 1, k2tog, pass slipped st over. 2 sts decreased. The Lambert Motifs  Fish-Bone
Pattern Fish-Bone
Pattern (Worked over a multiple of 4 sts + 3) Row 1 [RS]: Sl 1, k1, [yo, k2tog, k2] to last st, k1. Row 2 [WS]: Sl 1, [yo, p2tog, p2] to last 2 sts, p2. Repeat these two rows until you can’t take it any more.
|
||||||
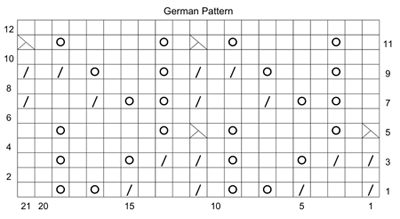
DIRECTIONS Casting On Creating a Garter Stitch Border: To determine the number of stitches needed, look at the length of the pattern repeat; for example, the German Pattern used at the beginning of this sampler is worked over a 21-st pattern repeat. To use this pattern, cast on 27 sts ([1 x 21] + 6) or 48 sts ([2 x 21] + 6). Work 6 rows in garter st (knit every row). Knit 3 stitches, place a marker,
and work the first row
of your motif. You should
have 3 stitches left.
Place another maker, and
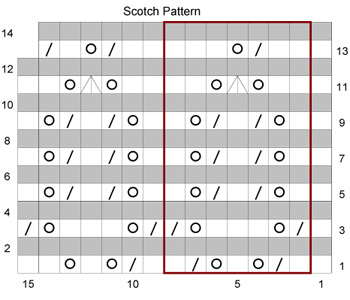
knit those last 3 stitches. For the model, I worked the Lambert motifs in this order:
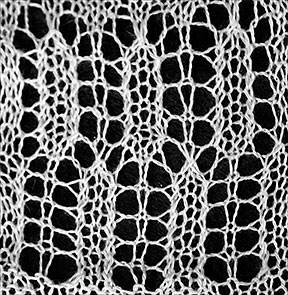
German, Scotch, Lace, Fish-Bone, Point, lather, rinse, repeat. Adding Garter Stitch Sections: These garter stitch buffer zones not only look handsome, they also hide the increases or decreases needed to begin a new pattern with the proper number of stitches; work these on the third or fourth row of garter stitch. (In a fine yarn, you can easily add or subtract 5 to 8 stitches in these rows without an appreciable change in the finished width.) They’re useful, too, if you decide to pull out a
motif because you’ve messed it up or don’t like
it. Rip with carefree abandon
past the pattern rows to a garter stitch row; return all
the nice, plain stitches to your needle; and press on. |
||||||
| FINISHING | ||||||
Once your sampler is the length you want it to be, work 6 rows in garter stitch, then bind off loosely. Weave in ends and block; links to information about blocking lace can be found in the Pattern Notes, above. |
||||||
| ABOUT THE AUTHOR | ||||||
 Visit his blog at the-panopticon.blogspot.com. |
||||||
| Pattern & images © 2009. Franklin Habit. Contact Franklin | ||||||

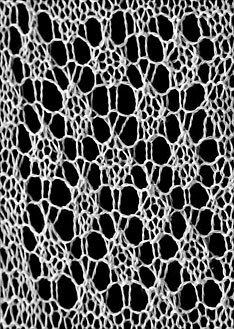
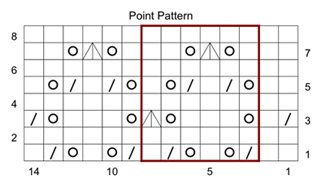 Point
Pattern
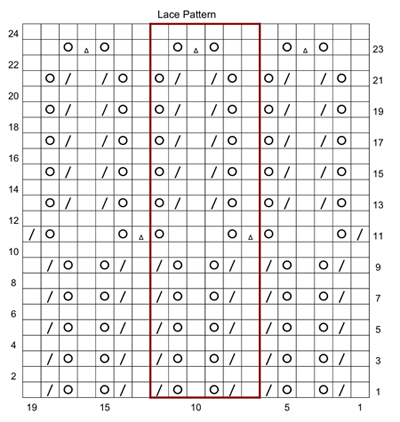
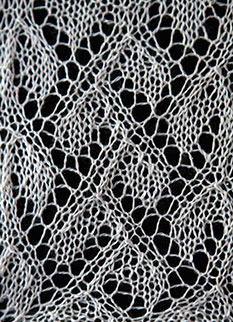
 Lace
Lace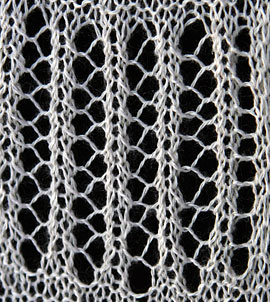
 Point
Point