Blank
Knitty�: little purls of wisdom
ul
ml
Knitty Ad
ur
b
Title
asdf
spacer model: Kelly-Anne Rush spacer photos: Hélène Rush

Tangy

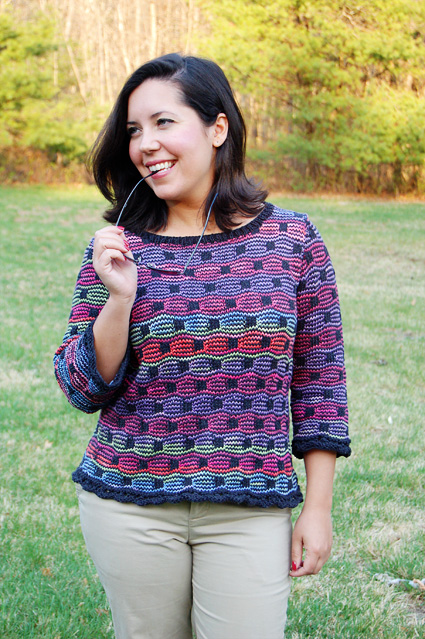
When I design using a self-striping yarn, I often look for either a stitch or a unique construction that will take advantage of the color changes that occur magically. In this design, the slipped stitch pattern creates the perfect palette to showcase this.

Not satisfied with using one color of Ty-Dy (although doing so will certainly give you a great effect), I opted to alternate two shades of this multicolor cotton yarn, on a solid background – that’s where the “X2” comes from in the title). The little black cubes are worked by slipping three stitches every other row, creating softly undulating lines. The simple scalloped edges echo the small ripples.

I gave the sweater some waist definition by working decreases in between each cube over three cube repeats; this gives a subtle, yet figure flattering shape.

This particular slipped stitch pattern adds a bit of a twist to the equation: you have to change color every row. That means you have to use a circular needle (unless you enjoy slipping all your stitches back to the end of the needle), even while working in rows, to have the ability to turn your work at will. You will also have to work two consecutive right or wrong side rows, all depending on which end of the piece your next color is lying in wait.

SIZE

XS [S, M, L, 1X, 2X, 3X][shown in size S]

 
FINISHED MEASUREMENTS

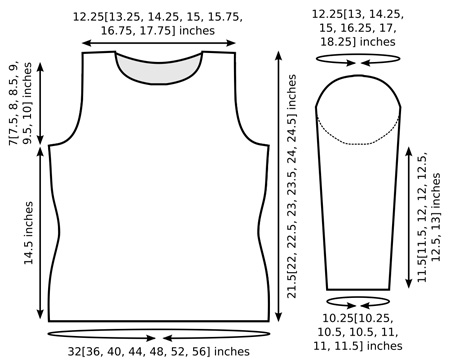
Chest: 32[36, 40, 44, 48, 52, 56] inches
Length: 21.5[22, 22.5, 23, 23.5, 24, 24.5] inches

 
MATERIALS

spacer [MC] Knit One, Crochet Too 2nd Time Cotton [75% recycled cotton/25% acrylic]; 180yd/165m per 100g ball]; color #922 Charcoal; 3[3, 3, 4, 4, 4, 5] balls
spacer [CC1] Knit One, Crochet Too Ty-Dy [100% cotton]; 196yd/180m per 100g ball]; color #672 Blue Pansy; 1[2, 2, 2, 2, 2, 2] balls
spacer [CC2] Knit One, Crochet Too Ty-Dy [100% cotton]; 196yd/180m per 100g ball]; color #265 Hibiscus; 1[2, 2, 2, 2, 2, 2] balls

Recommended needle size:
spacer 1 US #7/4.5mm circular needle; 24 inches for sizes XS and S, 32 inches for larger sizes (largest sizes may prefer a longer needle)
spacer 1 set #7/4.5mm double-point needles (used for sleeves; two circular needles or one long circular needle and magic loop technique may be used if preferred)

spacer 2 stitch markers
spacer 2 stitch holders
spacer Yarn needle

 
GAUGE

20 sts/30 rows = 4 inches in Cubix Pattern

 
PATTERN NOTES
[Knitty's list of standard abbreviations and techniques can be found here.]

sk2p: Sl 1 knitwise, k2tog, pass slipped st over. 2 sts decreased.

RLI (Right Lifted Increase): Use the right needle to pick up the stitch below the next stitch on the left needle. Place it on the left needle, then knit into it. 1 stitch has been increased.

K3tog: Knit 3 together. 2 sts decreased.

K3tog tbl: Knit 3 together through back loops. 2 sts decreased.

P3tog: Purl 3 together. 2 sts decreased.

P3tog tbl: Purl 3 together through back loops. 2 sts decreased.

DIRECTIONS
blank
BODY
Using circular needle and MC, CO 156[180, 198, 216, 240, 258, 276] sts.

P 1 row (a RS row), then place marker and join to begin working in the round, being careful not to twist.

Scalloped Edge:
Round 1: P all sts.
Round 2: [K1, yo, k1, sk2p, k1, yo] to end.
Round 3: K all sts.
Round 4: [K2, yo, sk2p, yo, k1] to end.
Round 5: K all sts.

Set up Cubix Pattern:
P 1 round, evenly increasing 4[0, 2, 4, 0, 2, 4] sts. 160[180, 200, 220, 240, 260, 280] sts.

Important Note: When slipping sts, always slip with yarn held to WS of work.

Carry unused colors loosely along inside of work. When beginning each round, pick up the new color from underneath old color. This will twist the strands, preventing holes from forming at color change points.

As written, lower body will measure 14.5 inches long to underarm after blocking. If you wish to add or subtract approx. 1.25 inches of length, begin with Row 11 of pattern; this will allow you to work 10 rounds more or fewer of pattern before beginning waist shaping.

Cubix Pattern:
Rounds 1, 3, 5, 7, 9:
Using MC, k all sts.
Round 2: Using CC1, k all sts.
Rounds 4, 6, 8: Using CC1, [k1, sl 3 sts, k6] to end.
Round 10: Using CC1, k all sts.

Rounds 11, 13, 15, 17, 19: Using MC, k all sts.
Round 12: Using CC2, k all sts.
Rounds 14, 16, 18: Using CC2, [k6, sl 3 sts, k1] to end.
Round 20: Using CC2, k all sts.

Rounds 21-30: Work as for Rounds 1-10.

Shape Waist:
Round 31: Using MC, k all sts.
Round 32: Using CC2, k all sts.
Round 33: Using MC, [k2tog, k8] to end. 144[162, 180, 198, 216, 234, 252] sts.
Rounds 34, 36, 38: Using CC2, [k5, sl 3 sts, k1] to end.
Rounds 35, 37, 39: Using MC, k all sts.
Round 40: Using CC2, [RLI, k9] to end. 160[180, 200, 220, 240, 260, 280] sts.

Round 41: Using MC, k all sts.
Round 42: Using CC1, k all sts.
Round 43: Using MC, [k6, k2 tog, k2] to end. 144[162, 180, 198, 216, 234, 252] sts.
Rounds 44, 46, 48: Using CC1, [k1, sl 3 sts, k5] to end.
Rounds 45, 47, 49: Using MC, k all sts.
Round 50: Using CC1, [k6, RLI, k3] to end. 160[180, 200, 220, 240, 260, 280] sts.

Round 51-59: Work as for Rounds 31-39.
Round 60: Using CC2, [RLI, k9] 8[9, 10, 11, 12, 13, 14] times, place marker, [RLI, k9] to end.

Rounds 61-100: Work as for Rounds 1-20. End last round (Round 100) 2[3, 4, 5, 6, 7, 8] sts before end-of-round marker.

Divide for Armholes:
Remove markers when working next round. You may wish to break the yarn and rejoin it before beginning next round. Break CC1 and CC2.
Round 101: Using MC, BO 9[11, 13, 15, 17, 19, 21] sts (2[3, 4, 5, 6, 7, 8] sts before marker and 7[8, 9, 10, 11, 12, 13] sts after marker); k to 2[3, 4, 5, 6, 7, 8] sts before next marker, place all sts just worked on hold for back; BO 9[11, 13, 15, 17, 19, 21] sts, k to end. 71[79, 87, 95, 103, 111, 119] sts.

UPPER FRONT

Notes:

  • The upper front and back are worked back and forth in rows, in Cubix pattern as set. You will be working rows in pairs: 2 WS rows (1 CC row, then 1 MC row) followed by 2 RS rows. Rejoin CC2 when needed.
  • Shaping will encroach on slipped-st blocks near edges of work. When working CC rows, work first and last sts of row in CC, then work remaining sts in pattern as set.
  • When decreasing on RS rows, work [ssk] at beginning of row and [k2tog] at end of row. When decreasing on WS rows, work [p2tog] at beginning of row and [ssp] at end of row.

Next Row [WS]: Join CC1 with WS facing and p all sts (counts as Row 2 of pattern).

Continuing in pattern as set, decrease 1 st at each end of next 4[6, 8, 10, 12, 14, 16] MC rows. 63[67, 71, 75, 79, 83, 87] sts.

Continue in pattern until work measures 4[4.5, 5, 5.5, 6. 6.5, 7] inches from underarm, ending with both yarns at same edge of work.

Shape Neckline:
Next Row: Work 21[22, 23, 24, 25, 26, 27] sts in pattern; place remaining sts on st holder.
Decrease 1 st at neckline edge of next 9 rows. 12[13, 14, 15, 16, 17, 18] sts.
Continue in pattern until work measures 7[7.5, 8, 8.5, 9, 9.5, 10] inches from underarm. BO all sts.

Leaving center 21[23, 25, 27, 29, 31, 33] sts on st holder, place 21[22, 23, 24, 25, 26, 27] sts on needle for other shoulder. If first shoulder began with a WS row, join yarn with WS facing; if it began with a RS row, join yarn with RS facing.
Work as for first shoulder.

blank

UPPER BACK
Place held sts of upper back on needle and rejoin MC and CC1 with WS facing.

Shape armholes as for upper front.

Continue in pattern until work measures 6[6.5, 7, 7.5, 8, 8.5, 9] inches from underarm, ending with both yarns at same edge of work.

Shape Neckline:
Next Row: Work 17[18, 19, 20, 21, 22, 23] sts in pattern; place remaining sts on st holder.
Decrease 1 st at neckline edge of next 5 rows. 12[13, 14, 15, 16, 17, 18] sts.

Continue in pattern until work measures 7[7.5, 8, 8.5, 9, 9.5, 10] inches from underarm. BO all sts.

Leaving center 29[31, 33, 35, 37, 39, 41] sts on st holder, place 17[18, 19, 20, 21, 22, 23] sts on needle for other shoulder. If first shoulder began with a WS row, join yarn with WS facing; if it began with a RS row, join yarn with RS facing.

Work as for first shoulder.

SLEEVES (Make 2)
Using double-point needles and MC, CO 51[51, 53, 53, 55, 55, 57] sts. Divide sts evenly between needles.

P 1 row (a RS row), then place marker and join to begin working in the round, being careful not to twist.

Scalloped Edge:
Round 1: P all sts.
Round 2: K1[1, 2, 2, 0, 0, 1], [k1, yo, k1, sk2p, k1, yo] 8[8, 8, 8, 9, 9, 9] times, k2[2, 3, 3, 1, 1, 2].
Round 3: K all sts.
Round 4: K1[1, 2, 2, 0, 0, 1], [k2, yo, sk2p, yo, k1] 8[8, 8, 8, 9, 9, 9] times, k2[2, 3, 3, 1, 1, 2].
Round 5: K all sts.

Set up Cubix Pattern:
P 1 round, evenly increasing 0[2, 2, 4, 4, 6, 6] sts. 51[53, 55, 57, 59, 61, 63] sts.

Note: Read ahead! Shaping directions and stitch pattern directions are worked at the same time, beginning on the next round.

Shape Sleeve:
Work 11[9, 7, 7, 5, 5, 5] rounds in pattern as directed below.
Increase Round: K1, m1, work in pattern to last st, m1, k1.
Repeat these 12[10, 8, 8, 6, 6, 6] rounds 4[5, 7, 8, 10, 11, 13] times more. 61[65, 71, 75, 81, 85, 91] sts.
Work increased sts into Cubix pattern, working additional slipped-st blocks as you have enough sts to complete them. Do not work first or last st of round into slipped-st block; these sts should always be worked using CC.
Note: If you prefer, increased sts may be worked in single-row stripes, instead of incorporating them into st pattern. This will be less challenging, though the stripes will not undulate over these increased sts as they do over the rest of the sleeve.

AT THE SAME TIME: Work st pattern as follows. The markers placed in Rounds 2 and 14 below are used to help set up st pattern.
Rounds 1, 3, 5, 7, 9: Using MC, k all sts.
Round 2: Using CC1, k4[5, 1, 2, 3, 4, 5], place marker, k to last 4[5, 1, 2, 3, 4, 5] sts, place marker, k to end.
Rounds 4, 6, 8: Using CC1, k to marker, [sl 3 sts, k7] to 3 sts before marker, sl 3 sts, k to end.
Round 10: Using CC1, k all sts, removing markers.

Rounds 11, 13, 15, 17, 19: Using MC, k all sts.
Round 12: Using CC2, k all sts. You will now have worked 1[1, 1, 1, 2, 2, 2] increase rounds. 53[55, 57, 59, 63, 65, 67] sts.
Rounds 14: Using CC2, k10[1, 7, 8, 10, 1, 2], place marker, [sl 3, k7] 3[5, 4, 4, 4, 6, 6] times, sl 3, place marker, k10[1, 7, 8, 10, 1, 2].
Rounds 16, 18: Using CC2, k to marker, [sl 3, k7] to 3 sts before marker, sl 3, k to end.
Round 20: Using CC2, k all sts, removing markers.

Continue in pattern until work measures 11.5[11.5, 12, 12, 12.5, 12.5, 13] inches or desired length to underarm, ending last CC round 5[6, 7, 8, 9, 10, 11] sts before marker. Using same color, BO 10[12, 14, 16, 18, 20, 22] sts. Break other 2 colors. 51[53, 57, 59, 63, 65, 69] sts.

Shape Sleeve Cap:
Sleeve cap will be worked back and forth in rows. See Notes for Upper Front. Join  other colors as needed.

Work 2 rows in pattern (a MC row and a CC row).

Decrease 1 st at each end of next 14[15, 17, 18, 20, 21, 23] MC rows. 23 sts remain.

Decrease 2 sts at each end of next 3 MC rows as follows:
If the row is a RS row: K3tog tbl, k to last 3 sts, k3tog.
If the row is a WS row: P3tog, p to last 3 sts, p3tog tbl.

BO remaining sts using CC currently in use.

FINISHING

Sew back to front at shoulders.

Neckband:
Beginning at left shoulder seam, with RS facing, using double-point needles and MC, pick up and k 17 sts along left front neckline edge, k 21[23, 25, 27, 29, 31, 33] held front neckline sts, pick up and k 17 sts along right front neckline edge and 10 sts along right back neckline edge, k 29[31, 33, 35, 37, 39, 41] held back neckline sts, pick up and k 10 sts along left back neckline edge. 104[108, 112, 116, 120, 124, 128] sts. Place marker and join to begin working in the round.

Note: Don't worry if you don't get exactly this number of sts. It is more important to pick up sts evenly so there will be no holes at the base of the neckband, and to have the same number of sts for the right and left sides.

Next Round: [K1, p1] to end.
Repeat this round twice more. Loosely BO all sts in pattern.

Sew sleeve caps into armholes. Weave in ends and block as desired.

schematic

 
ABOUT THE DESIGNER
designernameBlank
Hélène Rush, owner of Knit One, Crochet Too, the yarn company, eats, breathes, and dreams yarn.

She estimates she is close to the 1000 design mark after celebrating 30 years in the business, and she still gets daily inspiration to create new and unique garments.