Knitty: little purls of wisdom
Ragga - lopapeysa Ragga
Title
beauty shot

Tangy

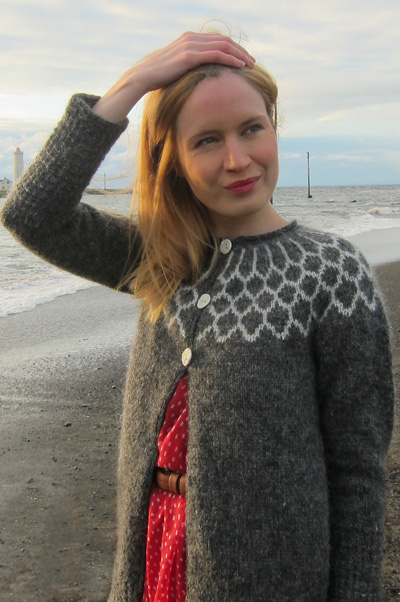
I spend a lot of my time talking about, thinking about, writing about and looking at different types of the iconic Icelandic Lopi sweaters. I travel the world teaching my classes, I wear them almost every day and I'm always thinking of new ways to improve fit and function of this amazingly versatile garment.

In spite of the tradition being fairly recent (with the first ones appearing in the late '40s of last century) this is the one garment people will associate with Iceland and I can truly say that it plays a great part in my nation's identity.

I like simple but beautiful yoke designs and in Iðunn, as so often before, I'm drawn to natural colors. I also think the fairly neutral color scheme of Iðunn can serve to inspire knitters to choose different and interesting color combinations. Lopi comes in so many amazingly beautiful heathery colors that remind us of the stark Icelandic landscapes, the oceans, the glaciers and the moss laden lava.

The Iðunn pattern is worked top-down, a method I truly love for sweaters, it is shaped in the back below the stranded pattern with short rows for a more flattering fit, the yoke pattern is quite short (very important for those of us with ample upper frontsides) and as an option it contains short-row elbows. The elbow idea came to me after endless mending of sweater elbows -- in fact it's very logical that the elbows are the weak point of the sweater -- arms bend, elbows stick out, fabric stretches -- so shaping the elbows with short rows, thus adding an extra bit of fabric just where it's needed is a good preventive measure. If you are too excited, you can of course skip the elbow shaping and just finish the sleeves without shaping.

spacer model: Ragga Eiríksdóttir, Maren Freyja Haraldsdóttir
spacer photos: Ragga Eiríksdóttir, Stephen West
   Pin It!


SIZE
XS [S, M, L, 1X, 2X, 3X]
shown in size S below and 2X above

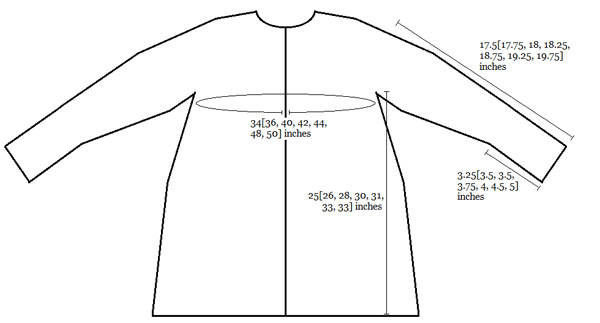
FINISHED MEASUREMENTS
Chest: 34[36, 40, 42, 44, 48, 50] inches
Length: 25[26, 28, 30, 31, 33, 33] inches (measured at back)

spacer

spacer
MATERIALS
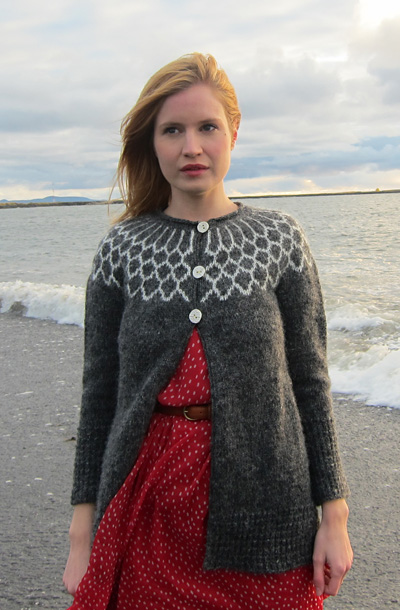
Yarn

Ístex Léttlopi (Light Lopi) [100% wool; 109yd/100m per 50g skein]; color
spacer [MC] 0058: Dark grey heather 7[8, 9, 10, 11, 12, 13] skeins
spacer [CC] 0051: White; 1[1, 1, 1, 1, 2, 2] skein(s)
Kits for this sweater are available here. See Pattern Notes regarding yarn substitution.


Recommended needle size
[always use a needle size that gives you the gauge listed below -- every knitter's gauge is unique]
spacer 1 set US #7/4.5mm double-point needles
spacer 1 32-inch US #7/4.5mm circular needle
(or use 32-inch needle and magic-loop method to knit the whole sweater)
spacer 1 crochet hook US #C/2.74mm

Notions
spacer yarn needle
spacer 3 stitch markers
spacer 2 pieces of 12" waste yarn to hold sleeve stitches
spacer 3-6 buttons
spacer approx. 1.5 yards of woven ribbon for finishing
spacer sharp scissors for steeking
spacer sewing thread to match MC
spacer sewing needle for sewing ribbon


GAUGE
19 sts/26 rows = 4" in stockinette stitch

spacer

PATTERN NOTES
[Knitty's list of standard abbreviations and techniques can be found here.]

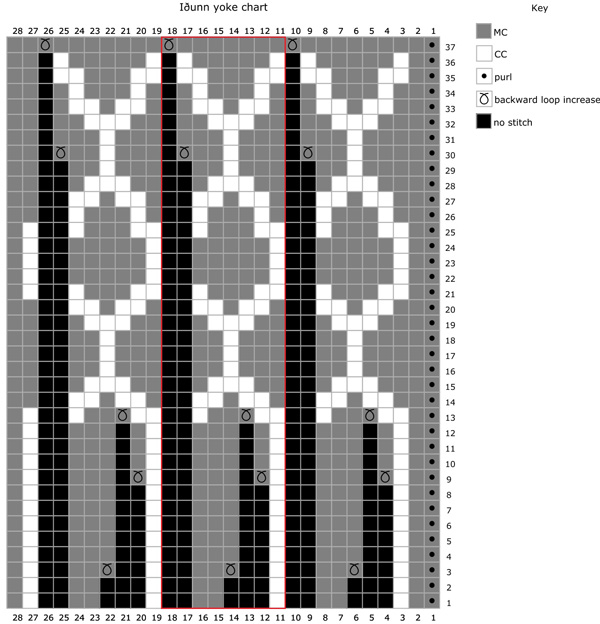
Lopi yarn has unique qualities that make the steeking method described here work. If you are choosing alternative yarn, consider machine-sewing your steek first. This article may be of assistance.

Ribbing (worked in the round):
Row 1: K
Row 2: P
Rows 3: [K1, P1]
Row 4: [K1, P1]

Ribbing (worked back and forth):
Row 1 [RS]: K
Row 2 [WS]: K
Row 3 [RS]: [K1, P1]
Row 4 [WS]: [P1, K1]

All increases in yoke are worked as backward loop increases (e-wraps)

spacerCharts
The chart for this pattern is very large and fits on a letter-sized page.
Click here and print the resulting page.


DIRECTIONS

spacer
Neckline and yoke:
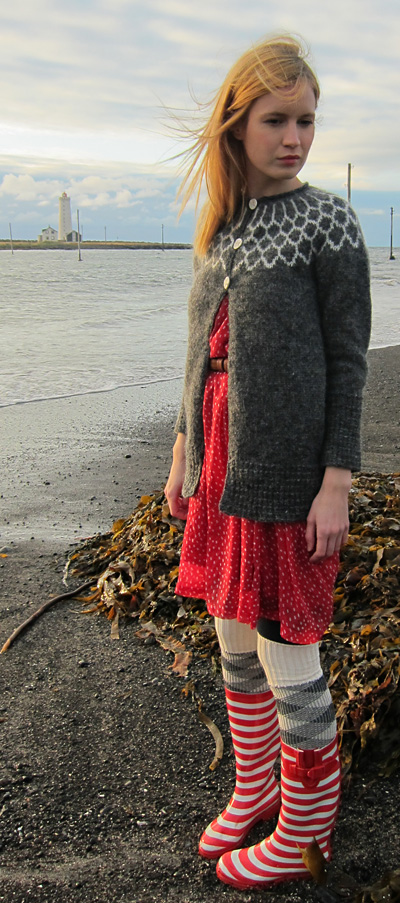
CO 89[89, 91, 95, 97, 101, 105] sts.

Row 1 [WS]: P all sts

Row 2 [RS]: K all sts

Repeat these rows 1[1, 1, 2, 2, 3, 3] more time(s).

Join yoke to begin working in the round, being careful not to twist work, and CO 1 st at beg of rnd for steek. This st will be purled all the way down to ribbing. Work all other stitches in stockinette (K all sts).

Work increases as follows in next rnd:
Size XS: *K8, M1* repeat until 8 sts remain, k8.

Size S: K2 *K5, M1* repeat until 6 sts remain, k6.

Size M: K9 *K3, M1* repeat until 12 sts remain, k12.

Size L: K1 *K4, M1* repeat until 5 sts remain, k5.

Size 1X: K8 *K3, M1* repeat until 10 sts remain, k10.

Size 2X: K15 *K2, M1* repeat until 17 sts remain, k17.

Size 3X: K15 *K2, M1* repeat until 17 sts remain, k17.

10[16, 23, 22, 26, 34, 36] sts increased.

By now you should have 100[106, 115, 118, 124, 136, 142] sts on your needles. Follow chart and work yoke pattern, skipping rounds as follows for sizes XS, S, M, L, and 1X. Remember to continue purling the middle front steek stitch.

Size XS only: skip rounds 5, 10, 11, 23, and 29

Size S only: skip rounds 5, 10, 23, and 29

Size M only: skip rounds 5, 23, and 29.

Size L only: skip rounds 5 and 23.

Size 1X only: skip round 5.

After working all increases in the chart, you should have 260[276, 300, 308, 324, 356, 372] sts on your needles. 100[106, 115, 118, 124, 136, 142] sts increased.

Shape back with short rows:
Setup rnd (place marker): P1, k 129[137, 149, 153, 161, 177, 185], pm, k to end of rnd.
Short row 1 [RS]: K to marker, sm, k 32[34, 37, 38, 40, 44, 46], turn work.,
Short row 2 [WS]: YO, p 64[68, 74, 76, 80, 88, 92], turn work.
Short row 3 [RS]: YO, k to YO, knit YO with the next stitch to the left, k6, turn work.
Short row 4 [WS]: YO, p to YO, slip YO purlwise, slip following st knitwise, place slipped sts back on left needle, p these two stitches together through the back loops, p6, turn work.
Rpt short rows 3 and 4 2[ 2, 3, 3, 3, 4, 4] more times.

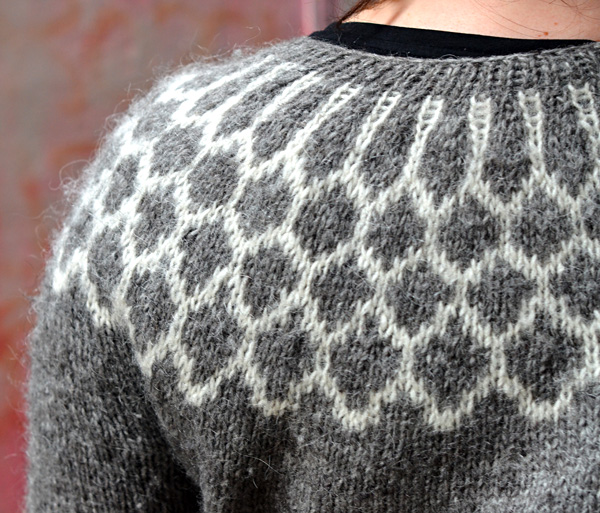
Work until you reach the st before the last YO, SSK; finish rnd. Remove marker.

Work 0[0, 2, 3, 4, 4, 5] more rnds.

. spacer
Divide work into body and sleeves:
Next rnd: P1, k 38[41, 45, 46, 49, 52, 55], *thread the next 54[56, 60, 62, 64, 74, 76] stitches onto a piece of scrap yarn, cast on 8[8, 8, 10, 10, 12, 12] sts, placing marker mid way through, i.e. after 4[4, 4, 5, 5, 6, 6] sts,* k 77[83, 91, 93, 99, 105, 111], repeat from * to *; k to end of rnd.

BODY
Work 13[13, 17, 17, 20, 20, 22] more rnds.

Increase rnd: P1, *k to st before marker, M1R, k1, sm, k1, M1L*, repeat from * to *, k to end of rnd.

Work Increase rnd in every 8th rnd a total of 6[6, 6, 7, 7, 7, 7] times.

Work even until body measures 12.5[13, 13.75, 13.75, 14.25, 14.5, 14.5] inches.

Cast off purled steek st and work ribbing according to pattern for a total of 3.25[3.5, 3.5, 4.25, 4.75, 5.25, 5.25] inches. Bind off all sts.

SLEEVES (two options given below)

Straight sleeves (make two the same):
Slip sleeve sts from waste yarn to knitting needles.

With RS facing k until you reach the underarm sts; pick up and knit 10[10, 10, 12, 12, 14, 14] sts to complete the circle, place marker at mid underarm, i.e. after picking up 5[5, 5, 6, 6, 7, 7] of the sts. You should now have 64[66, 70, 74, 76, 88, 90] sts on the needles.

Work 2 rnds.

Decrease rnd: k to 3 sts before marker, k2tog, K1, slip marker, K1, SSK.
Repeat Decrease rnd every 4[5, 5, 5, 5, 4, 4] rnds a total of 9[9, 9, 10, 10, 15, 15] times.
Work sleeve until it measures 14.25[14.25, 14.5, 14.5, 14.75, 14.75, 14.75] inches from underarm. Work ribbing in the round for 3.25[3.5, 3.5, 3.75, 4, 4.5, 5] inches. Bind off.
Work other sleeve the same way.

. spacer
Sleeves with shaped elbows (make one left and one right sleeve):
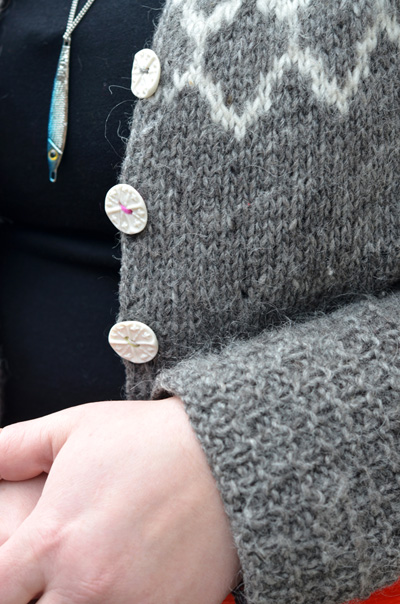
Slip sleeve sts from waste yarn to knitting needles.

Right sleeve: With RS facing, work 20[20, 21, 22, 22, 25, 25] sts, place marker (M1).

Left sleeve: With RS facing work 34[36, 39, 40, 42, 49, 51] sts, place marker (M1).

Work until you reach the underarm sts. Pick up and knit 10[10, 10, 12, 12, 14, 14] sts to complete the circle, place marker (M2) at mid underarm, i.e. after picking up 5[5, 5, 6, 6, 7, 7] of the sts. You should now have 64[66, 70, 74, 76, 88, 90] sts on the needles.

Work 2 rnds.

Decrease rnd: k to 3 sts before M2, k2tog, K1, slip marker, K1, SSK.

Repeat Decrease rnd every 4[5, 5, 5, 5, 4, 4] rnds a total of 9[9, 9, 10, 10, 15, 15] times.

When sleeve measures 7.5[7.75, 8, 8, 8.25, 8.5, 8.5] inches from underarm work short rows as follows:

Short row 1 [RS]: K to M1, slip M1 (and slip every time you pass it), k 4[4, 4, 5, 5, 6, 6] sts, turn work.

Short row 2 [WS]: YO, p 8[8, 8, 10, 10, 12, 12] sts, turn work.

Short row 3 [RS]: YO, k to YO, k YO and st to left together as k2tog, k 2 sts, turn work.

Short row 4 [WS]: YO, p to YO, slip YO purlwise, slip following stitch knitwise, place slipped stitches back on left needle, p these two sts together through the back loops, work 2 sts, turn work.

Rep Short rows 3 and 4 one more time.

Short row 5 [RS]: YO, k to 3 sts before YO, turn work.
Short row 6 [WS]: YO, p to 3 sts before YO, turn work.

Rep Short rows 5 and 6 one more time.

Resume working in the round.
Work to st before YO, work YO and st to left of it together as k2tog*, repeat * to * two more times; *k to stitch before next YO, slip stitch as if to knit, slip YO as if to purl, K these two together through the back loops (SSK)*, repeat * to * two more times.

Work sleeve until it measures 14.25[14.25, 14.5, 14.5, 14.75, 14.75, 14.75] inches from underarm. Work ribbing in the round 3.25[3.5, 3.5, 3.75, 4, 4.5, 5] inches. Bind off.

spacer

spacer
FINISHING
Weave in all ends.
Before steeking, wash the sweater in lukewarm water with mild wool soap and lay flat to dry. A trick to make your lopi sweater soft is to add hair conditioner to the last rinsing water (about two times the amount you would use for your hair). Let the sweater soak for 5 minutes and don't rinse it out.

Crochet steek:
Two single crochet ridges are worked into the knit stitches on either side of the purled steek stitch all the way from neckline to lower hem on the right side of the fabric BEFORE cutting the steek. Bring the crochet hook under both legs of each knit stitch immediately next to the purled stitch with the purled stitch facing away from you. This means working from bottom to top (hem to neckline) for the right side of the sweater and from top to bottom for the left side of the sweater. Work tightly and switch to a smaller crochet hook and rework if the crochet edge seems to flare out. When crochet ridges are in place on either side of the purled steek stitch it's time to cut the sweater open. You might want to turn the sweater inside out before cutting, that way you can clearly see the steek stitch (that looks knit on the wrong side) and use it to guide you.

This tutorial may be helpful.

Adding the ribbon/trim:
After cutting the sweater open little bits and ends will be exposed. This is where the ribbon comes into the picture. Measure the right length and use lots of pins to pin down the ribbon. Start by pinning down the outer edges and the middle and add more pins gradually working into the middle of each section. Use a sewing thread that matches the main color of the sweater nicely and make sure that all the ends are tucked under the ribbon as you whip stitch it down, starting with the outer edge (crochet edge) and then the inner edge.

Adding buttonholes:
There are many ways you can use to add buttonholes or other type of closure to the cardigan. A zipper can be sewn in by hand, using the technique described above for adding the trimming, snaps can be sewn in and buttonholes can be added with various methods. Usually at the end of making a sweater I'm so excited that I choose the simplest, quickest option, crocheting chains that make up as many button holes as needed.
Mark the places for your buttons and buttonholes with pins. By marking both sides you can make sure to match the holes and the buttons perfectly. Bring the crochet hook under the crochet edge stitch right above one of the pins, chain 4 (a good fit for a 1/2 inch button) or the number that makes a good fit for the size of buttons you have chosen. Fasten to the edge on the other side of the pin. Weave in the ends. Repeat for as many buttonholes you would like to make and fasten the buttons to the opposite side.

This tutorial may be helpful.

spacer
ABOUT THE DESIGNER

designernamespacer Ragga is a mother, grandmother, a passionate knitting entrepreneur and a nurse. She is the owner of Knitting Iceland, the fun and funky tour operator that brings knitters from all over the world to Iceland. Ragga LOVES knitting, spinning, running and cooking but really dislikes red beets and goat cheese.

Check out Ragga's Top-down Icelandic Sweater class on Craftsy. Most of the techniques for Iðunn are covered there -- plus you'll learn fun things about Icelandic sheep, wool and knitting!

You'll find more of her work on Ravelry.


spacer