
|
|
Tweet
|
|
|
|
 |
by Donna Druchunas These earliest sweaters were knitted in the round, on multiple double-pointed needles, producing seamless garments that were custom made to fit the wearer. Sweaters made with multiple colors, such as Norwegian pullovers, were usually knit as plain tubes and cut open to create neck and armhole openings, while others made with single-color texture patterns, such as British fishermen's ganseys, were shaped as they were knitted. |
|
 |
Tweet

|
|
SIZE |
|
MATERIALS Notions |
| GAUGE |
26 sts and 34 rnds = 4" in St st over Body Charts and Sleeve Chart, St st, and Lice Stitch |
|
PATTERN NOTES |
2x2 Rib: Steek Patterns: During Lice Stitch:
|
|
DIRECTIONS |
| Body Using long circular needle and MC, CO 216[240, 264, 288, 312, 336, 360] sts and join to work in the round, being careful not to twist. Place a marker to indicate the beginning of the rnd and a second marker after first 108[120, 132, 144, 156, 168, 180] sts to mark halfway point. Work in 2x2 rib, working colors as follows:
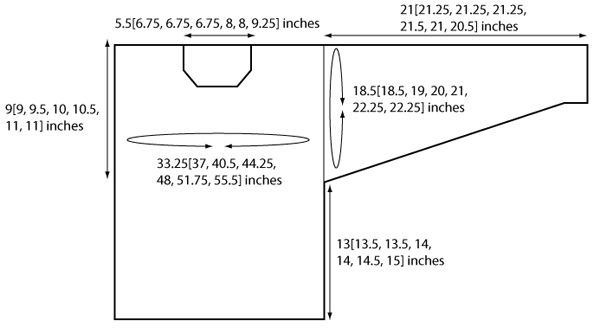
With MC, knit 2 rnds. Work Lice Chart, working 12-st repeat 18[20, 22, 24, 26, 28, 30] times across each rnd, until piece measures 11[11.5, 11.5, 12, 12, 12.5, 13] inches from cast-on edge, or approx 2 inches shorter than desired length to armhole. Knit in MC only for 4 rnds (.5 inches). Work Rnds 1-14 of Body Chart 1, working 24-st repeat 9[10, 11, 12, 13, 14, 15] times across each rnd. Piece measures approx. 13[13.5, 13.5, 14, 14, 14.5, 15] inches from cast-on edge. Begin armhole steeks: Next rnd: *Patt to 1 st before next marker, remove marker, BO 2 sts (removing marker); rep from * once more. 106[118, 130, 142, 154, 166, 178] sts rem in each half. Patt rnd: *Work Body Chart 1 in patt to m, sl m, work Steek Pattern to m, sl m; rep from * once more. Begin neck steek and shaping: Cont to work Body Chart 2 through Rnd 39, then change to working Lice Stitch over body sts; AT THE SAME TIME, shape neck as follows: Next rnd: Work 41[47, 53, 59, 65, 71, 77] sts in patt as est. With MC, BO next 24 sts, weaving in CC as you go (or cut CC and rejoin at other side of neck), work in patt to end of rnd. Dec rnd: Patt to 6 sts before first steek marker, with MC (k2tog twice, k2), sl m, work Steek Pattern, sl m, with MC (k2, ssk twice), patt to end. Work even in patt until armholes measures 9[9, 9.5, 10, 10.5, 11, 11] inches. Note: Sleeves are designed to fall approx. 2.5 inches past the wrist. For a shorter sleeve, you may want to eliminate the work even rnds after picking up sts. Refer to schematic for measurements in full. Locate the center steek stitch at each armhole. Using a small reinforcing stitch, machine stitch two rows of stitches along each side of this stitch. Carefully cut open in the column between the machine stitching. Sew shoulder seams. With MC and shorter circular needle, beginning at underarm, pick up and knit 120 [120, 124, 130, 136, 144, 144] sts around armhole and join to work in the rnd. Pm for beg of rnd. Note: Read ahead! Pattern changes at the same time as sleeve decreases are worked. Change to DPNs when/if needed. Patt rnd: Beg with st 1[1, 23, 20, 17, 1, 1] of chart, work Sleeve Chart to end of rnd, ending with st 24[24, 2, 5, 8, 24, 24]. AT THE SAME TIME, work even for 3[4, 5, 0, 14, 3, 7] rnds, then dec each end of every 5[5, 5, 5, 4, 4, 4] rnds 32[32, 32, 24, 38, 40, 31] times, then every 0[0, 0, 4, 0, 0, 3] rnds 0[0, 0, 11, 0, 0, 9] times, working dec rnd as foll: Dec rnd: Patt 1, k2tog, patt to last 3 sts, ssk, patt 1. 56[56, 60, 60, 60, 64, 64] sts rem. Work in 2x2 rib, working colors as follows: 4 rnds in MC and CC1, 2 rnds in MC and CC2, 4 rnds in MC and CC3, 2 rnds in MC and CC2, 4 rnds in MC and CC1. Repeat for other sleeve. |
 |
| FINISHING |
|
Collar Cut and reinforce steek for neck as for armholes. With RS facing, MC, and shorter circular needle, pick up and knit 36[44, 44, 44, 52, 52, 60] across back neck sts, pick up and knit 16[18, 18, 20, 20, 20, 22] sts down left neck, pick up and knit 24 sts across front neck, then 16[18, 18, 20, 20, 20, 22] sts up right neck. Join to work in the rnd and pm for beg of rnd. 92[104, 104, 108, 116, 116, 128] sts. Work in 2x2 rib with MC and CC1 for 1 inch. Fold the neck band at the purl ridge and sew it down to the inside of the sweater through the bind off edge, covering the steeked stitches as you do so and being careful that your stitches don not show on the right side of the sweater. Weave in all ends. Wash and block to measurements. |
| ABOUT THE DESIGNER |
| Donna Druchunas escaped a corporate
cubicle to honor her passions for knitting,
world travel, research, and writing.
She teaches in the United States and Europe, offers online sock-knitting classes at Craftsy.com, and holds retreats at her studio in Vermont. Her newest project, Stories In Stitches is a pattern line featuring stories about knitters and their lives, traditions, history, and travel, all tied together with gorgeous knitting patterns and projects. Visit Donna's website at sheeptoshawl.com.
|
| Pattern & images © 2014 Donna Druchunas. All rights reserved. Contact Donna |