
|
|
 |
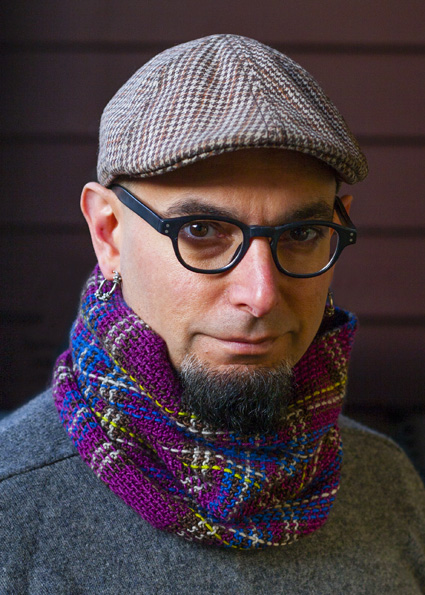 Adapted by Franklin Habit from "Princess Mary Plaid" from Minerva Complete Knitting Manual (1940)
|
|
Tweet

|
|
| SIZE |
One |
|
FINISHED MEASUREMENTS |
| Height: 12 inches high Circumference: 20.5 inches |
 |
|
MATERIALS Notions |
| 32 sts/32 ridges = 4 inches in garter stitch |
|
PATTERN NOTES |
Method. The collar is worked flat and joined into a tube using garter stitch grafting. If grafting really, truly scares you to death (it shouldn't) then you could join the ends with a three-needle bind off on the wrong side. It won't look quite as perfect; but I don't have to wear it so it's none of my business. Garter Stitch Grafting. Not difficult -- in fact rather easier than its sibling, Kitchener Stitch -- but do be sure to take time after the graft is finished to gently tug and pull your grafted row with the tip of a needle until it perfectly matches the tension of the knitted rows. The method can be found at the end of the article. Instructions for a three-needle bind off can be found here. Provisional Cast-On. There are many methods for provisional cast-ons, but my favorite -- and the one employed in knitting the sample -- is extremely simple. Use your scrap yarn to CO the number of sts required, and k 3 rows; then join C1 and proceed as pattern dictates. To remove the CO, snip it near the edge with a pair of sharp scissors and unravel, placing the live sts on the second ndl as they are revealed. Carrying Unused Colors. There is no way to avoid having a lot of ends to weave in, but you can eliminate a few of them by carrying the unused stripe color along the selvage of the work. This can be done only when the distance between color changes is four rows or fewer. |
|
DIRECTIONS |
|
Knitting the HorizontalsWith 1 circular ndl and scrap yarn, CO 74 sts. K 3 rows.
Join C1 and work in garter stitch as follows: C1: 8 rows Repeat from * twice more. Fourth repeat: Work from * through final rows of C2. With C1, k 15 rows. Remove provisional cast on, carefully placing revealed live sts on second circular ndl. Break working yarn, leaving a length equal to three times the width of the work plus about 8 inches. Thread working yarn onto tapestry ndl and work garter stitch graft to join two sets of live sts. When graft is complete, use tip of tapestry needle to adjust tension of grafted row to exactly match tension of knitted rows. Weave in all ends on WS before proceeding to next step. Weaving the VerticalsAll 74 columns of sts created during the knitting of stripes will have a length of yarn woven through them to form the vertical stripes of the plaid. Begin at either CO or BO edge of the collar, and work column by column until you reach the other selvage. You'll weave the following colors, in the following pattern, twice across the columns of stitches: Begin each round by threading a suitable length -- about 30 inches -- of yarn up from the WS of the fabric. End the round by bringing the weaving yarn down through the fabric to the WS, immediately adjacent to the spot from which it began. Weave the yarn up and down over the garter ridges: weave over a garter bump of one ridge, then under a garter bump in the following ridge. The weaving yarn does not penetrate the fabric completely, but only goes over and under the surface bumps. (One the WS, you will see only knitting, no weaving.) Be sure to alternate which bumps are woven over, and which are woven under, with each successive round of weaving. Start a new length of yarn for each woven round, even if successive rows are in the same color. Weaving rounds may be started anywhere on the round. I recommend that you vary your starting points so as not to wind up with one narrow portion of the collar in which all the loose ends will be buried -- this would tend to cause distortion on the RS of the fabric. Take care that the tension of your woven rounds is even. The weaving yarn should lie gently and neatly on the surface of the fabric. It should not form loose loops, and neither should it pull the fabric into puckers. Before weaving in ends, a gentle stretch around the circumference of the collar should help to settle the weaving nicely. FINISHING |
| ABOUT THE DESIGNER |
| Franklin Habit (@franklinhabit on Twitter) is the proprietor of the popular knitting blog The Panopticon and author of It Itches: A Stash of Knitting Cartoons. His work appears regularly in major fiber arts publications, and he travels extensively to teach and speak on knitting-related topics.
He found a pea under his mattress this morning. |
| Pattern & images © 2014. Franklin Habit. |