
|
|
 |
|
|
|
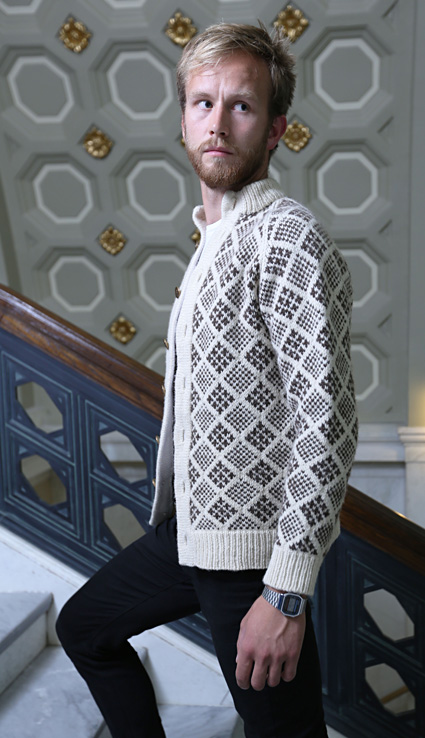
During season 2 of the television show "The Voice," judge Adam Levine wore a Faroese style sweater which sent the whole twitterverse and blogosphere ablaze with references to his "grandpa sweater." I remember seeing that episode, and my attraction was immediate, I was obsessed. I replayed the episode several times in freeze frame slow motion to soak in every detail. I loved how the sweater looked very cozy and casual, while still being elegant and carrying an aire of traditional craftsmanship; however, the more I looked at the sweater, the more I saw things that I would want to change if I were to knit one (and it didn't take me very long to realize that I WOULD be knitting one.) I decided I wanted a more traditional, seamless construction rather than the set in sleeves, and the vertical ribbing on the button bands can stretch and drape oddly -- so I would want to change those, and the small, all-over pattern, while very traditional, was not as interesting as I thought it could be. I imagine that Adam Levine's sweater was probably hand knit, and bought at an L.A. boutique for about the price of a decent automobile. Luckily for me, I can knit, and could have one without relinquishing a huge pile of cash. I did some research and some swatching and some thinking and came up Streymoy, named after the largest of the Faroe Islands, but chic enough for wherever your travels take you. I am not sure if Streymoy will set the twitterverse afire like Mr. Levine's sweater did, but if so, I would respond much the same way he did. In response to the chatter, he tweeted "I like my sweater. Grandfather sweaters are badass. Get with the program." Oh, I am definitely with the program. |
||
|
|
 |
Tweet
 |
|
SIZE |
|
|
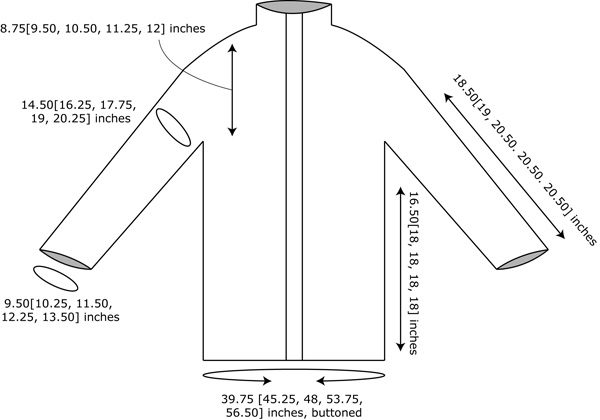
FINISHED MEASUREMENTS |
|
MATERIALS Notions |
|
GAUGE |
| 20 sts/32 rows = 4 inches in stockinette stitch with smaller needles 20 sts/20 rows = 4 inches in stranded colorwork with larger needles |
|
PATTERN NOTES |
|
Steeks can open up a world of possibilities for your knitting. A great tutorial on how to steek can be found on knittyHERE. In this design, all steeks are eventually encased in the button band or collar which makes them very secure, as well as aesthetically pleasing. M1L (left-leaning increase): Insert left needle, from front to back, under horizontal strand of yarn running between last stitch on left needle and first stitch on right needle; knit this stitch through back loop. 1 stitch increased. M1R (right-leaning increase): Insert left needle, from back to front, under horizontal strand of yarn running between last stitch on left needle and first stitch on right needle; knit this stitch through front loop. 1 stitch increased. |
|
|
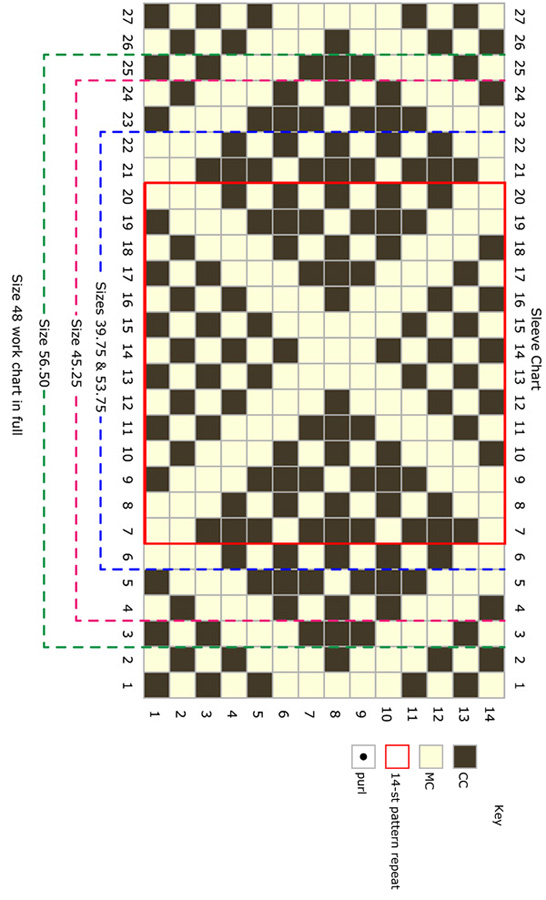
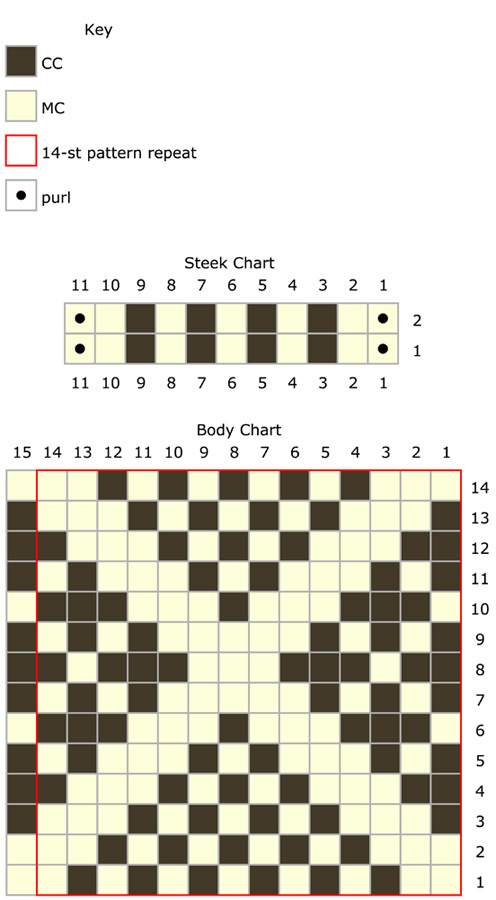
DIRECTIONS Work in 1x1 Rib until work measures 2[2.5, 2.5 ,2.5 ,2.5] inches. Next Rnd: Knit, evenly increasing 5[7, 7, 7, 9] sts across rnd. 47[51, 57, 61, 67] sts. Switch to larger needles. Size M Only: All Other Sizes: All Sizes Continue Here: Continue to work without increases until work reaches 18.5[19, 20.5, 20.5, 20.5] inches. On the last rnd place the last 4[6, 6, 7, 7] sts before the marker and the first 4[6, 6, 7, 7] sts after the marker onto waste yarn 8[12, 12, 14, 14] sts. Make a note of which chart rnd you stopped on. Make second sleeve identical to the first, stopping on the same pattern rnd as the first. Starting and ending with a k1, work in 1x1 Rib until work measures 3 inches, ending on a WS row. Next Row [RS]: K1, p1, place marker, work to last 2 sts, place marker, p1, k1. CO 7 sts (steek sts) onto the RH needle using a backwards loop cast on. Join to work in the rnd, k1, p1, sl marker. This is the new beg of rnd. Switch to larger needles. Next Rnd: Work Body Chart to marker, sl marker, work Steek Chart, sl marker. Continue to work as established, maintaining 1 p st at each side of the steek sts until the work measures 16.5 [18, 18, 18, 18] inches, stopping on the same chart rnd as both sleeves. Attach the Sleeves:Working in pattern as established, work 38[43, 46, 52, 56] sts of body (Right Front), k1 MC, place next 8[12, 12, 14, 14] sts of the body onto waste yarn, place marker, k1 MC from the first sleeve, work 63[69, 75, 79, 85] sts from the first sleeve, k1 MC, place marker, k1 MC from the Body, work 87[97, 105, 117, 123] sts across the Back, k1 MC, place next 8[12, 12, 14, 14]sts of the body onto waste yarn place marker, k1 MC from the second sleeve, work 63[69, 75, 79, 85] sts from the second sleeve, k1 MC, place marker, k1 MC from the body, place marker, work 38[43, 46, 52, 56] sts of Left Front, work steek sts as established. 312[340, 370, 402, 428]sts including steek. Working in pattern as established, and maintaining the k1 MC on each side of each sleeve marker, work 3 more rnds. Yoke Decrease Rnd B: [Work in patt as established to marker, sl marker, ssk, work to 2 sts before next marker, k2tog, sl marker] twice, work in patt to end of rnd. 4 sts decreased. Work the last 2 rnds 9[10, 11, 12, 13] more times - 20[22, 24, 26, 28] rnds total. 192[208, 226, 246, 260] sts. Work Decrease Rnd A once more. Decrease Rnd C: [Work in pattern as established to 2 sts before marker, k2tog, sl marker, work to next marker, sl marker, ssk] twice, work in patt to end of rnd. Work the last 2 rnds 5[6, 7, 7, 8] more times, then rep Decrease Rnd A 1[0, 0, 1, 0] times. 112[124, 130, 142, 152] sts Neck Shaping: Next Rnd: Work Decrease Rnd A[C, C, A, C] to 2 sts before end of rnd, k2tog, place marker, CO 7sts (new steek) using backwards loop cast on, place marker, join in rnd. This marker denotes the new beg of rnd. Next Rnd: Ssk, work Decrease Rnd C[A, A, C, A] to 2 sts before end of row, k2tog. Continue established pattern and sleeve marker decreases, alternating Decrease Rnds A & C in order and at the same time decreasing 1 st before and after the steek sts on every row for 4[5, 5, 6, 7] more rnds. 48[48, 54, 56, 56] sts. BO all sts with MC. |
 |
|
FINISHING With RS facing and smaller needles, starting with the last 2 sts (k1, p1) of the main steek, pick up and knit 61[69, 71, 79, 81] sts, ending with the first 2 sts (p1, k1) of the main steek. Row 1 [WS]: [P1, k1] to end. Repeat the last 2 rows until collar measures 3.75 inches. BO and sew to inside of neckline, trapping neck steek sts inside the collar. Button Band Work in St st for 28 rows, BO and sew to WS of jacket, trapping steek inside. Buttonhole Band Work in St st for 6 rows, ending on a WS row. Buttonhole Row [RS]: Distribute 8 6-st buttonholes evenly along the row. Next Row [RS]: Repeat Buttonhole Row. BO and sew to WS of jacket, trapping steek inside. Sew the two layers of buttonholes together with fine yarn or thread using buttonhole or blanket stitch. |
| ABOUT THE DESIGNER |
|
Todd Gocken has spent most of his adult life in schooling of some sort and has been employed in an impressive array of interesting occupations, none of which have stuck. After suffering "middle child syndrome" for nearly 40 years, he is almost ready to figure out what he wants to do when he grows up. Until then he continues to knit and design. |
|
Pattern & images © 2014 Todd Gocken. Contact Todd |